
Your New Favorite Way to Travel (That You Probably Already Wrote Off): The Southeast Asia Homestay
Why “regular” travelers should stop sleeping on homestays and start sleeping AT them
If you’ve ever thought “hell, no!” at the mention of a homestay…you’re not alone
I need my privacy and lots of alone time, I’m super picky about food, and I sleep at weird hours…
So sharing common areas/bathrooms just isn’t really an option for me, especially when I’m on vacation. And my whole life, that’s what I thought homestays entailed…a room in a local family’s house, like my friends did on the European study-abroads or when they visited Cuba.
But what I didn’t realize until a few years ago is that homestays vary widely across the world. And that false assumption cost me dearly in time, money, and energy on my trips to Southeast Asia, where “homestay” means something entirely different…and much more enticing…at unbelievable price points.
Read on for the honest truth about my Southeast Asia homestay experiences, what to look out for to make sure your choice works with your travel vibe, and how to streamline your search.
Or scroll to the end for a list of Southeasty Asia homestays I’ve personally stayed at and whole-heartedly recommend.
Disclaimer: This blog post may contain affiliate links, meaning I may get a small commission if you make a purchase after clicking the link…at zero extra cost to you. I only share things I genuinely love and believe in and think my audience would benefit from too. This is how I’m able to keep making free travel resources and guides for you. Learn more about my affiliate policy here.
Thanks for your continued support!
Southeast Asia Homestays Are Their Own Animal
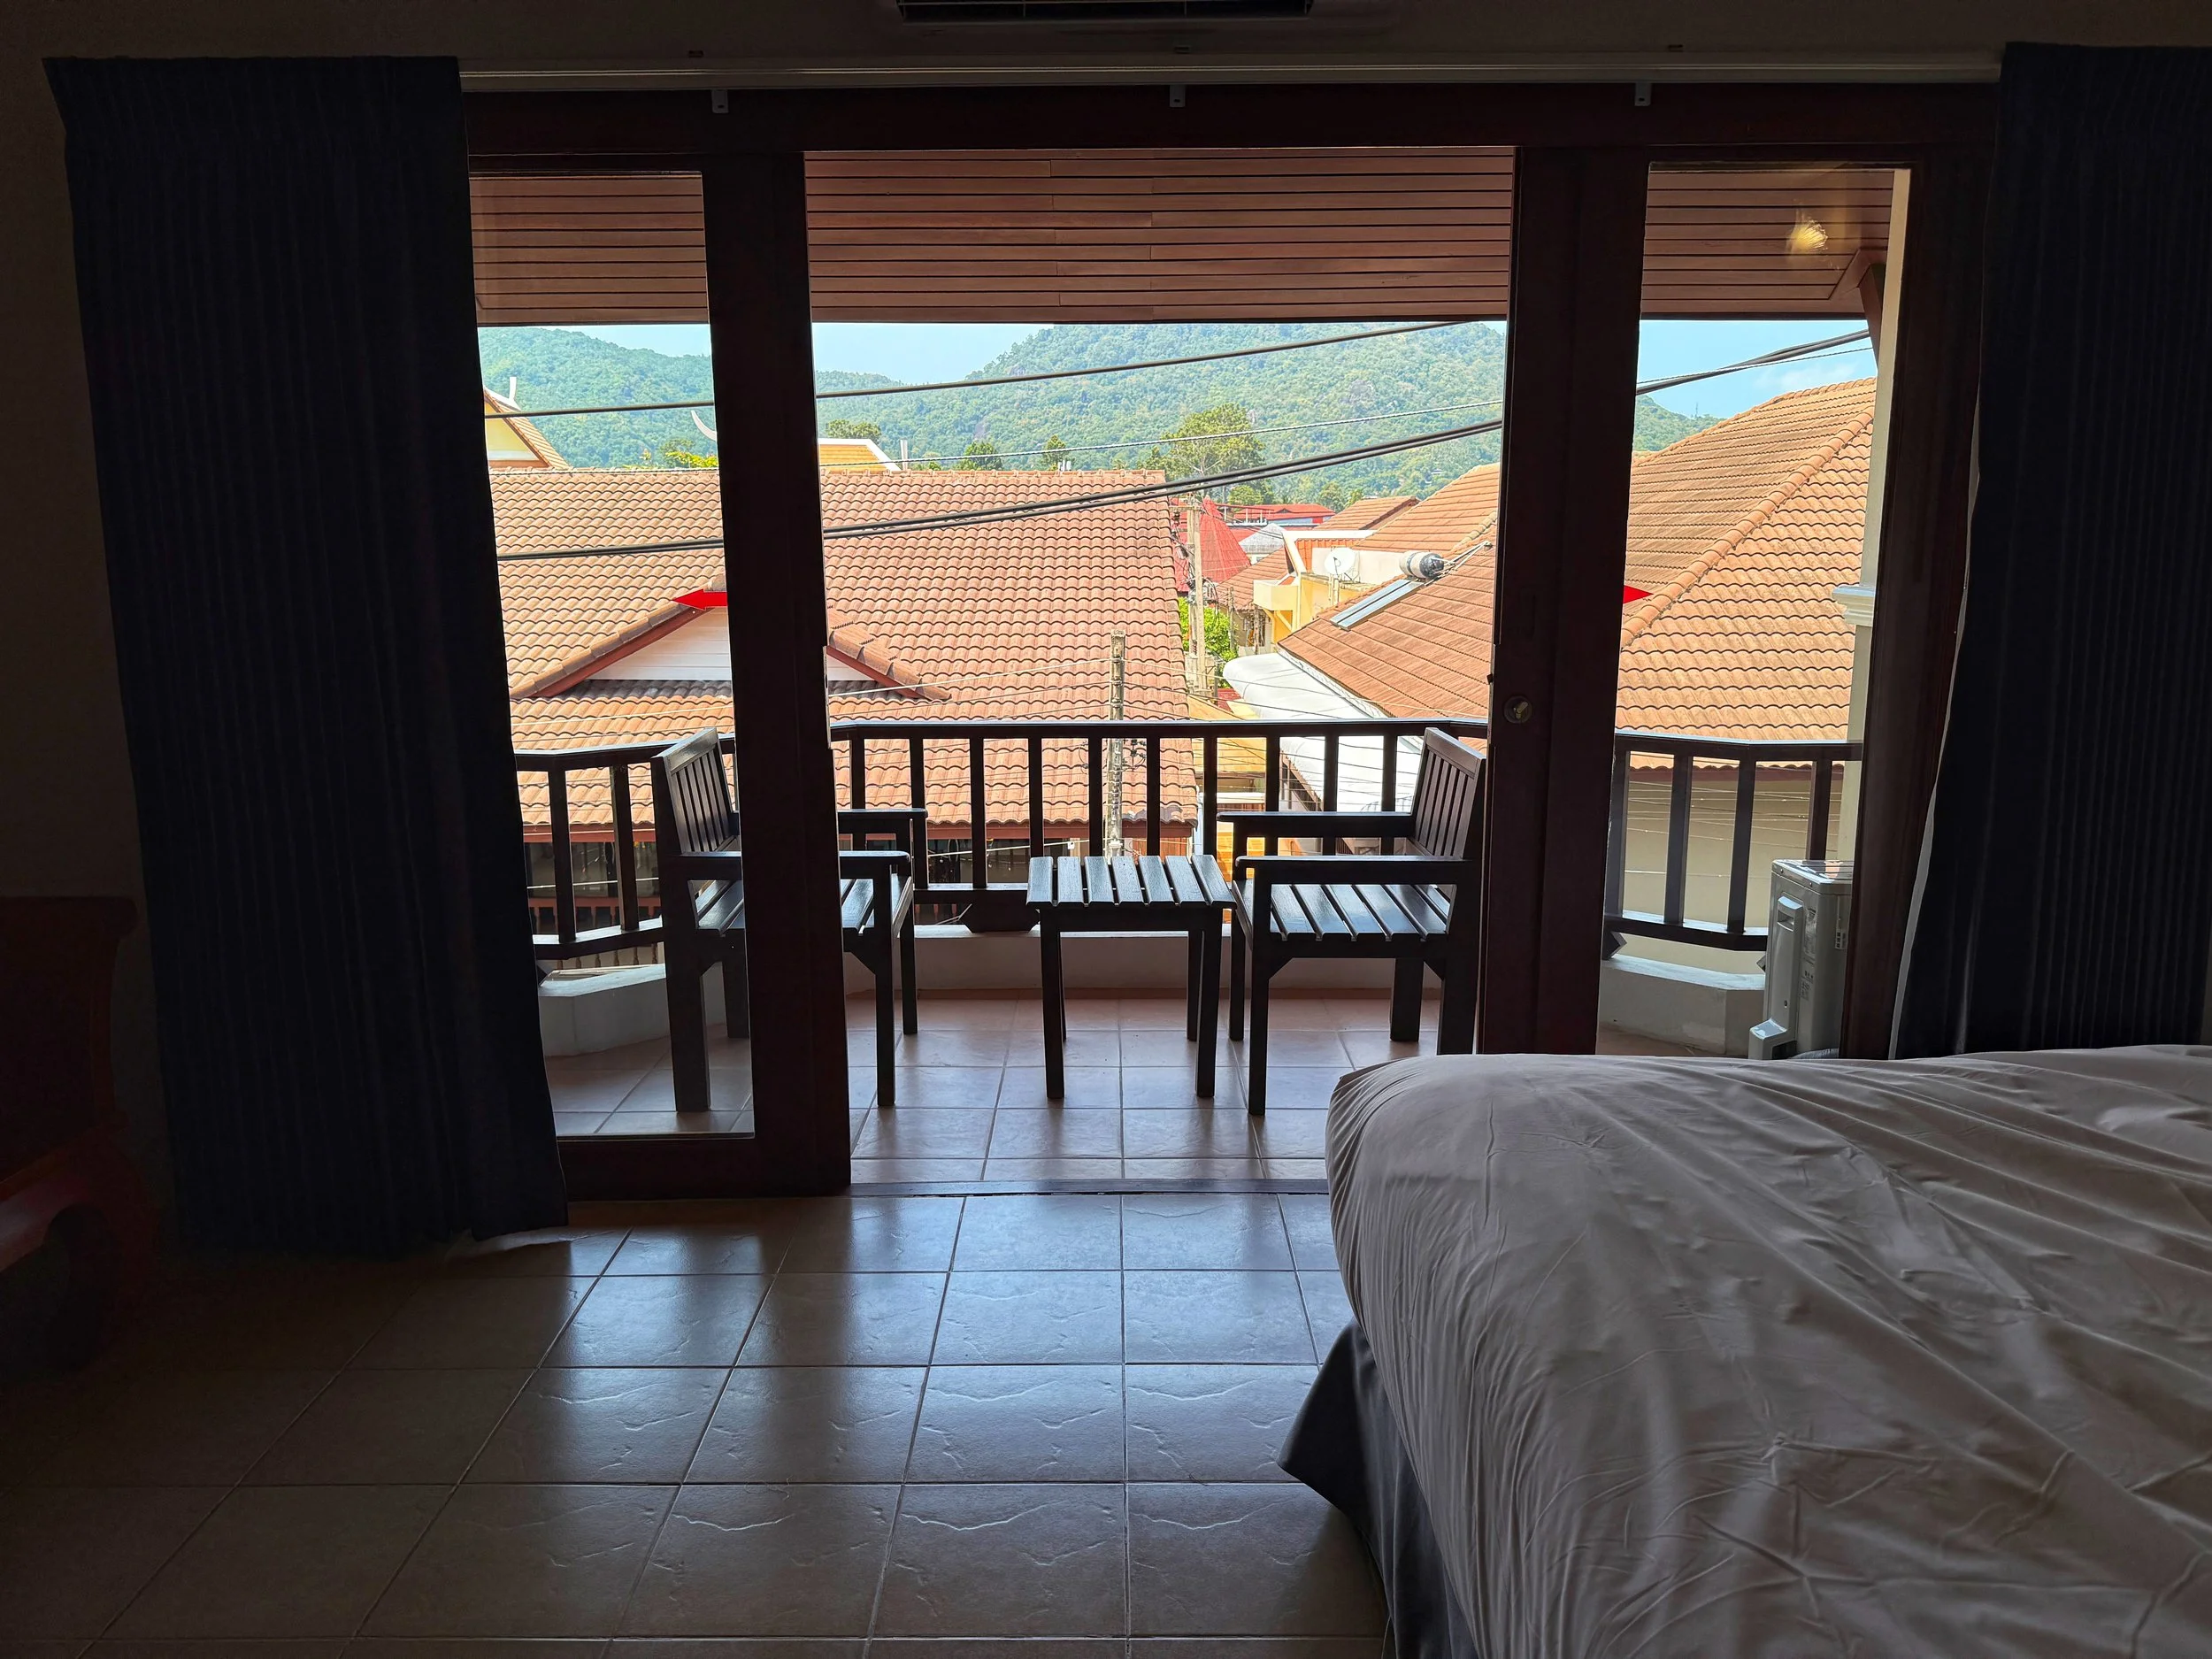
Throughout Thailand, Vietnam, Indonesia, the Phillippines, and other countries in the region, homestays tend to operate like boutique hotels…where you have your own spacious private room with en-suite bathroom, a private entrance so you can come and go freely without disturbing anyone, and usually some kind of terrace or balcony area.
The technical difference between hotels and homestays is that homestays are owned and run by a local family who lives on-premises.
But just like hotels, homestay quality varies. I wouldn’t say homestays are generally any less comfortable than hotels, but they do tend to be more casual/less “fancy”.
You won’t have amenities like room service (that’s what Grab and Gojek are for anyway 😉). But you’ll probably get daily room cleaning and sometimes laundry services, a pool, an on-site restaurant, on-site bike rentals, or a communal kitchen.
And you’ll almost always pay significantly less than hotels (we’re talking from as low as $11 per day). Prices vary from place to place but even in central Ubud in Bali I paid under $20 per day for a huge room with spacious private balcony and amazing view of the Indonesian rooftops where I worked and ate all the yummy food Gojek delivered.
After years of giving homestays a chance, it’s now my favorite way to travel Southeast Asia, especially as a solo female traveler who values the safety of staying on a local family’s property and having those local connections during my visit.
Plus, I’d MUCH rather stay somewhere with local character and a great view than somewhere “fancy”.
But to be fair, I’m also someone who doesn’t require a lot of fluff…
I’d rather eat whenever I want and sleep in, than set an alarm for a free hotel breakfast. I’d rather plan my own schedule and get local recommendations for more reasonably-priced activities, than have a concierge pack my schedule with generic marked-up tours. I hate having to go through a freezing lobby and wait for an elevator every time I want to run out to grab water or pick up a food delivery.
But if you value “luxury” in the traditional sense, then you might find yourself annoyed with the less polished operation of homestays, where you’re more likely to run into little inconveniences like lack of room service or not having a concierge available 24/7 to book your activities.
I Know What You’re Thinking: What’s the Privacy/Forced Socializing Situation?
If you’re hesitant about the forced social aspect of homestays, same. As an introvert, I was legitimately worried that I wouldn’t get the downtime I needed if I was constantly pulled into conversations I didn’t have social battery for. But in reality…
All of my hosts have been hands-off by default, friendly and open to conversation but rarely initiating beyond the logistics of room-cleaning.
Some hosts, I barely got to know at all. Others, I really hit it off with…like Tuong Vy in Vietnam, who I ended up giving a content creation lesson to and who made me hot tea with honey and lemon when I felt sick. But those connections developed organically over time, in a way that felt natural and not at all forced.
Getting Homestays Right: How to Avoid the Pitfalls
If you’re thinking that a Southeast Asia homestay might be right for you, the only thing left to do is to NOT mess it up…
Research is crucial here, just like with hotels.
I usually start my search with booking.com because they have the best filters and a huge selection of hotels, homestays, and even private villa and apartment rentals. I save my favorites as I go, then check booking.com’s prices against those on Agoda, Trip.com, and the property’s own website if it has one.
Pro Tip! Remember to compare the earnings rates on Rakuten before booking to try to maximize the number of points you earn. If you’re not signed up for Rakuten, click here to get 5,000 extra free points on your first purchase of $50 or more (easily met with a hotel stay on booking.com, Agoda, Trip.com, etc.).
You can also access my guide to setting up Rakuten in 10 minutes by clicking here.
Here’s exactly what I filter for on booking.com (or confirm separately if not in the filters):
Private bathroom
Air conditioning
Hot water
Private balcony/terrace
Free wifi
Price
Here are the features I confirm separately through photos or other information posted about the hotel:
Location (and neighborhood)
Plenty of natural light
Tall ceilings
Surface space in the bathroom to put my things (I also travel with S-hooks LOL)
Is the outdoor space truly private? Or is it more of a veranda that serves as a walkway that other guests will be accessing?
Does the outdoor space have a roof? Otherwise the sun or rain can make it practically unusable
Bedding - ideally it’s white and looks like a fluffy duvet with a cover (less westernized places sometimes just provide a comforter with no flat sheet under it, which I personally CANNOT handle. And one time I just got a sheet as the entire “comforter” 😅)
If you plan to work remotely while traveling:
A desk area, ideally one that’s set up to enjoy the view or moveable so you can drag it in front of the window or onto the balcony
Quality and realiability of wifi
When you’re doing your research, look at photos of the specific room type you’re booking (not just the photos of random rooms on the main page). I VERY rarely will book a room in a homestay, hotel, or otherwise, if they don’t have photos posted of my specific room type.
Pro Tip! Booking.com makes it easy to filter reviews and even search for specific keywords in reviews, which is clutch when you’re looking for specific info that isn’t listed on the hotel’s overview page or website.
Don’t Get Scammed
There have been reports of fake listings on third-party hotel booking sites (for hotels and homestays alike). But you can avoid most of these just by knowing what to look out for.
Confirm that there are recent reviews, and Google the place to make sure there’s nothing else sketchy-seeming after a quick search.
It’s also always a good idea to message with the hotel close to your stay (ideally before you get charged) to confirm your stay and expected check-in time.
Here’s a list of Southeast Asia homestays I’ve personally stayed at and recommend (with direct links):

Bali (Indonesia)
Canggu - Koming Guest House
Super-friendly and helpful host family. Large garden area with pool. On-site full-service laundry, great views of the Bali rooftops from the higher floors. Ideal location in quiet little alley off main road easy walking distance to beach, shops, cafes/restaurants.
Sanur Beach - Taman Bali Homestay
Putu and her family are the greatest hosts who are genuinely caring. Beautiful well-maintained property with just a few spacious rooms, each room has semi-private balcony overlooking the garden, gate is locked at night which made me feel really safe as a solo female (but you can arrange coming and going after-hours however you want). They were also happy to hold my luggage safely while I visited Nusa Penida. Down the street from convenience store and great full-service laundry spot and tons of restaurants, 7-minutes walking to Sanur beach and 4 minutes to the main road and a huge multi-level grocery store (even faster if you discover the secret alleyway 🤫), great kitchenette with handy basics like silverware, a kitchen sink, a hot plate, etc. so great for longer-term stays.
Seminyak - Titeng Guest House
Great small multi-level homestay with pool and common verandas on each floor that still feel like a private balcony onto the pool area. Perfect location in middle of main road in Seminyak close to restaurants, cafes, shops, massages, and walking distance to the beach.
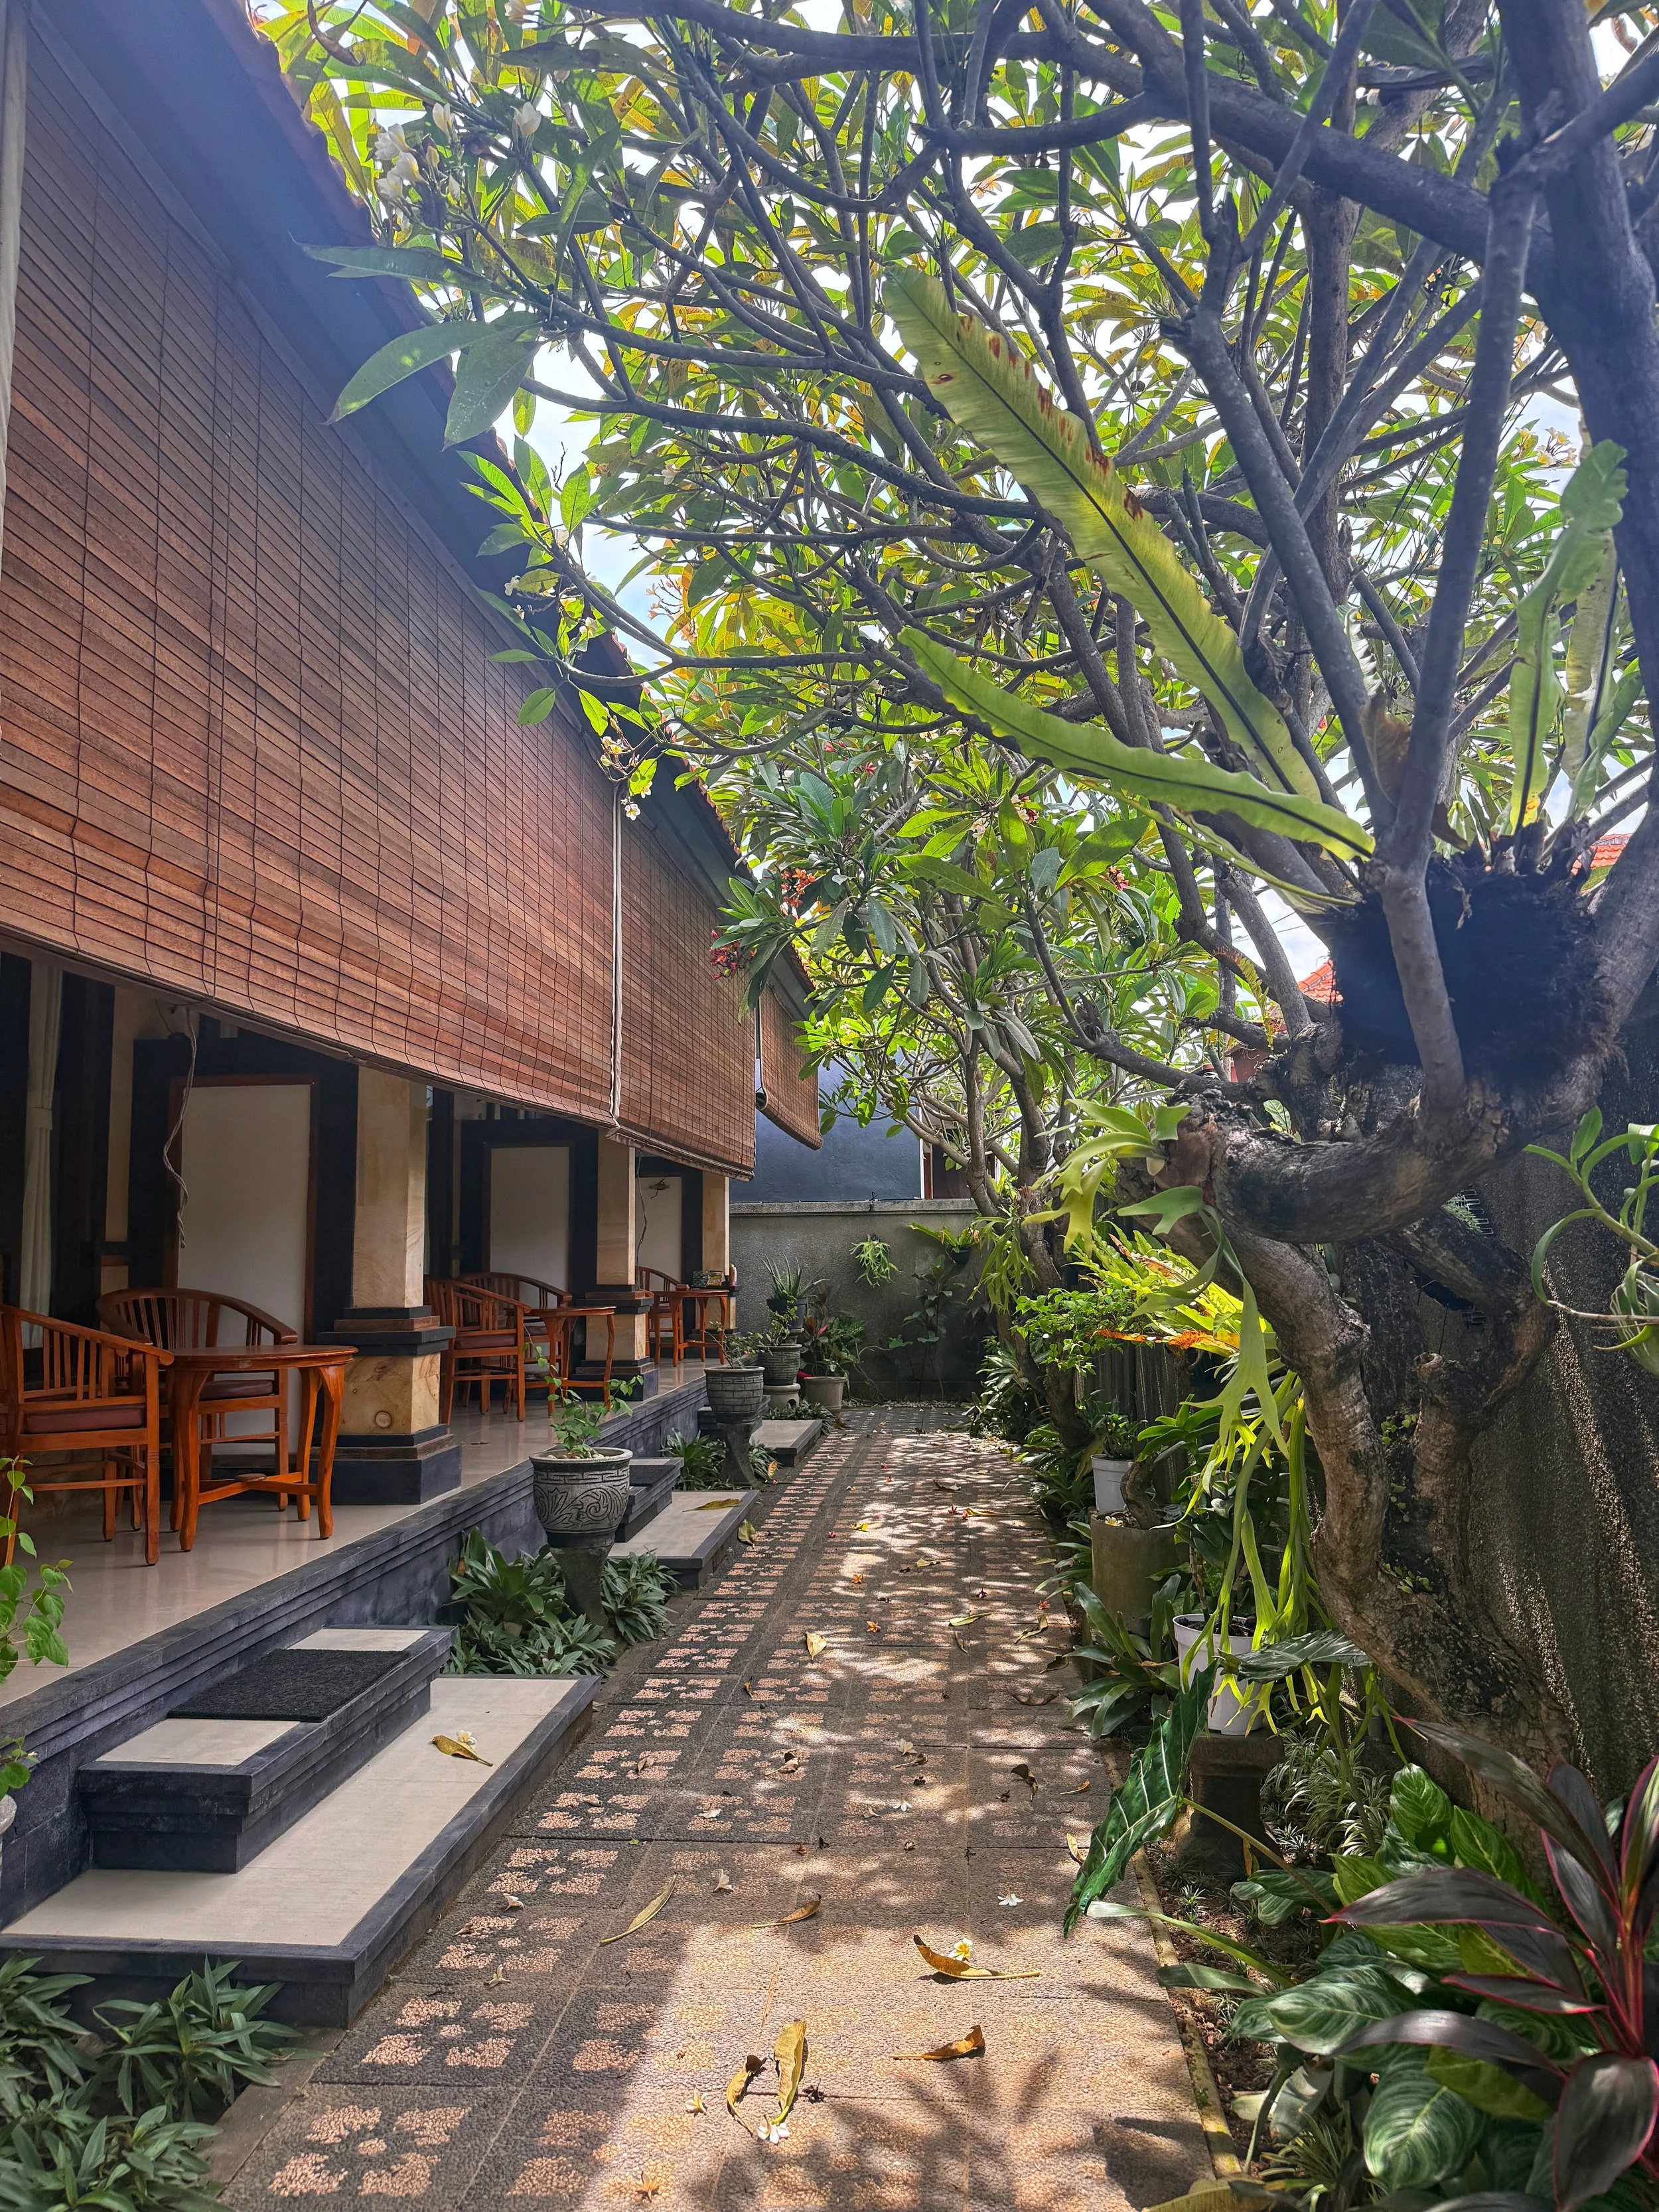
Ubud - Teja Homestay
Spacious, fresh-feeling rooms in the center of Ubud town tucked into a quiet little alley. walkable to everything. Sweet but non-intrusive host family with multiple generation living on-site. Traditional Balinese architecture (the carved wooden doors on the ground-floor rooms are stunning), lovely serene grounds with fish tanks amid the family temple statues.
Thailand

Bangkok/BKK Airport - Lilac Relax-Residence
Convenient for BKK airport. Adorable lilac aesthetic, great little garden in the back. They’ll arrange private door-to-door airport transport for you. Nice competent staff that made me feel safe, older building but clean with sufficient space and surface area in rooms.
Chiang Mai - Suan Dok Gate Guesthouse
Quiet multi-level house in a prime spot in Chiang Mai Old Town, walkable to plenty of restaurants/cafes and one of the main temples (Wat Phra Singh Woramahawihan). Kind staff. Traditional feel with house slippers and a shoe locker to keep your outside shoes at the entrance. Great balconies with nice views of the surrounding mountains and town street.
Vietnam
Tam Coc/Ninh Binh - Tam Coc Tuong Vy Homestay
Tuong Vy and her family are the BEST sweetest hosts who can and will arrange anything you want, and they’ll steal your heart in the process. Perfectly-located homestay in the picturesque town near Vietnam’s best Ninh Binh attractions, set on a quiet lovely little residential-leaning alley off the main strip in Tam Coc, full of great restaurants/cafes. 5 minutes walking to the Tam Coc boat rides. On-site bike rental makes it easy to ride right out into the rice fields and limestone karsts and lotus ponds and caves and everything else there is to explore in the area.
And here are some similarly-vibed locally-operated/boutique hotels I’ve stayed at:
Indonesia (Bali)
Balangan Beach (Bukit Peninsula, Bali) - Balangan Surf Resort
The perfect peaceful clifftop hotel with walking access to a gorgeous surfing beach below, and cows in the backyard! The grounds are gorgeous, the staff is friendly. Typical Bali architecture in individual bungalows with lots of light. Beautiful restaurant area with sweeping views of the cows roaming the cliff, nice pool area as well. Each bungalow has an outdoor terrace sitting area on the porch.
Kelingking Beach (Nusa Penida, Bali) - Kelingking Mesari Villa & Spa
Comfy rooms within easy walking distance to Kelingking Beach and the best food I ate in all of Nusa Penida (with outdoor dining options by the pool, or in-room delivery for the introverts). Outdoor terrace/sitting areas for each room. Amazing host family (pretty sure they live on-site or next door) who is happy to organize all tours, etc. with trusted vendors at fair prices.
Indonesia (Komodo Islands)
Komodo Islands (Labuan Bajo, Flores) - Bintang Flores Hotel
Incredible spot on a private beach within very close driving distance of the port where all the Komodo tours depart. Lovely light-filled with rooms with many having stunning sea views. Great food at the hotel restaurant. Competent friendly staff who offered to pack me a take-away breakfast for an early tour.
Thailand
Bangkok - Alley & Pier
Right next to the river and one of the stops on the tourist ferry boat that gets you quickly between the main Bangkok attractions. Also easy walking distance to Khao San Road and in a busy area with plenty of restaurants/cafes. Some rooms have river views. Contactless check-in and super cute library-type aesthetic. Spacious rooms with lots of light. Communal washing machines and dryer for use downstairs.
Hua Hin - BaanBusarin Hotel
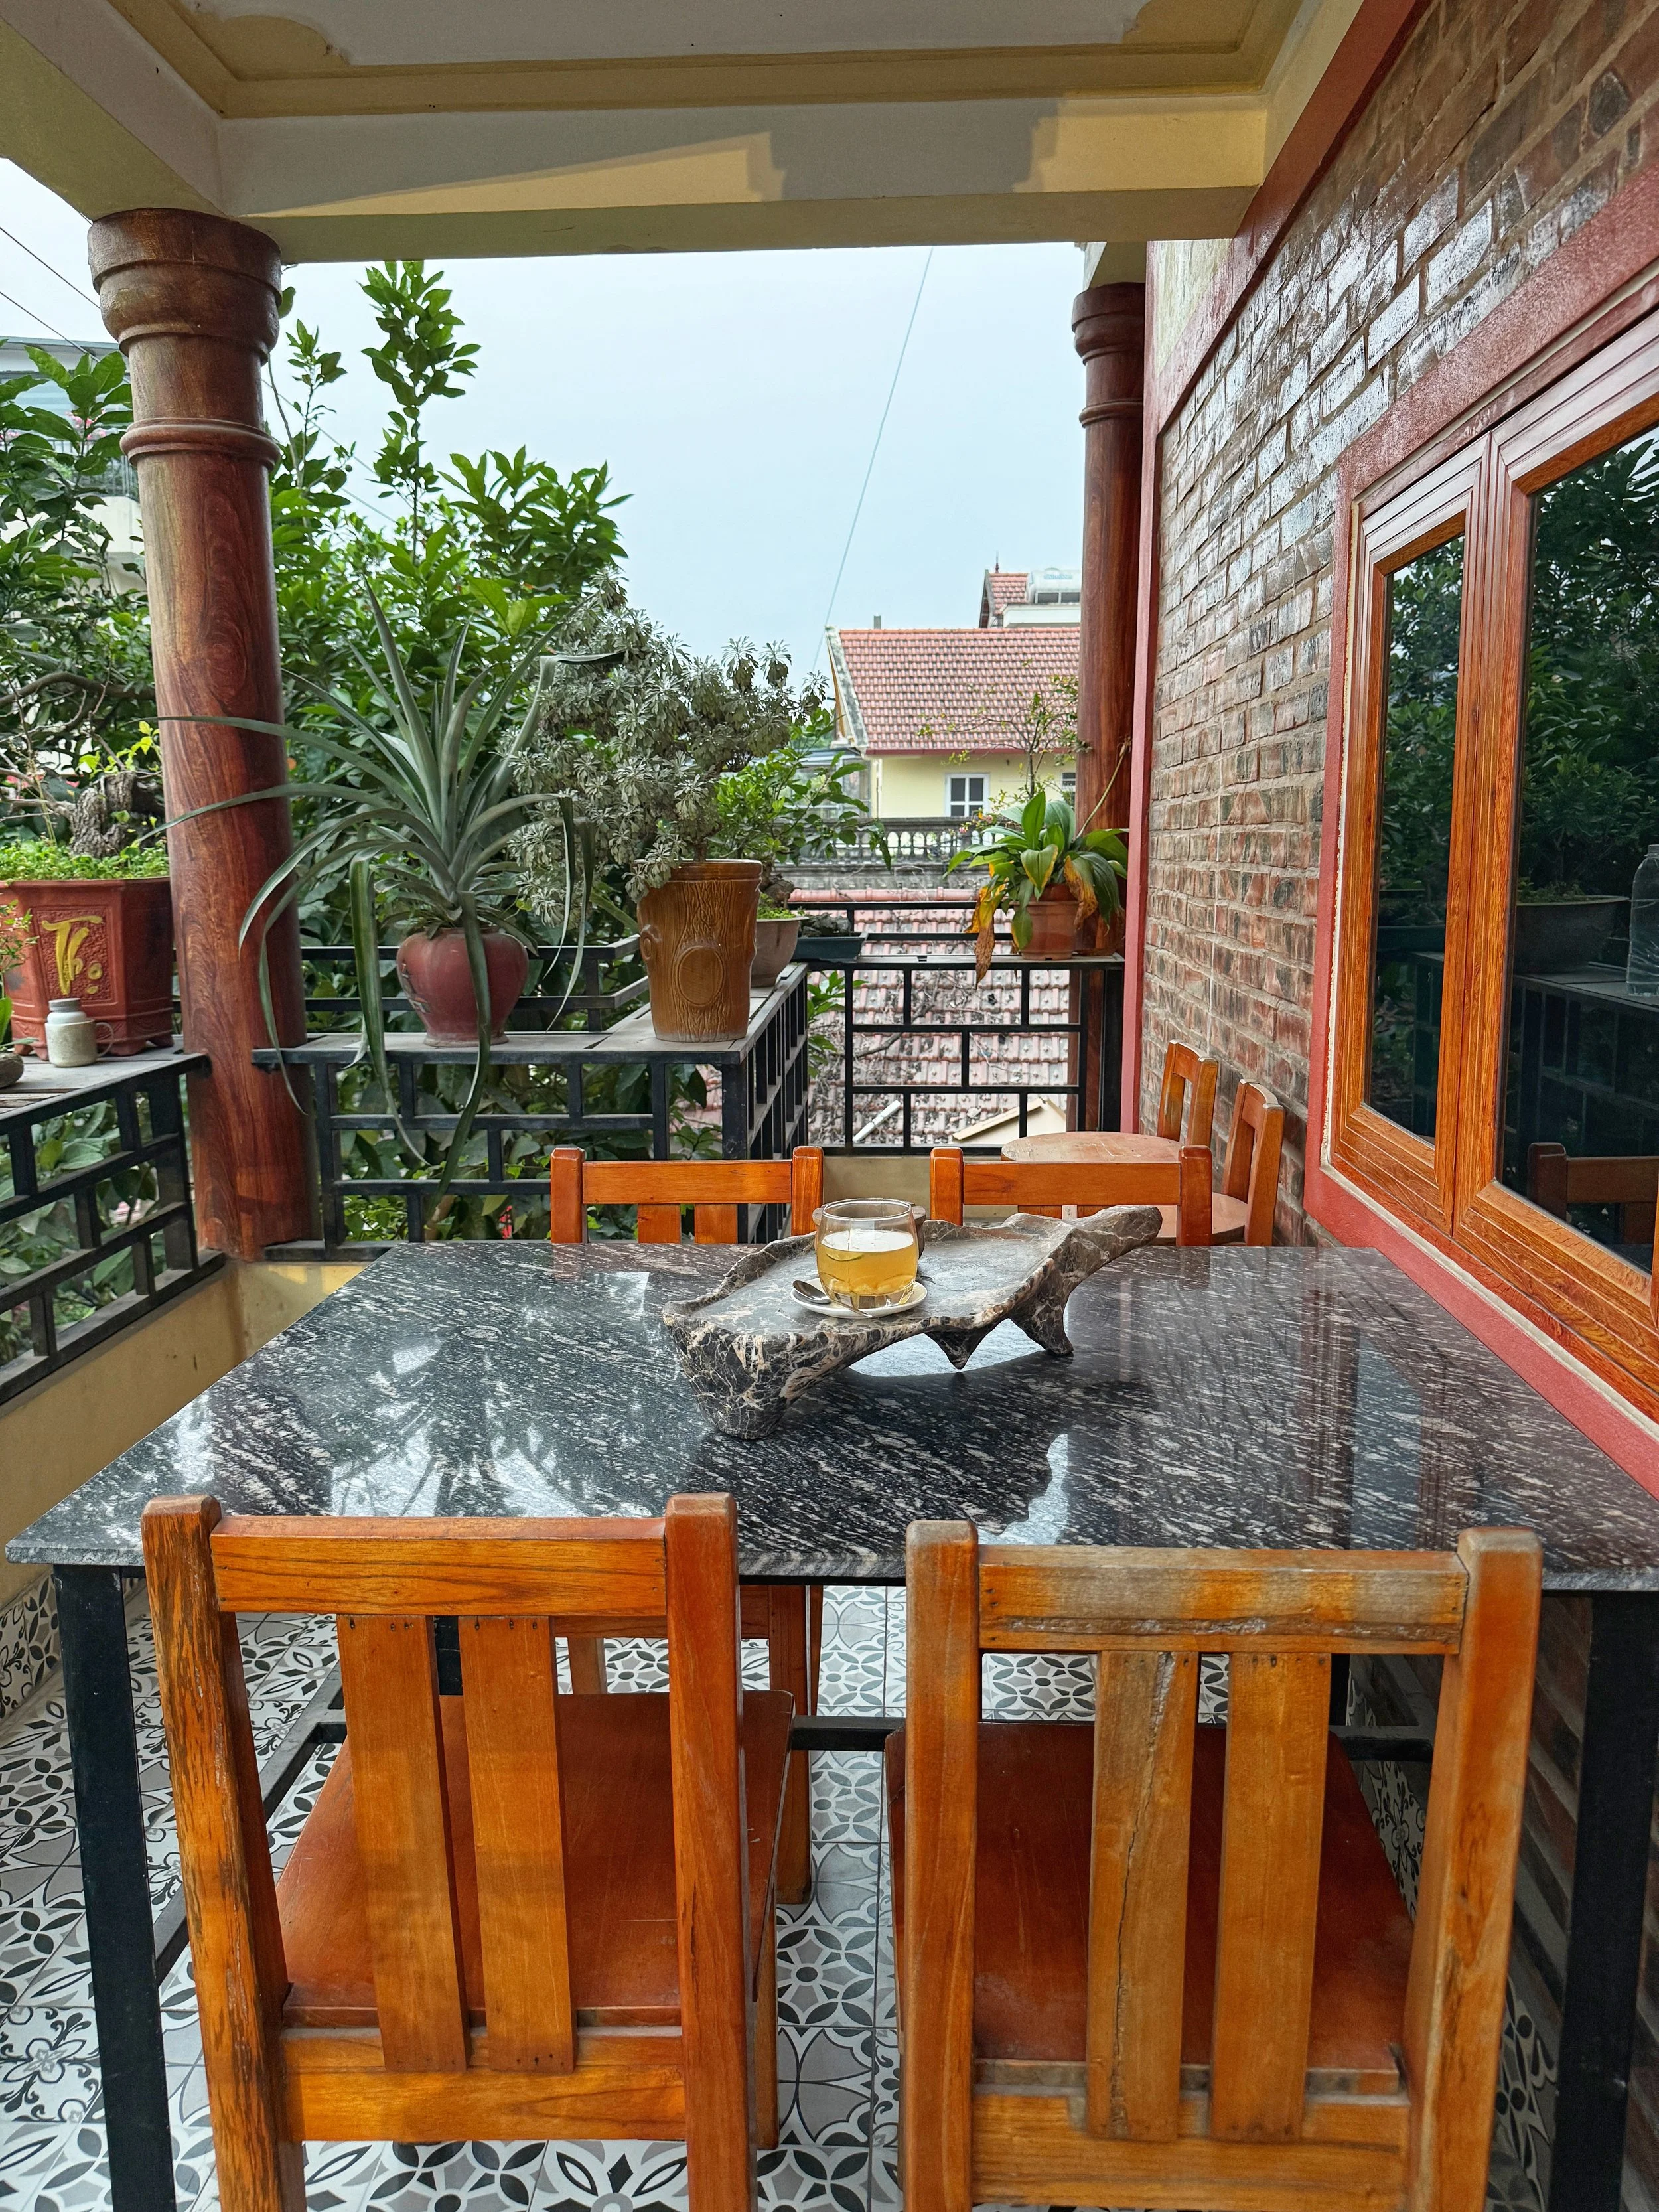
Ideal location on the edge of the main Old Town tourist area within easy walking distance to the beach and tons of restaurants/cafes and shops, sweet management family, amazing huge communal areas with big a separate big communal balcony on each floor. Plus private balconies in each room. Comfy beds with nice linens.
Hua Hin - Thipurai Beach Hotel
Ideal location in a quiet bubble of central Hua Hin beach, around the corner from the beach and an excellent beachfront cat cafe (LOL), 7-11 and a major shopping mall nearby (walking distance). Great speedy elevator, feels super safe because main entrance is reception/restaurant/lobby area with staff on-site 24/7 as far as I could tell. Great linens, awesome private balconies with nice views, especially on the south-side rooms. Endless hot water and great pressure. Kind, competent management and staff (the housekeeper here was one of my favorites 🥹).
Koh Samui (Lamai) - MyVillage Lamai
Great spacious rooms in center of Lamai town, on a walking street/night market close to the beach and right on the main strip with 7-11 and everything else you want. Private balconies with nice views of the town and lush hills. Quiet if you stay on the side opposite from the walking street/night market. Comfy beds and linens.
Koh Samui (Lamai) - Marina Beach Resort
Quiet beachfront location in the middle of Lamai town while still being on the main strip, around the corner from 7-11 and tons of restaurants, etc. Plenty of beach chairs/umbrellas to use all day. Nice private balconies with great views. Spacious rooms with lots of light. Sweet accommodating staff.
For the Long-Term Travelers: If you need lodging for 10-ish days or more, you’re gonna wanna hear about my favorite new hack for reducing expenses AND stress…
A longer stay is a bigger commitment (and a higher price tag), and a wrong decision can be tough to live with for an extended time.
So I usually pick one place to stay for the first 3-4 days and make refundable bookings for the remainder of my stay, both there and at a couple of other good options. Then when I arrive, I scout the area for the first couple days, pop in to tour my alternate options, negotiate pricing with management on-site to make sure I’m getting the best price, before deciding if I want to stay or move.
Just make sure to cancel your backup bookings before the full-refund deadline! I have been this-close to making that mistake, several times. So now I set an alarm or reminder for the day before the deadline.
Pro tip! Booking.com has a “free cancellation” filter that makes it easy to narrow the search results for your research. Their superior filters are literally the reason every one of my accommodation searches starts there.
10 Minutes to Multiply Your Points: Earn More Free Travel With Rakuten
How To Get Started With 5,000 FREE Points
If you’re not already using Rakuten, let’s get that corrected ASAP, my friend.
Because Rakuten is the #1 best way to earn extra points for more free travel…without having to spending a penny more than you would otherwise. And it’s 100% free. No catches.
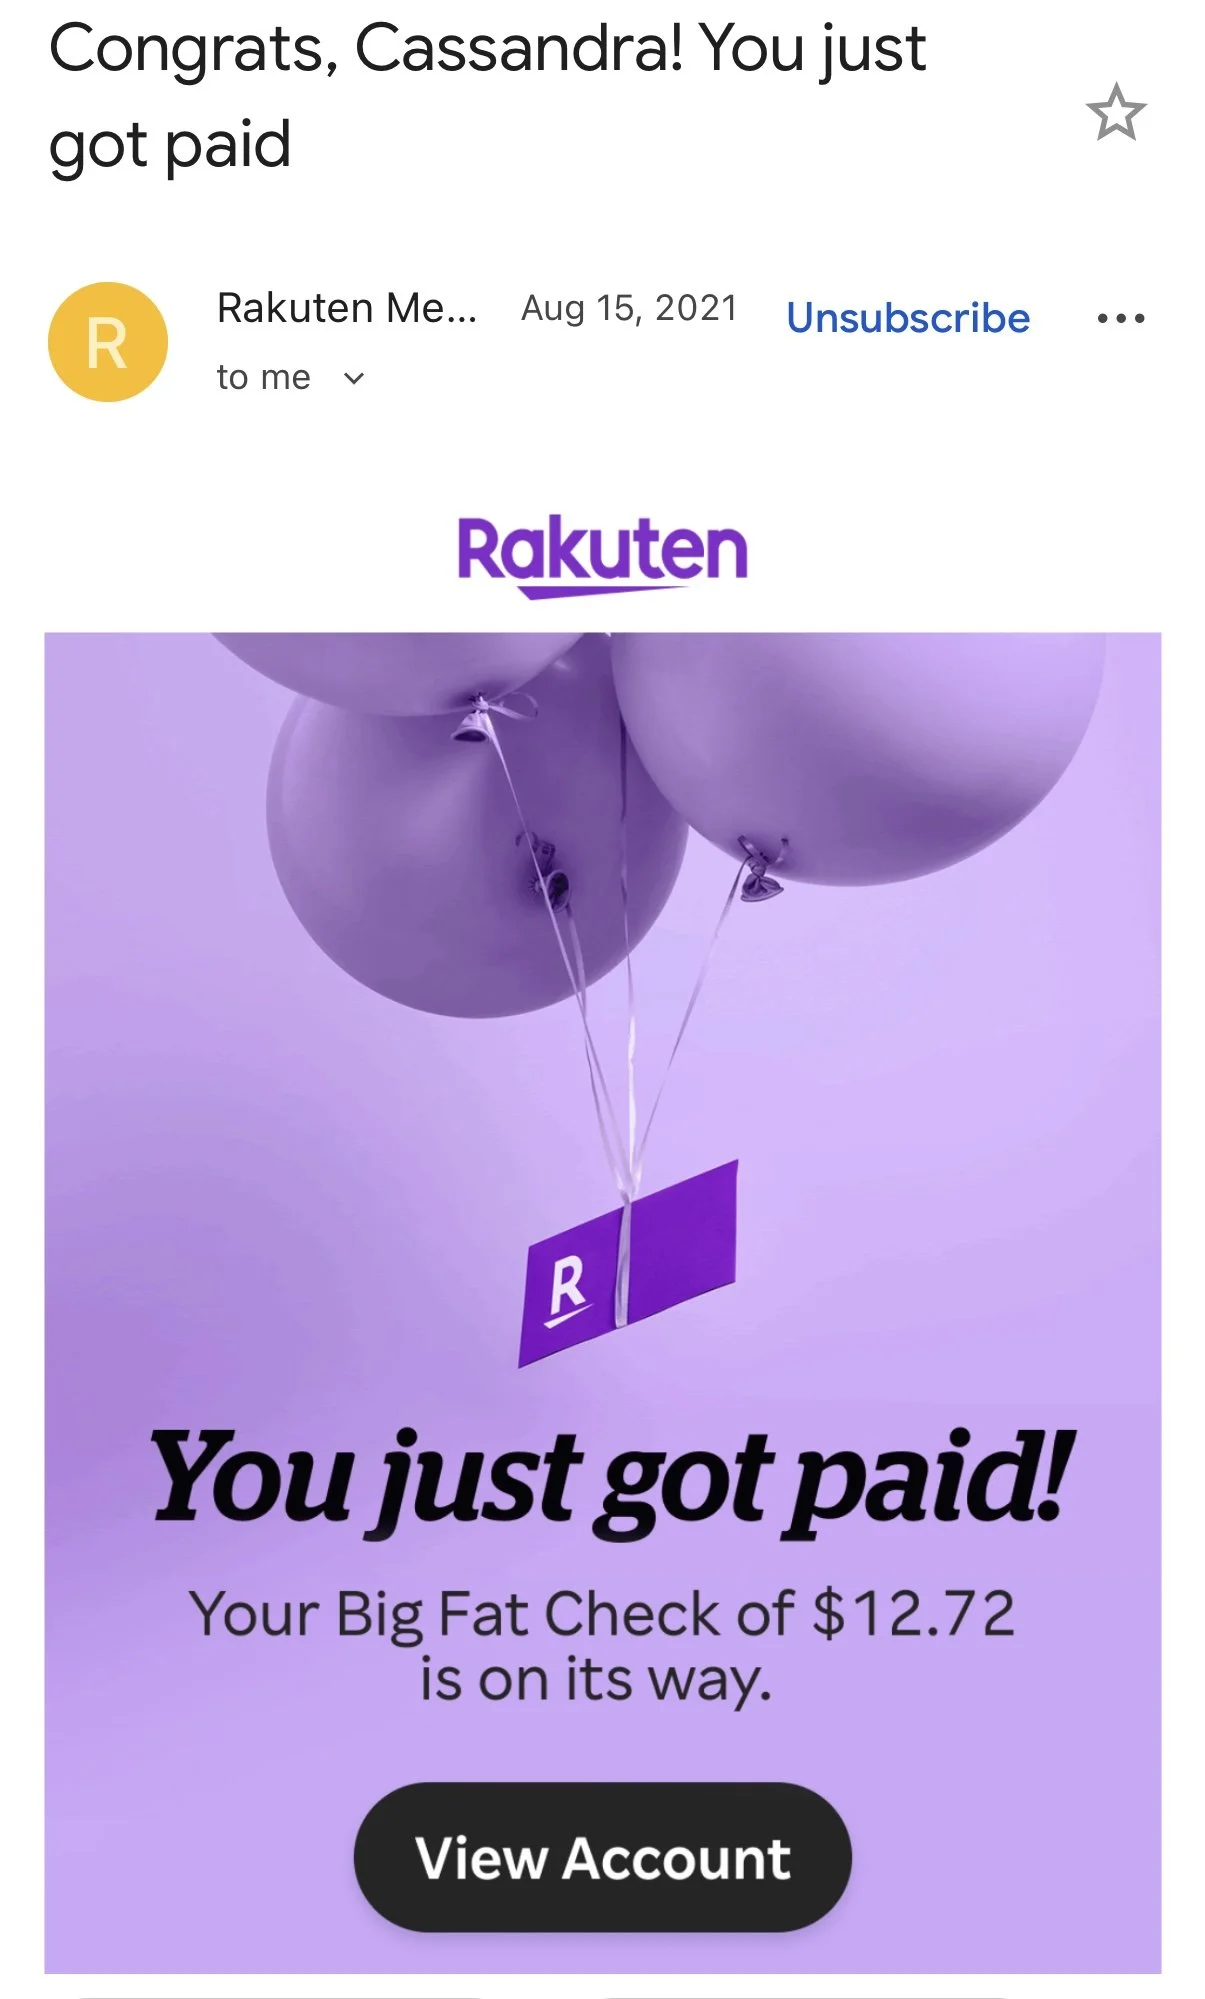
I first signed up for Rakuten back in 2016, when it was still known as ebates. For years, I earned rewards in the form of “Big Fat Checks”…essentially cash back that arrived quarterly via snail mail, which I’d deposit at the ATM and later on my bank app.
Don’t get me wrong, it was great having a bit of extra cash appear out of nowhere (and a couple of those Big Fat Checks were over $100!)…
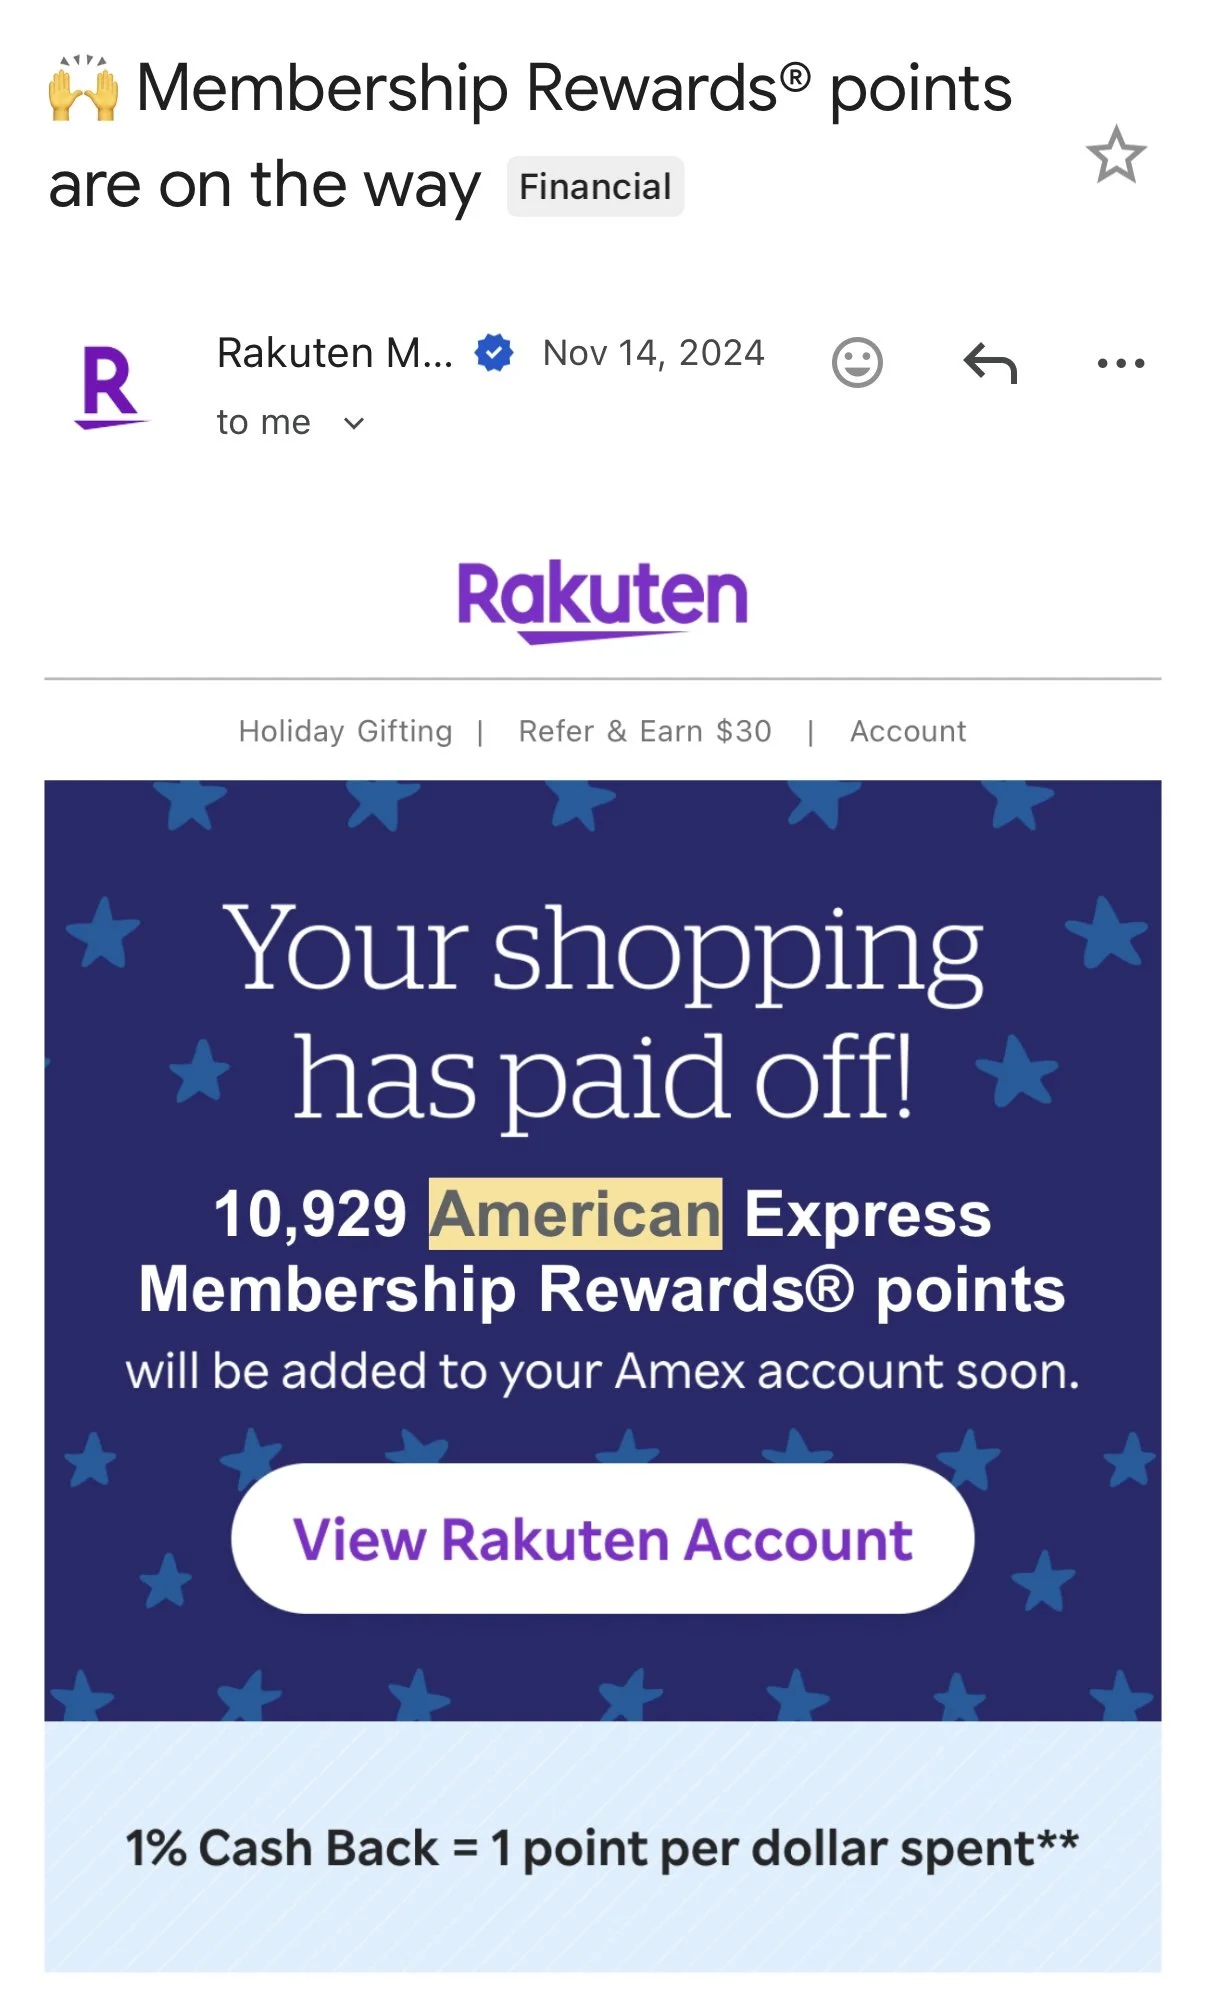
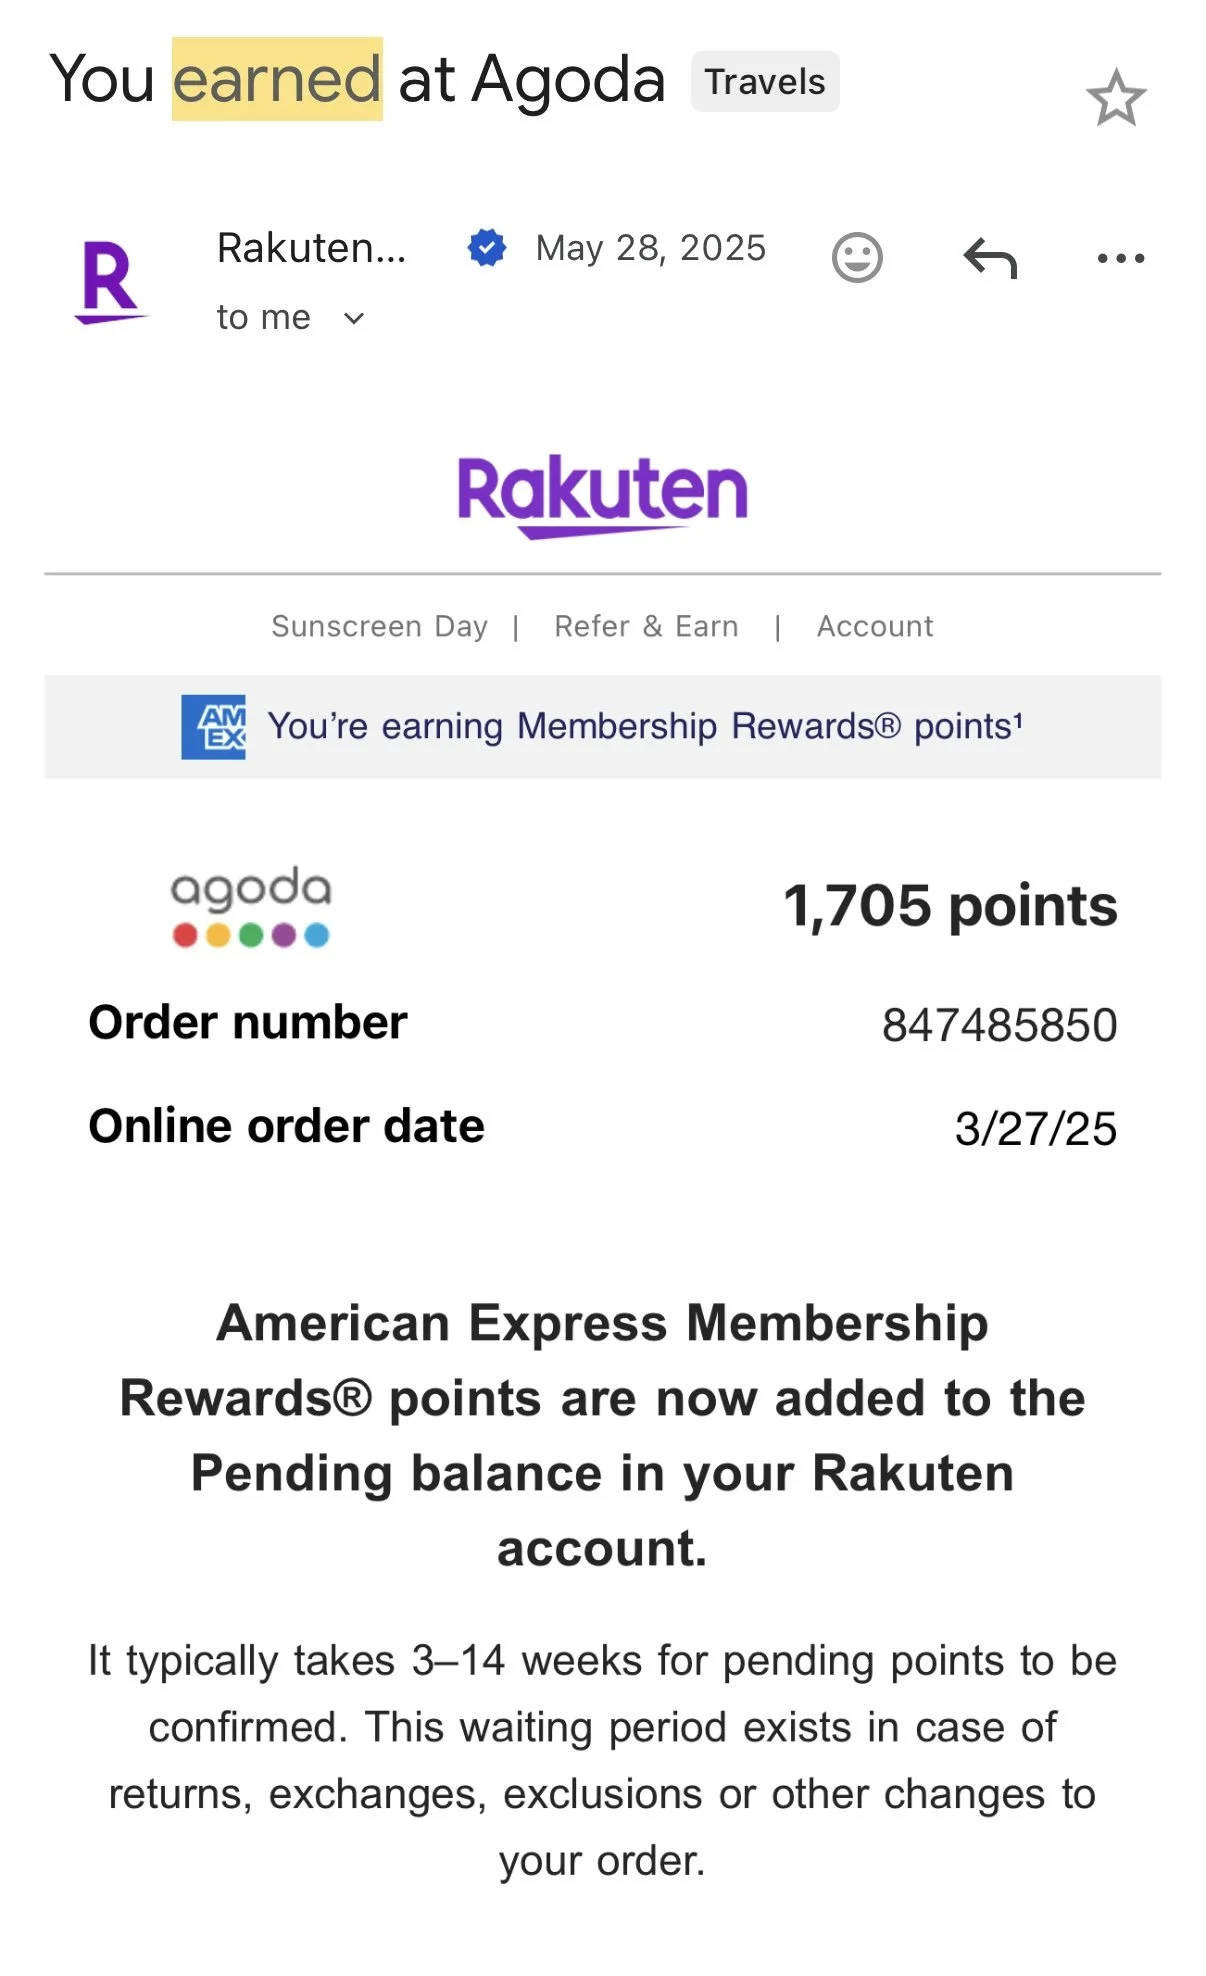
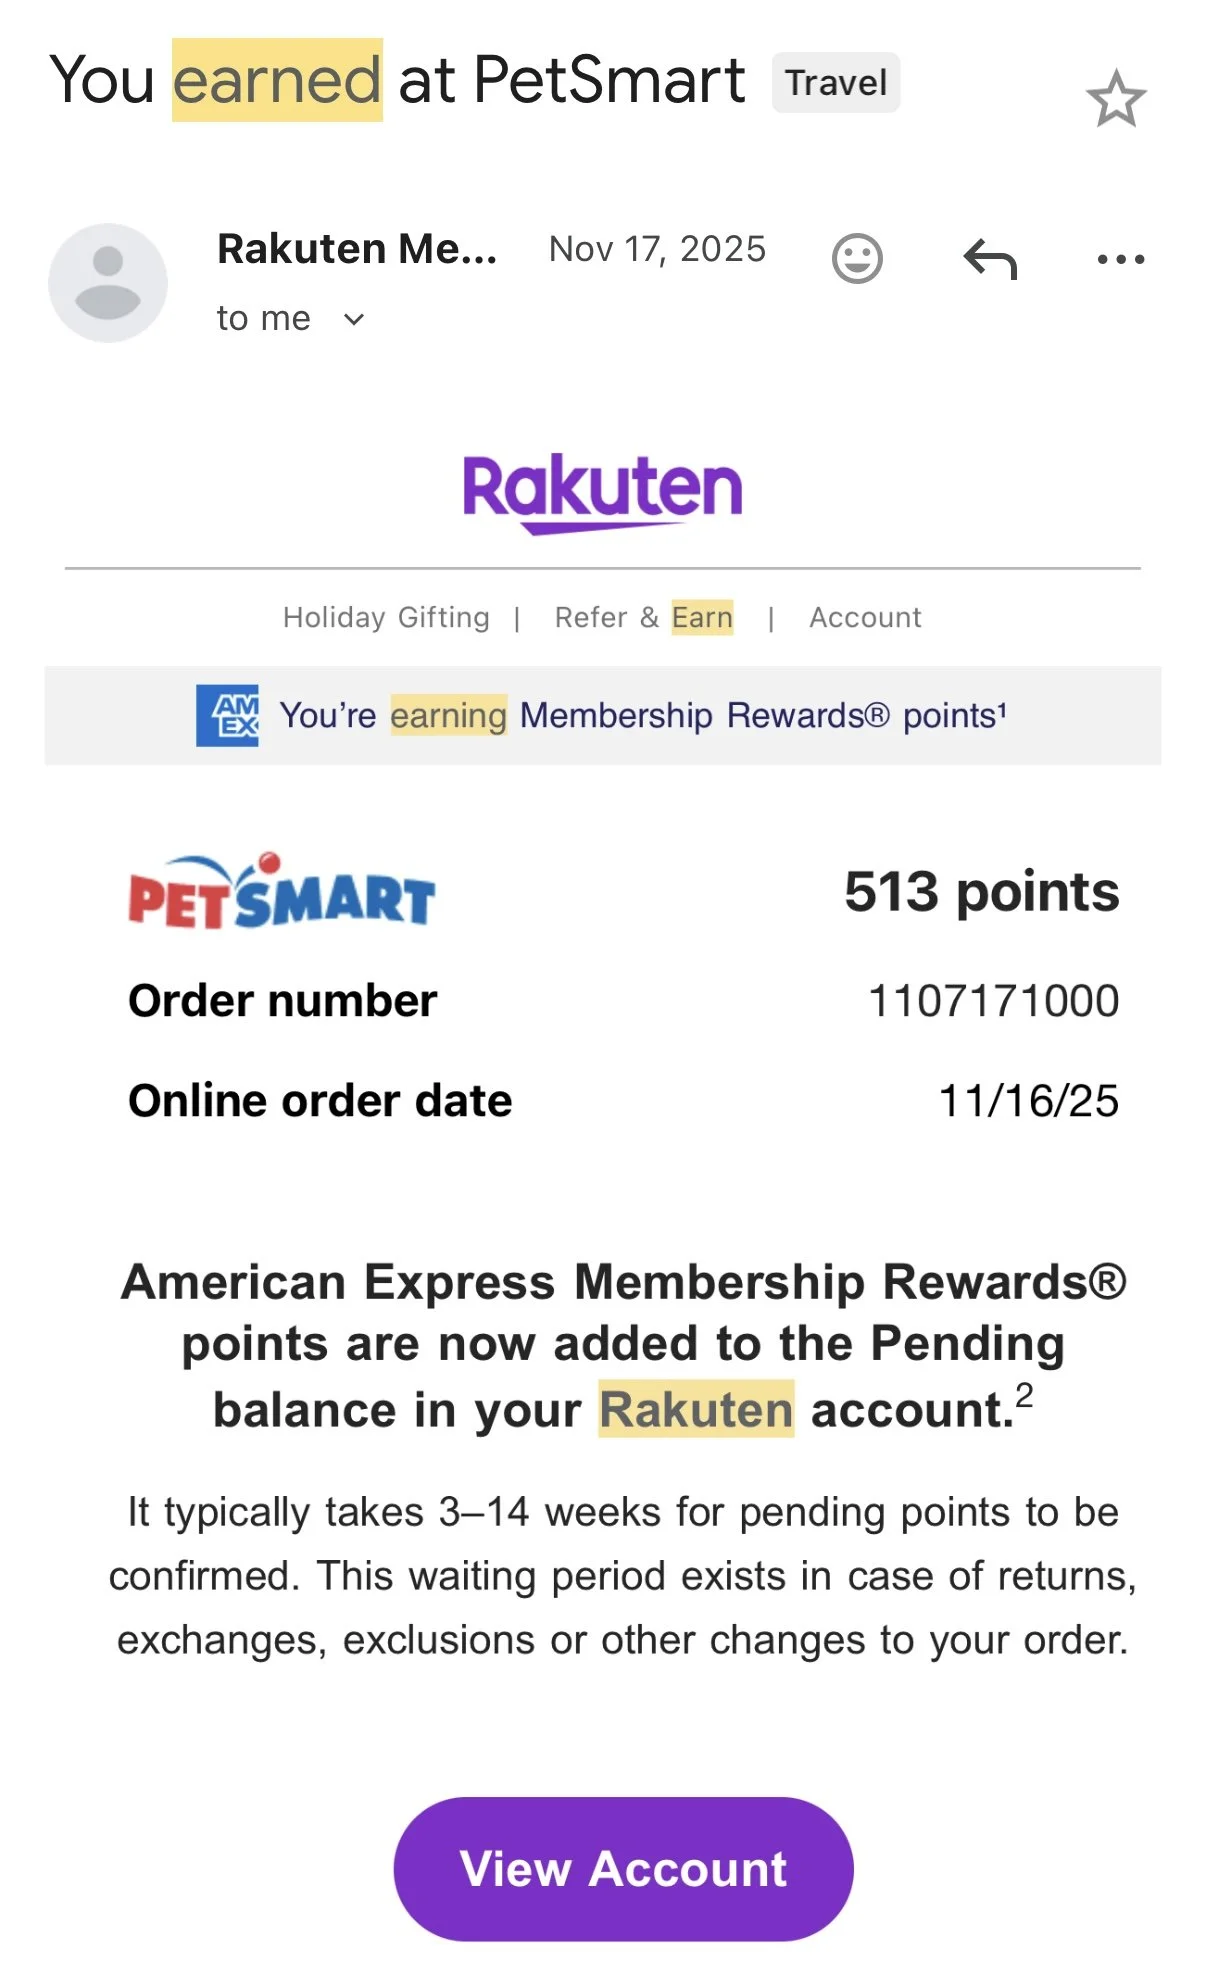
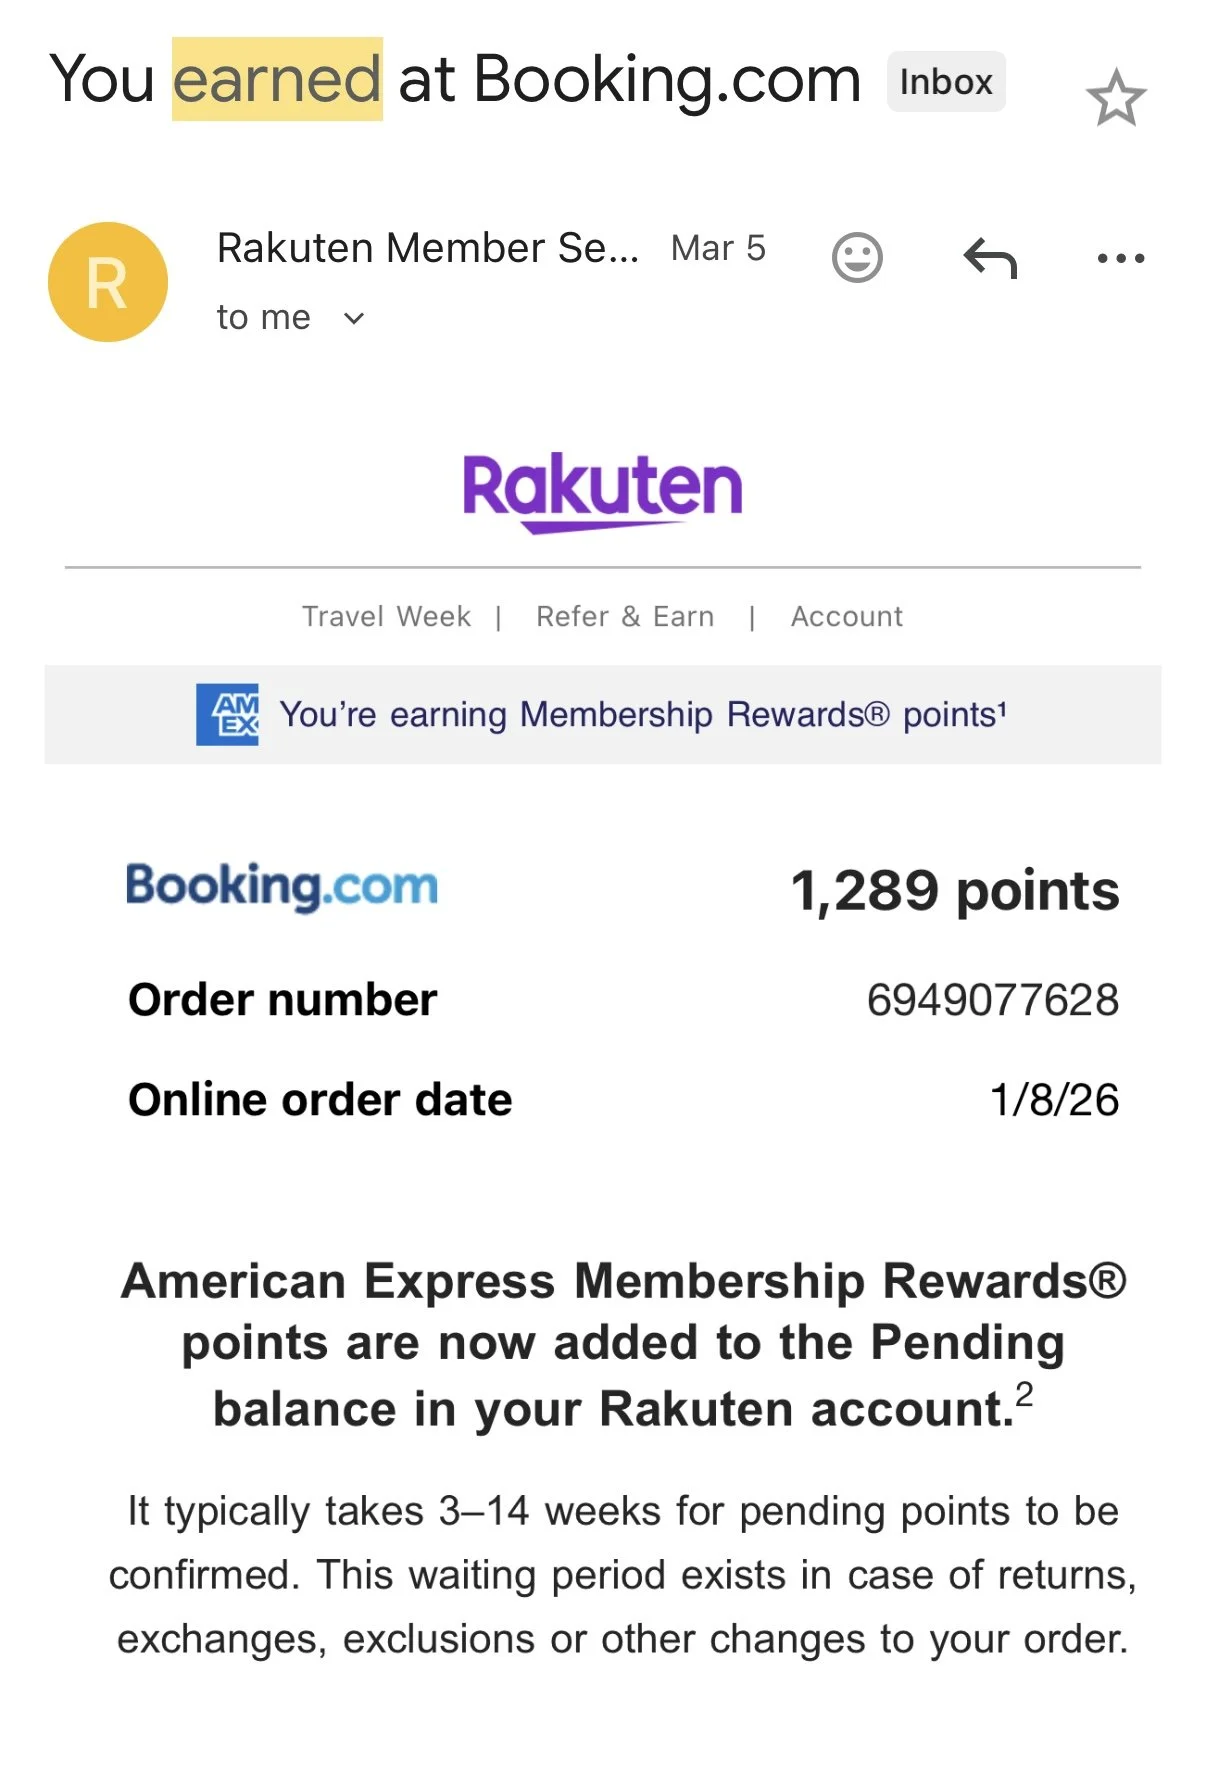
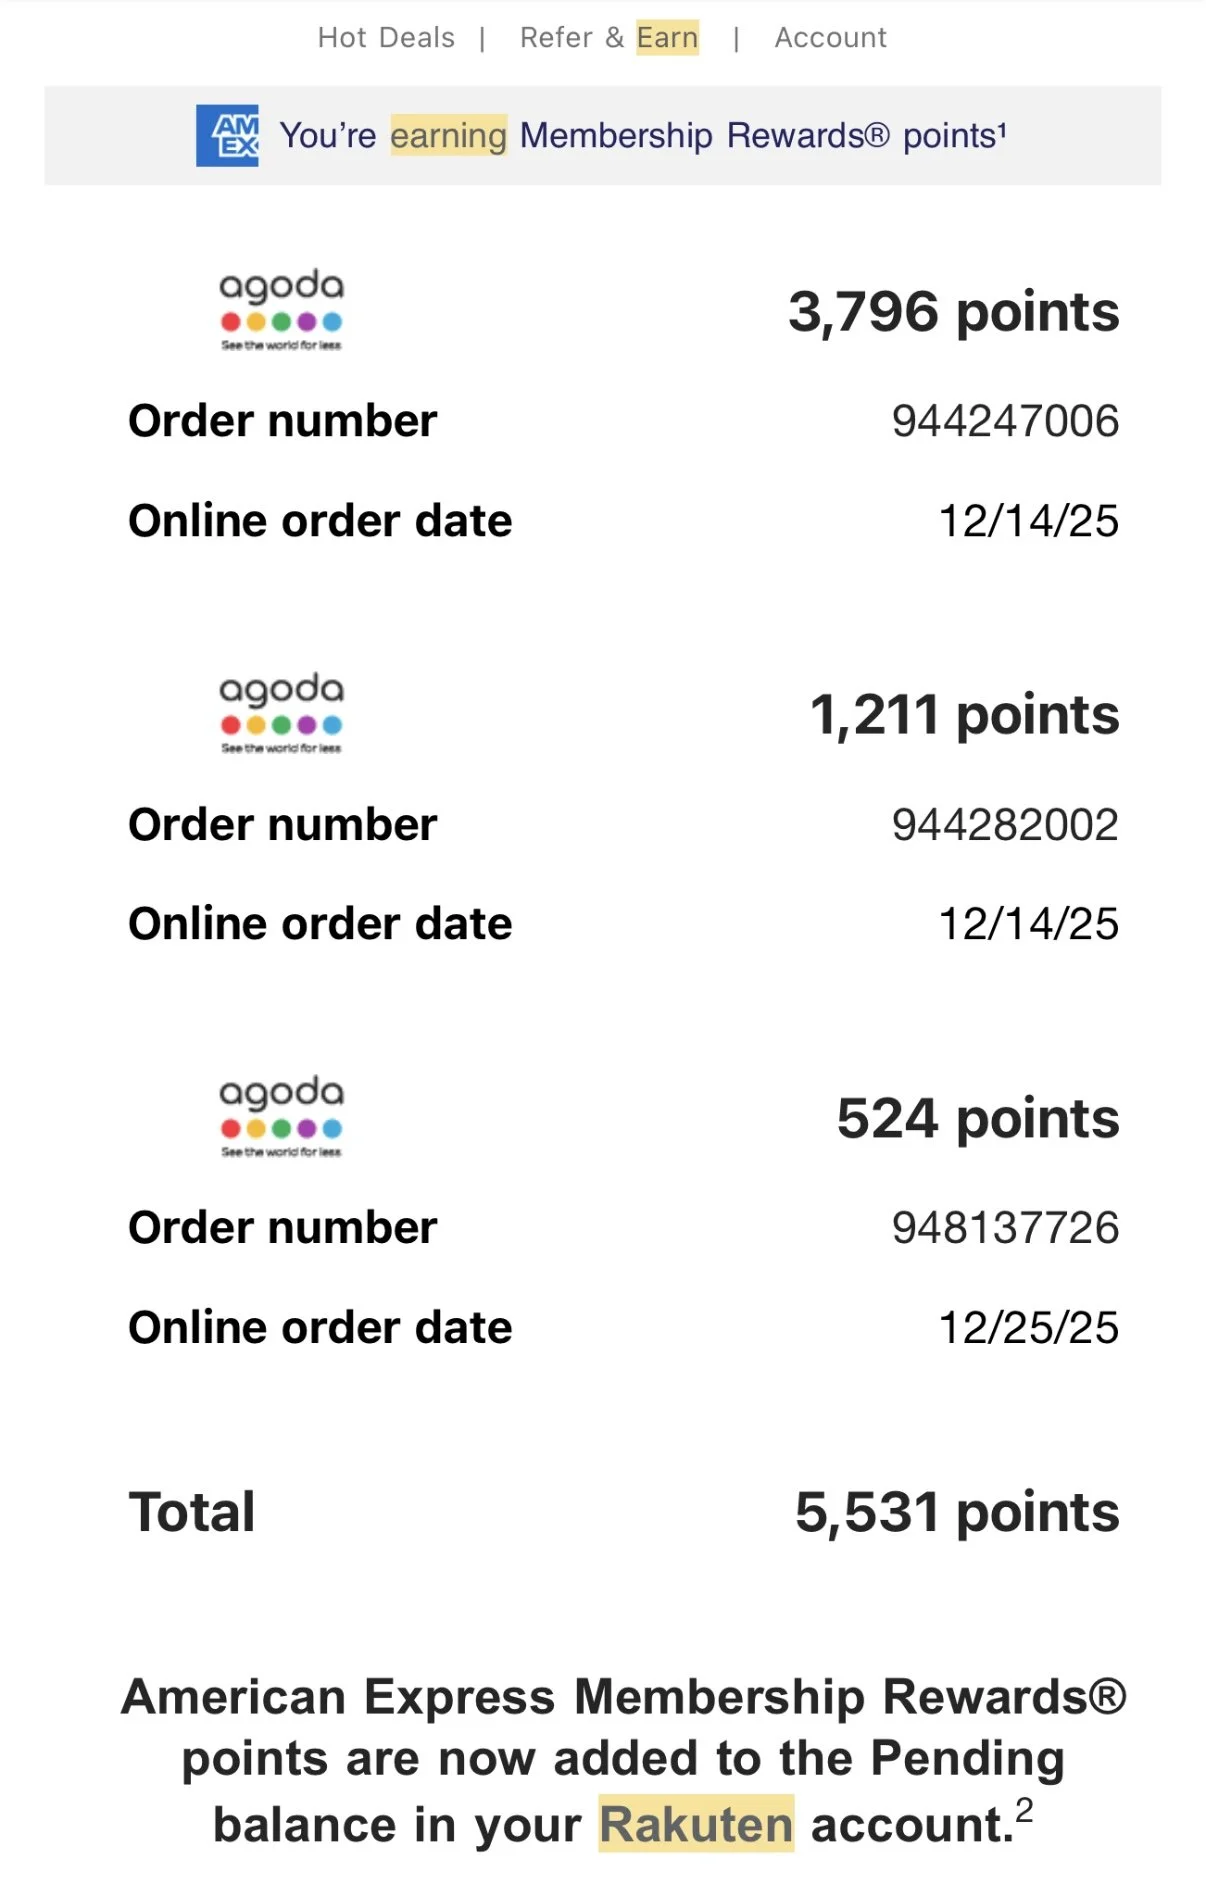
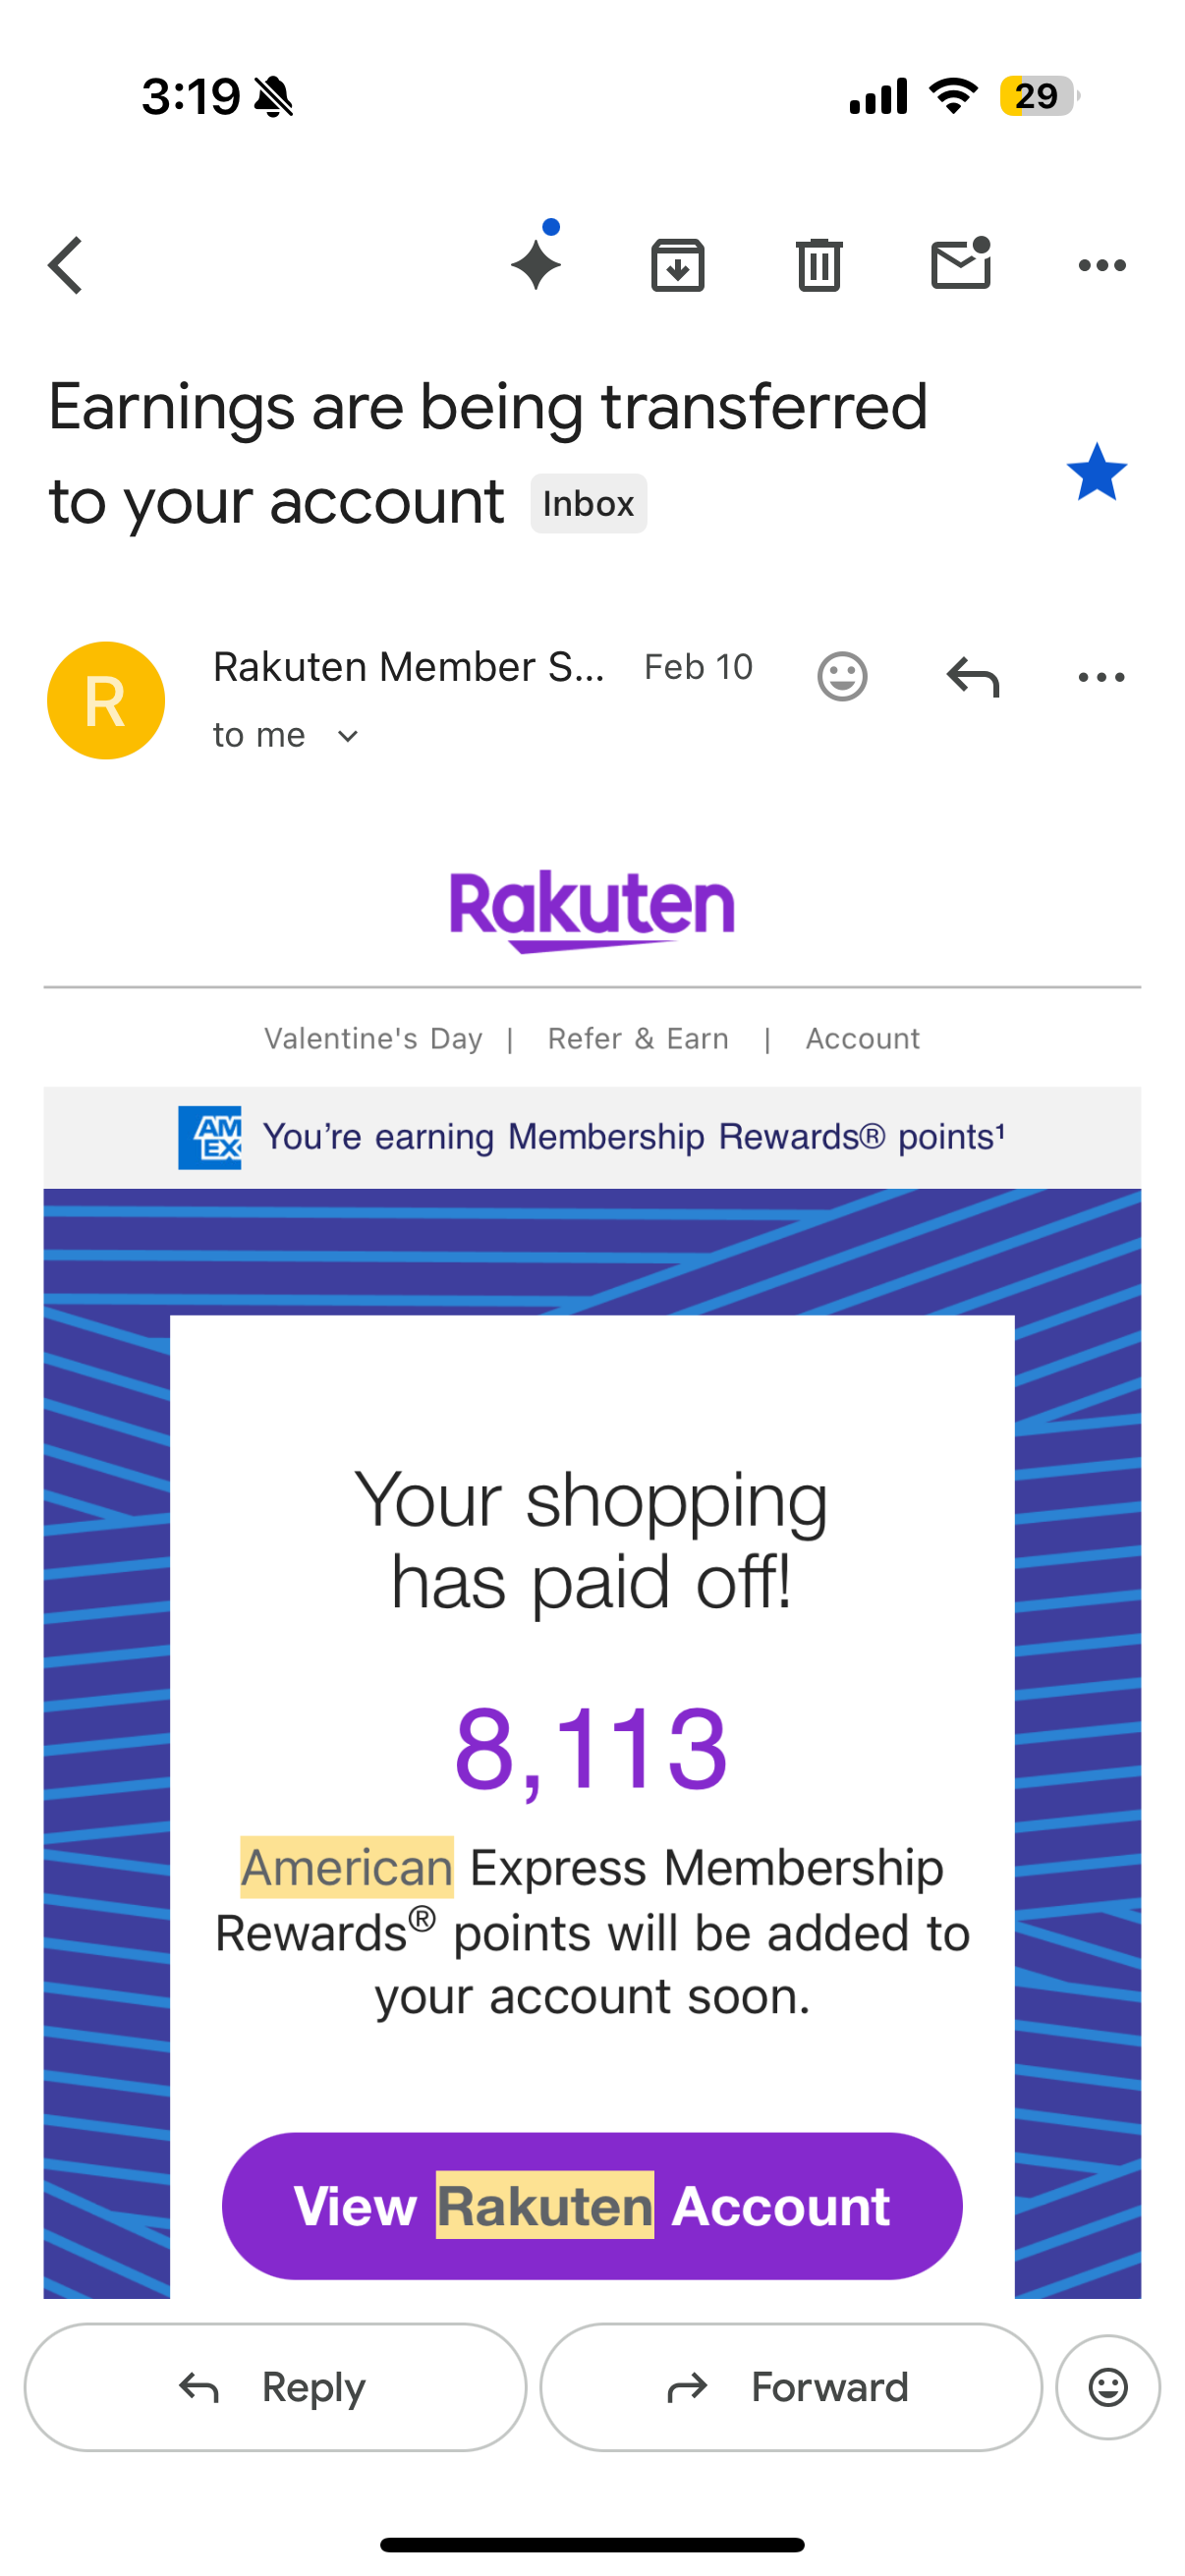
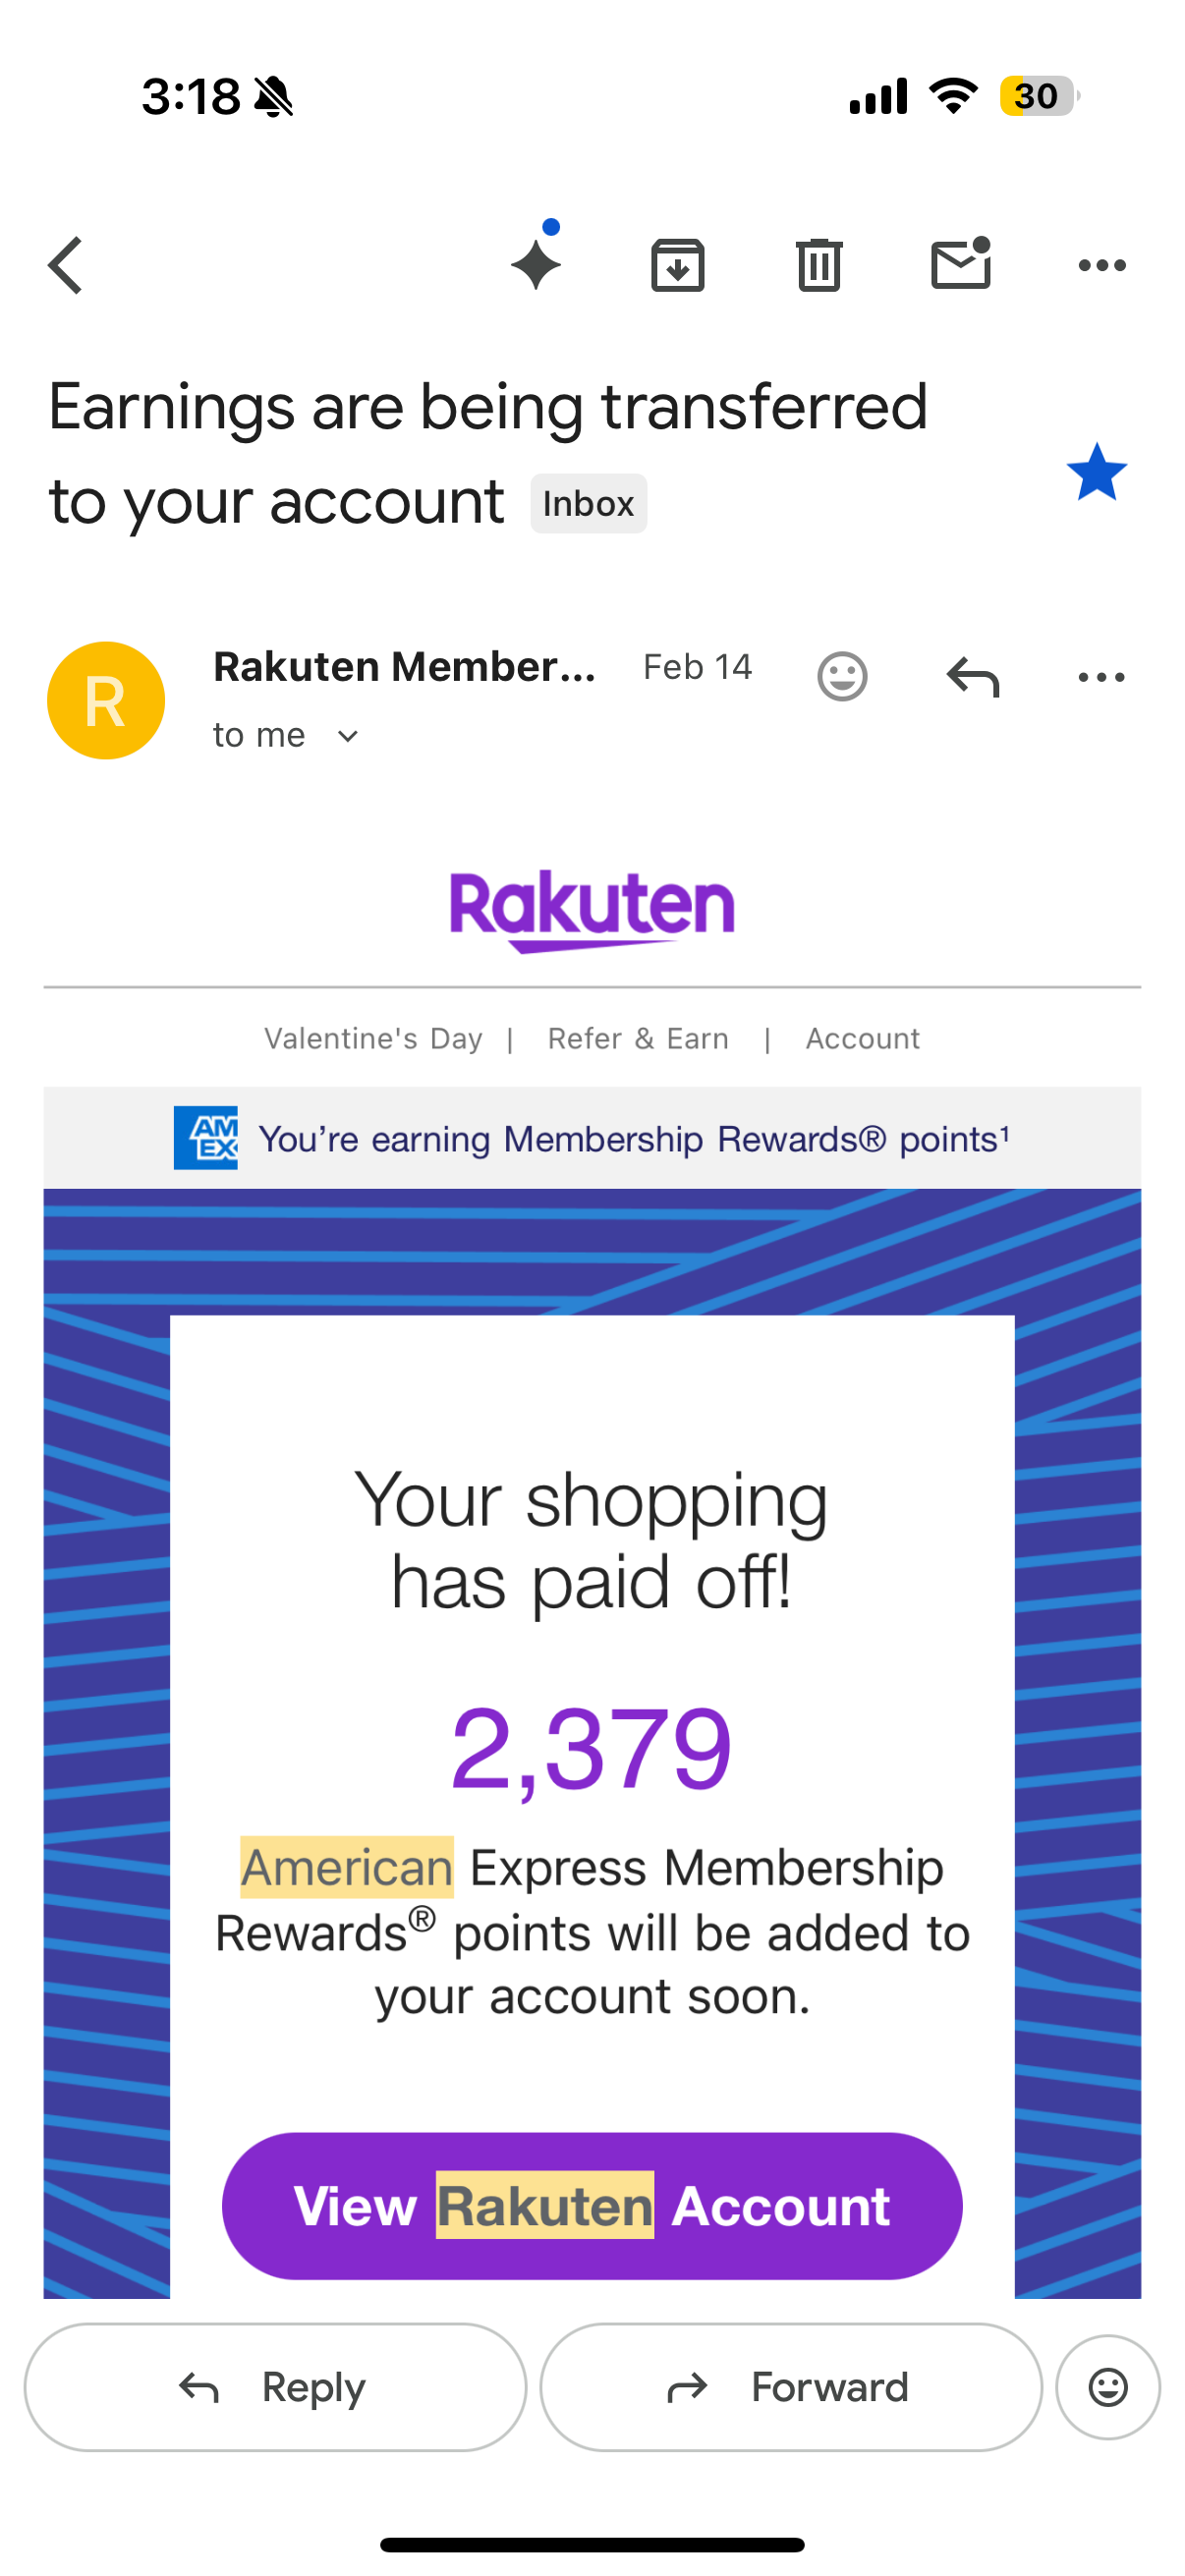
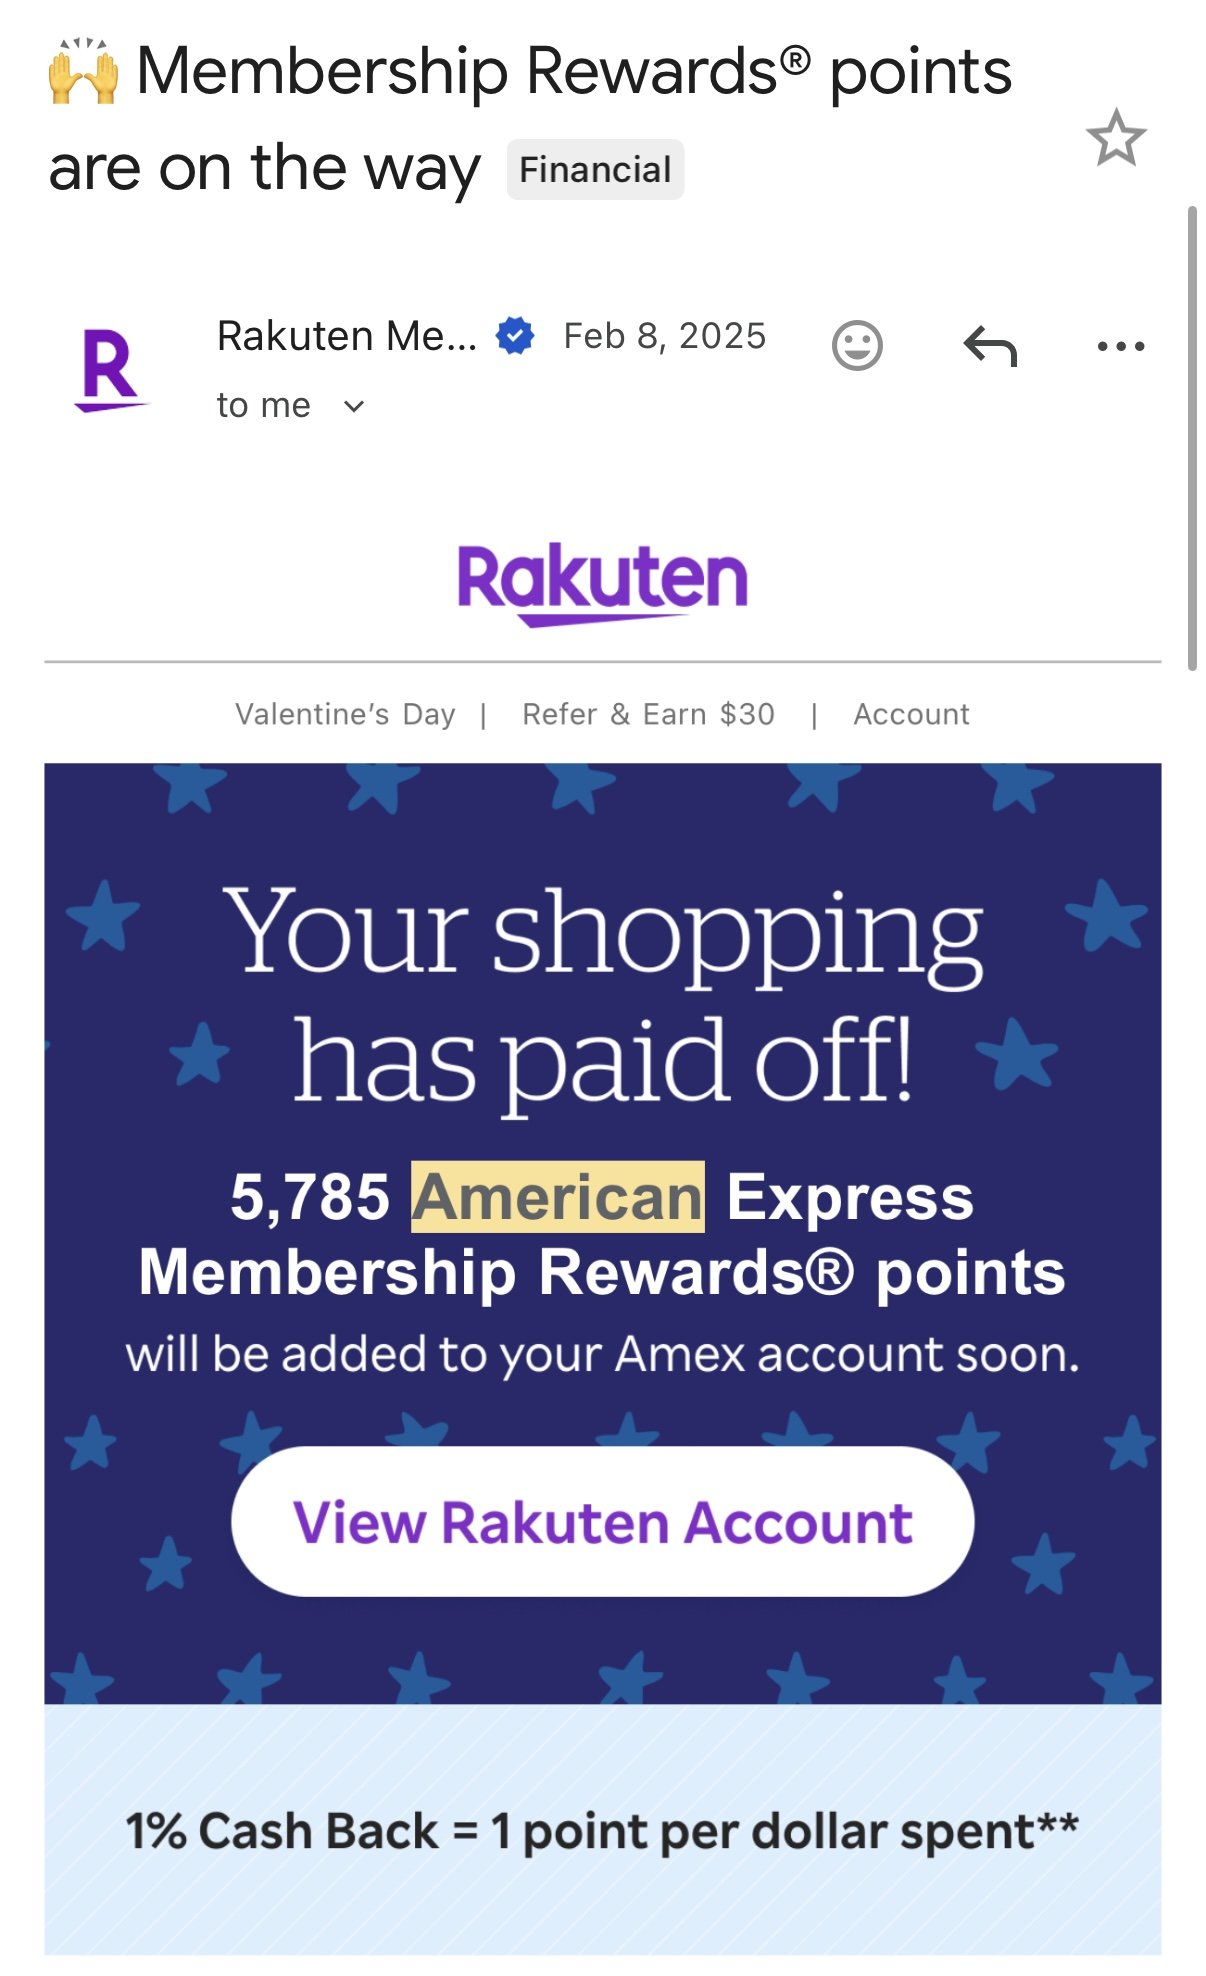
But the game truly changed when Rakuten added the ability to convert earned “cash back” rewards into super-valuable American Express Membership Rewards Points (along with a few other travel-related options).
In total, I’ve earned precisely 95,903 points through Rakuten (plus over 10,000 currently pending), which I’ve turned into multiple award flights (including one particularly nice business class flight on Singapore Airlines). A huge majority of those points were earned from purchases I would’ve made anyway…though a couple of particularly intentional purchases earned me over 5,000 points each (more on that strategy later).
Read on to learn how to get set up and start earning more free travel through Rakuten in less than 10 minutes. Or don’t…
But whatever you do, don’t register for Rakuten without claiming your 5,000 FREE points. Make sure to sign up using my referral code MENDOZ5257 (or register by clicking any of the signup links on my page) to earn your extra 5,000 points with your first purchase of $50 or more within 90 days of sign-up.
Disclaimer: I make, and have always made, my purchases through Rakuten using my own money, as a regular user, and I haven’t been compensated in any way in exchange for expressing my opinions in this article. However, this blog post may contain referral or affiliate links, meaning I could get a small commission if you make a purchase after clicking the link…at zero extra cost to you. I only share things I genuinely love and believe in and think my audience would benefit from too. This is how I’m able to keep making free travel resources and guides for you. Learn more about my policies here. Thanks for your continued support!
Here’s How It Works
To earn Rakuten points, all you have to do is “activate” Rakuten before each eligible purchase.
Activation is easy through the app, the website, or even through a dedicated Chrome browser extension that automatically notifies you when a purchase you’re about to make is eligible for Rakuten points (my personal favorite).
You just install the plug-in on your Chrome browser one time, and from then on it’ll alert you if whatever “store” you’re shopping at online is eligible for rewards.
If you prefer not to deal with the Chrome extension, then you just have to be a little more intentional about remembering to activate Rakuten through the app or website each time you’re about to make an eligible purchase. So worth the free travel!
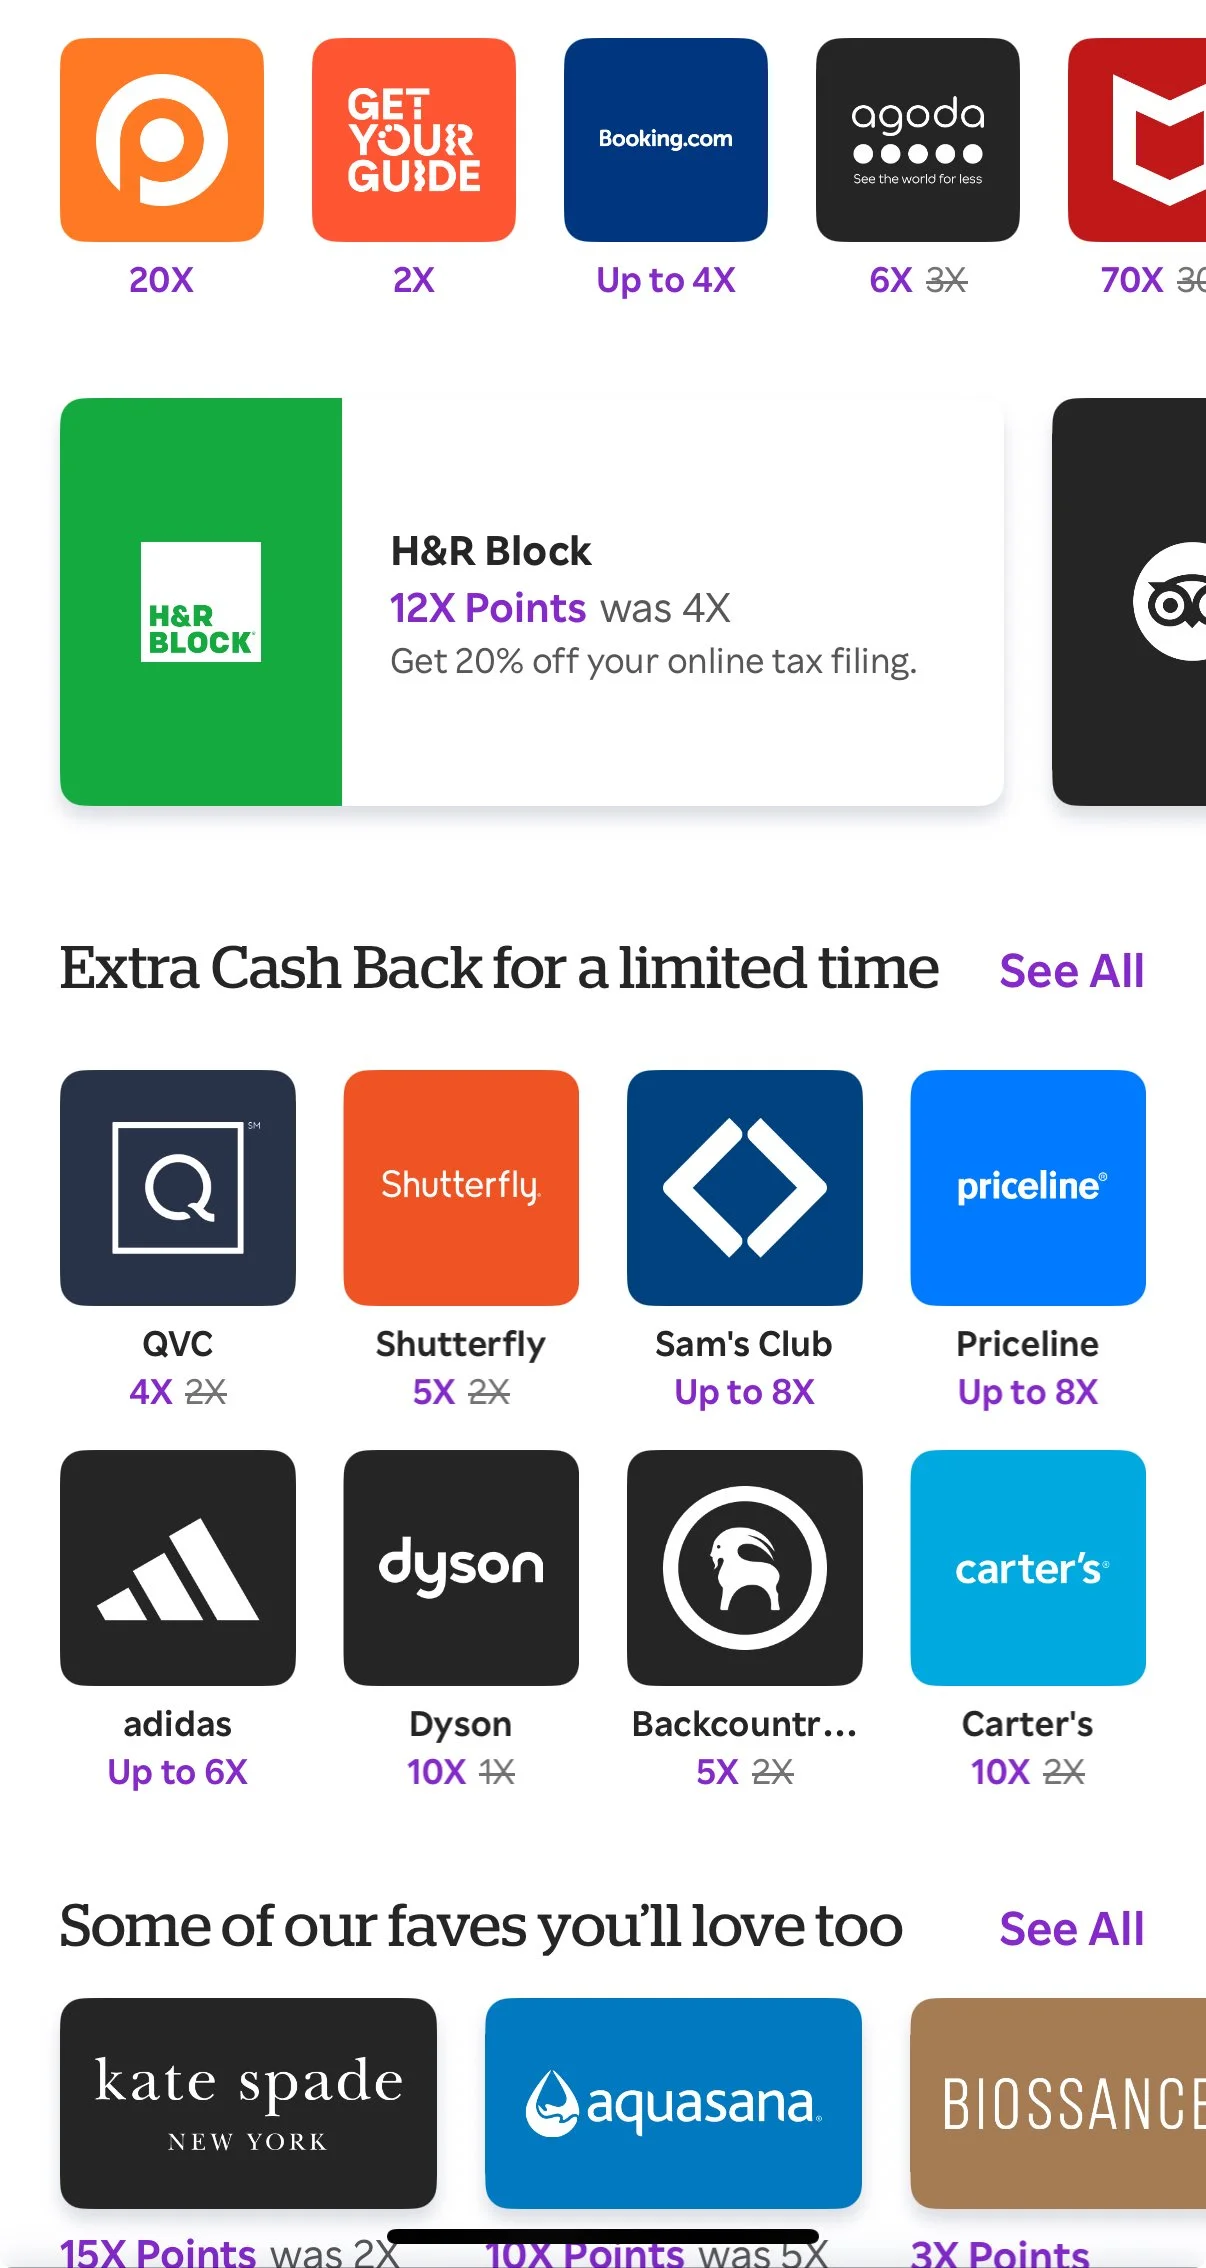
Rakuten displays eligible stores/vendors and their earnings rates on their app and website, so you know exactly how many extra points you’ll be earning before you even pull out your credit card.
There are tons of opportunities to earn when you shop in stores or online, at anywhere from Petco to lululemon. But because Rakuten partners with all kinds of different vendors, it’s easy to earn more free travel even if you’re not an avid shopper.
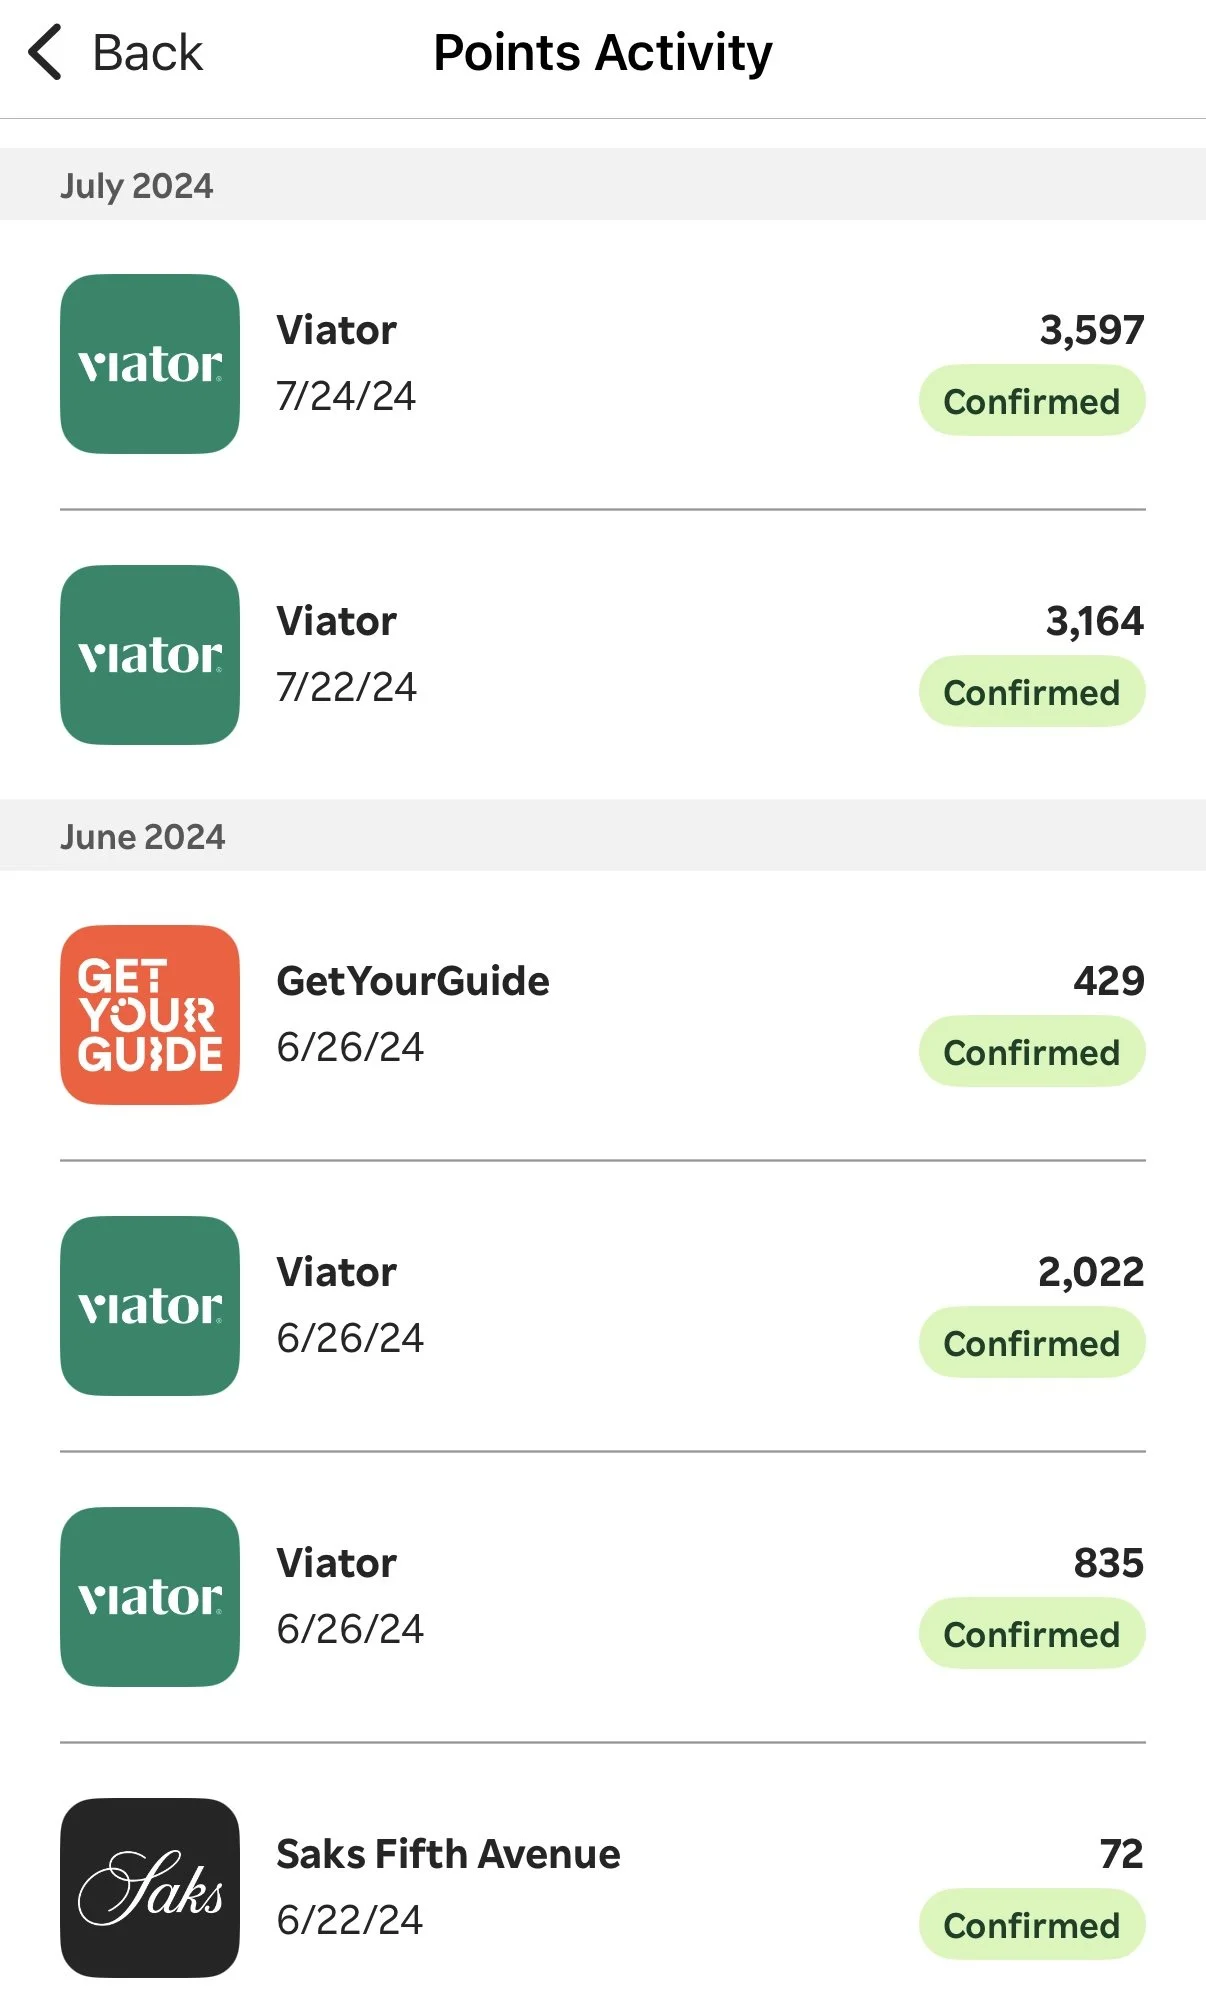
As a full-time traveler, I don’t shop much in the traditional sense myself, so I earn most of my Rakuten points from hotel bookings on booking.com and agoda, plus tour booking sites like Viator, Getyourguide, and Klook.
There’s also rewards on office supply stores (like Staples), software (like VPN/antivirus services), and home improvement stores (like Lowe’s).
Adding Up Your Rewards
The Rakuten earnings rate can sound complicated, but it becomes super simple when you think of it like this…
Your Rakuten points earnings = Your purchase amount, multiplied by the Rakuten earnings rate
For example: If the earnings rate for Petco is 1X, and you spend $100 at Petco while Rakuten is activated, you earn Rakuten “cash back” equivalent to 100x1=100 Rakuten points. But if the earnings rate is 2X, you get 100x2=200 points on that same $100 Petco purchase. And so on.
The earnings rates are always changing, but most of the time you can find stores with rates of 5X, 10X, or way more…I’ve even seen as high as 100X 🤯
And just to be clear, Rakuten rewards are earned in addition to any points you already earn on that purchase from spending on your credit card.
Talk about a truly risk-free way to earn extra free travel with a couple extra clicks! The unlimited potential and no real downside is exactly why Rakuten is the first recommendation I make to anyone who wants to start earning extra points without extra spending.
Get Paid
By default, Rakuten points earn “cash back” in the form of those “Big Fat Checks” I mentioned earlier, which are essentially worth $.01 each.
To get more value out of your points, you’ll need to elect to get paid another way…
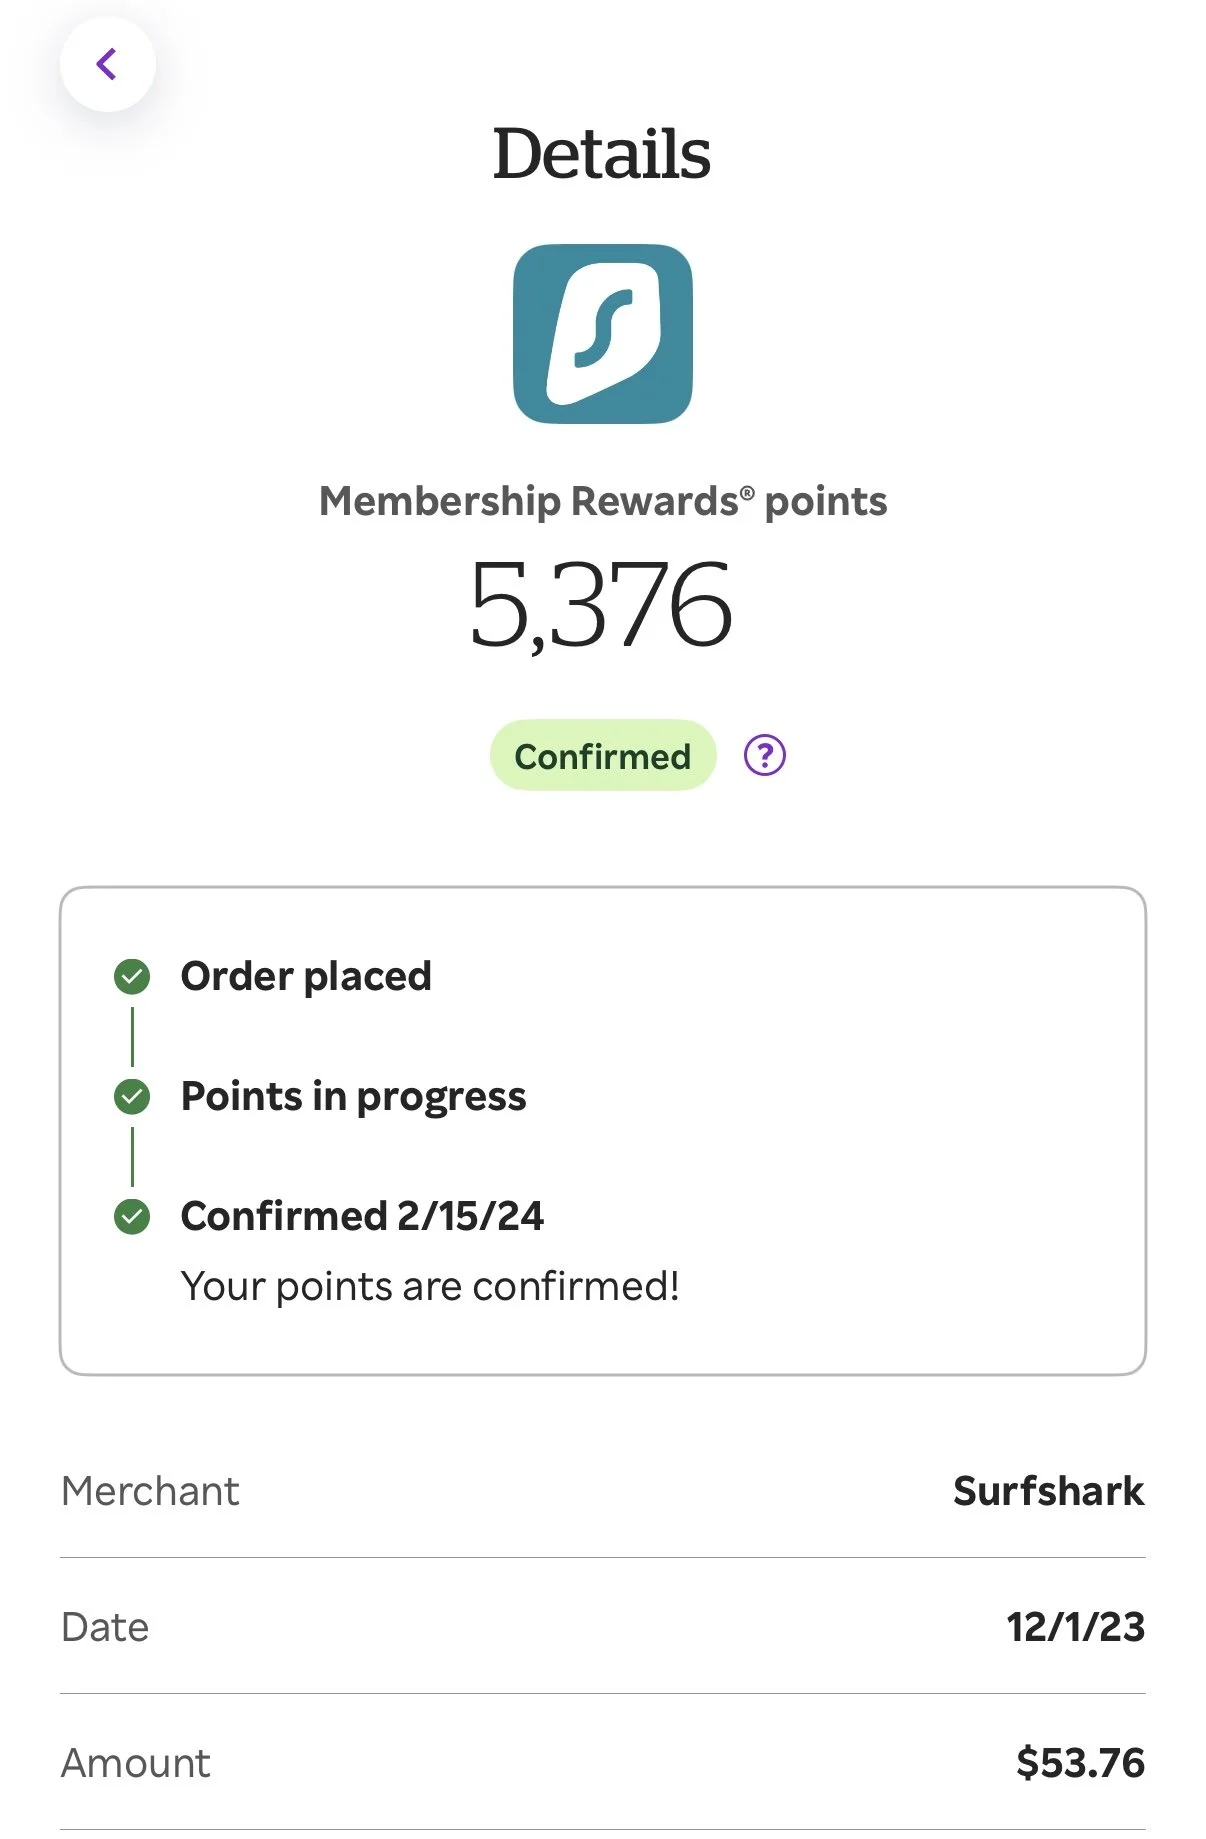
My personal favorite is to get paid in American Express Membership Rewards points, which are redeemable across tons of airline and hotel partners, at a 1:1 transfer ratio (meaning you get 1 Amex point for each Rakuten point). Note that this requires having an Amex account that earns Ultimate Rewards, like the American Express Gold or Platinum credit card.
You can also choose to redeem your Rakuten “cash back” rewards for Bilt points, but starting on May 16, 2026, the transfer ratio decreases to 0.5:1, meaning you’ll need 2 Rakuten points to earn each Bilt point…unless you have Silver, Platinum, or Gold status with Bilt (in which case you keep your 1:1 ratio).
Rewards add up in your Rakuten account until they’re automatically paid out quarterly each February 15th, May 15th, August 15th, and November 15th.

Earn Rewards On Your Next Purchase
To start earning more free points in 10 minutes or less, follow these easy one-time steps:
Register for a free account with Rakuten.
To get 5,000 points FREE for your first purchase, register using this link (click here), or enter my referral code MENDOZ5257 when creating your account.
Then you have a full 90 days to make a purchase of $50+ through Rakuten to claim your free 5,000 points (but only spend on something you were planning to buy anyway, please)!
Optional (but highly encouraged): Add the Rakuten extension to your Chrome browser to activate rewards at a single click and get automatically notified when rewards are available for your purchases.
In your Rakuten account settings, choose how you get paid, and link the relevant account (I suggest American Express Ultimate Rewards points for the greatest flexibility and best value, but you can also choose to link your Bilt account to receive Bilt points).
Then, for each eligible purchase you make, activate Rakuten through the browser extension, app, or website to earn your extra points. As long as Rakuten is activated when you make your purchase with the store, you’ll get the extra “cash back” through Rakuten in your chosen form of free travel points.
Extra Credit
If you stuck around this long for more info on those huge 5,000+ points hauls I mentioned earlier, this is what you’ve been waiting for.
Warning: This pro tip is only for people who are already paying off their credit cards every month, and have a little extra cash they’re willing to spend to earn a huge chunk of extra points. If you’re not currently in a position to increase your spending, do yourself a favor and pretend this section is blank :)
My general rule is to NEVER pay more cash just to get extra points, and most of the time I follow it. But occasionally, a deal comes around on Rakuten that’s too good to pass up.
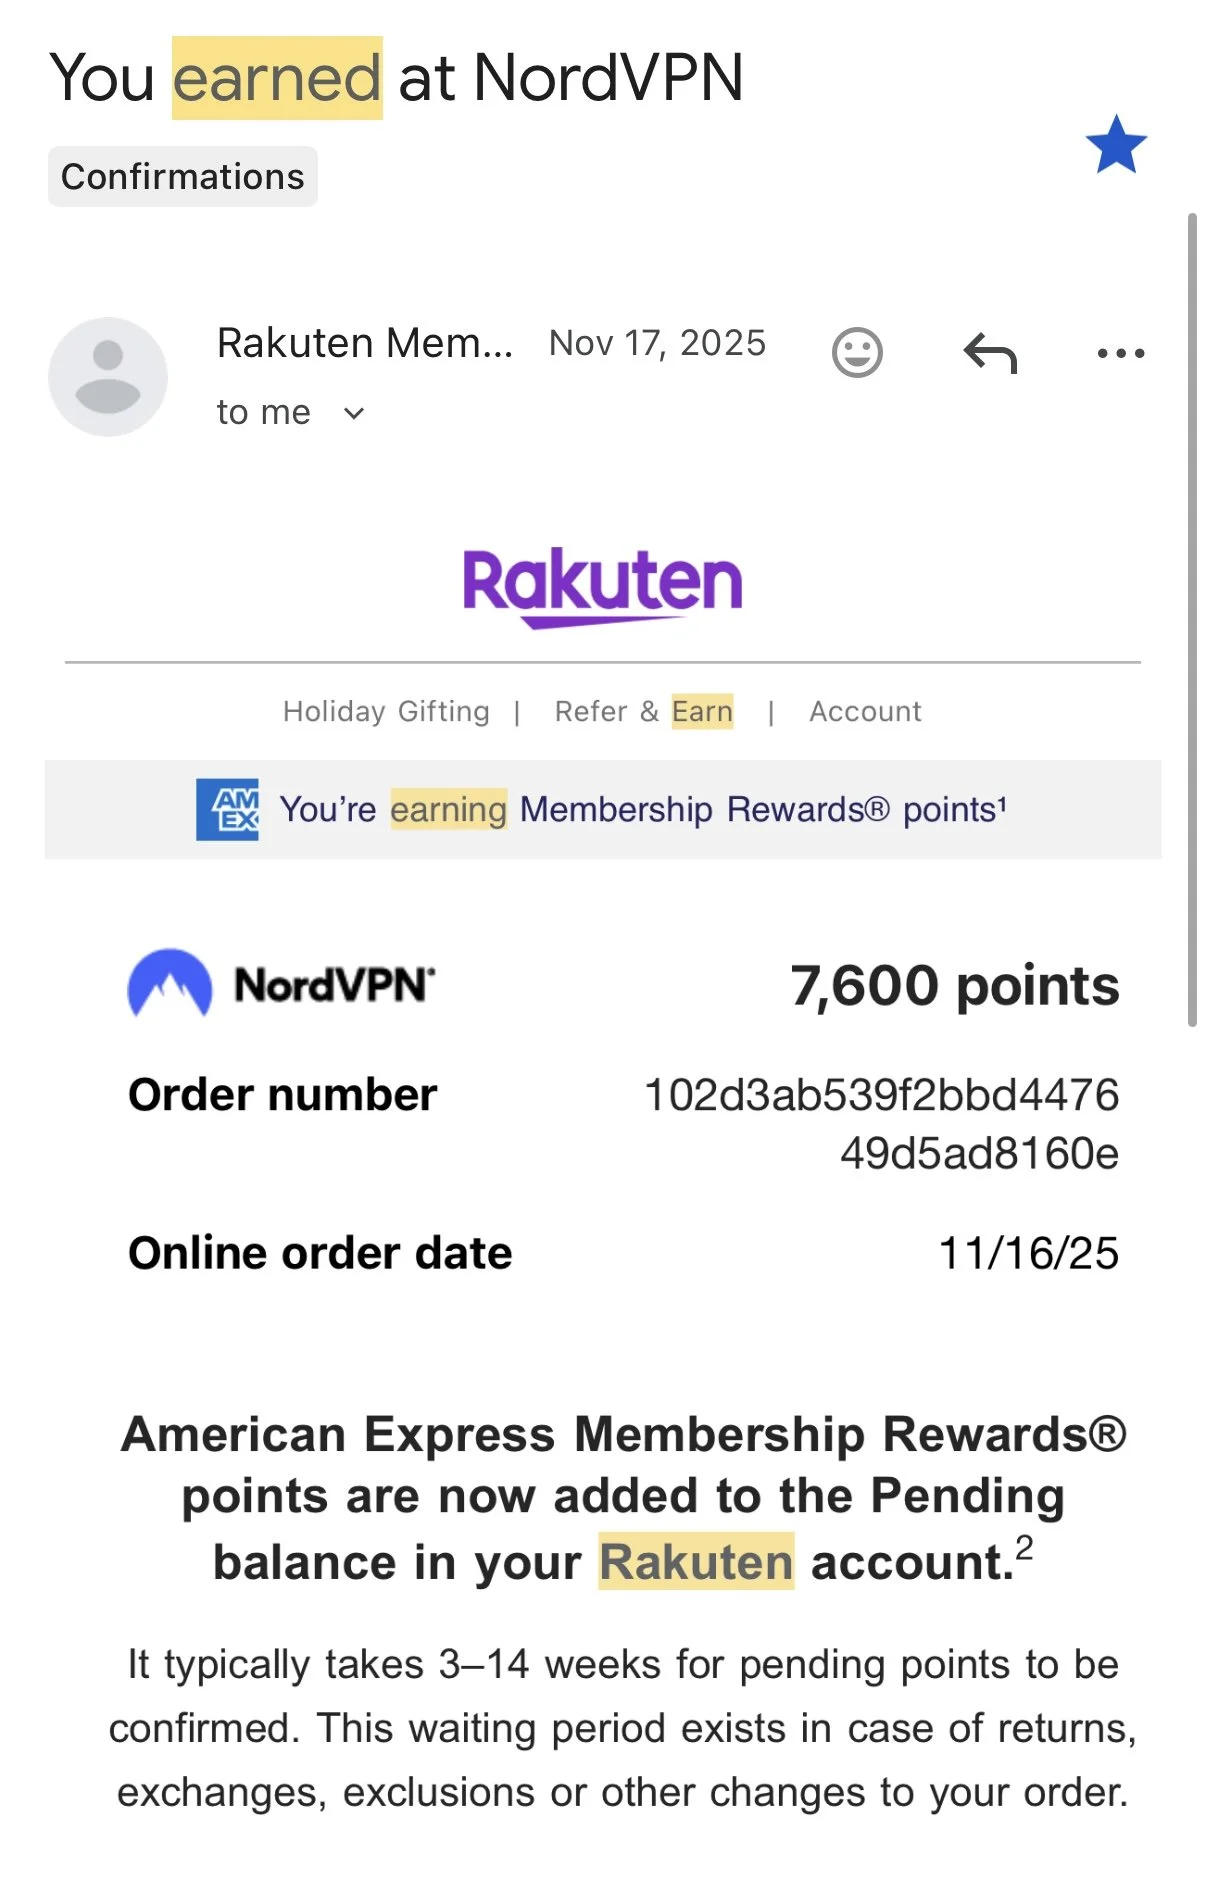
Like earlier this year, when I saw I could get 7,600 points for buying an $80 annual subscription to NordVPN. It turned out my VPN was expiring soon so I needed one anyway, but at $80 for 7,600 points that I can turn into a whole economy flight…I would’ve bought it anyway.
If you want to keep a lookout for insane deals like this one, I suggest following Julia @journeyonpoints on Instagram. She’s how I heard about the NordVPN deal and a couple others I’ve jumped on. Absolutely worth following for her great point finds and breakdowns.
That’s All, Folks!
If you haven’t signed up for Rakuten yet…let’s go! I promise you’ll be so grateful you took 10 minutes right now to set yourself up for a lifetime of free travel.
FINAL FRIENDLY REMINDER: If you don’t have a Rakuten account yet, make sure to sign up using this link! - this will give you a 5,000 points FREE just for signing up (worth $50) and spending your first $50 through the portal in the first 90 days! I’ll also get 5,000 points as a thank you :)
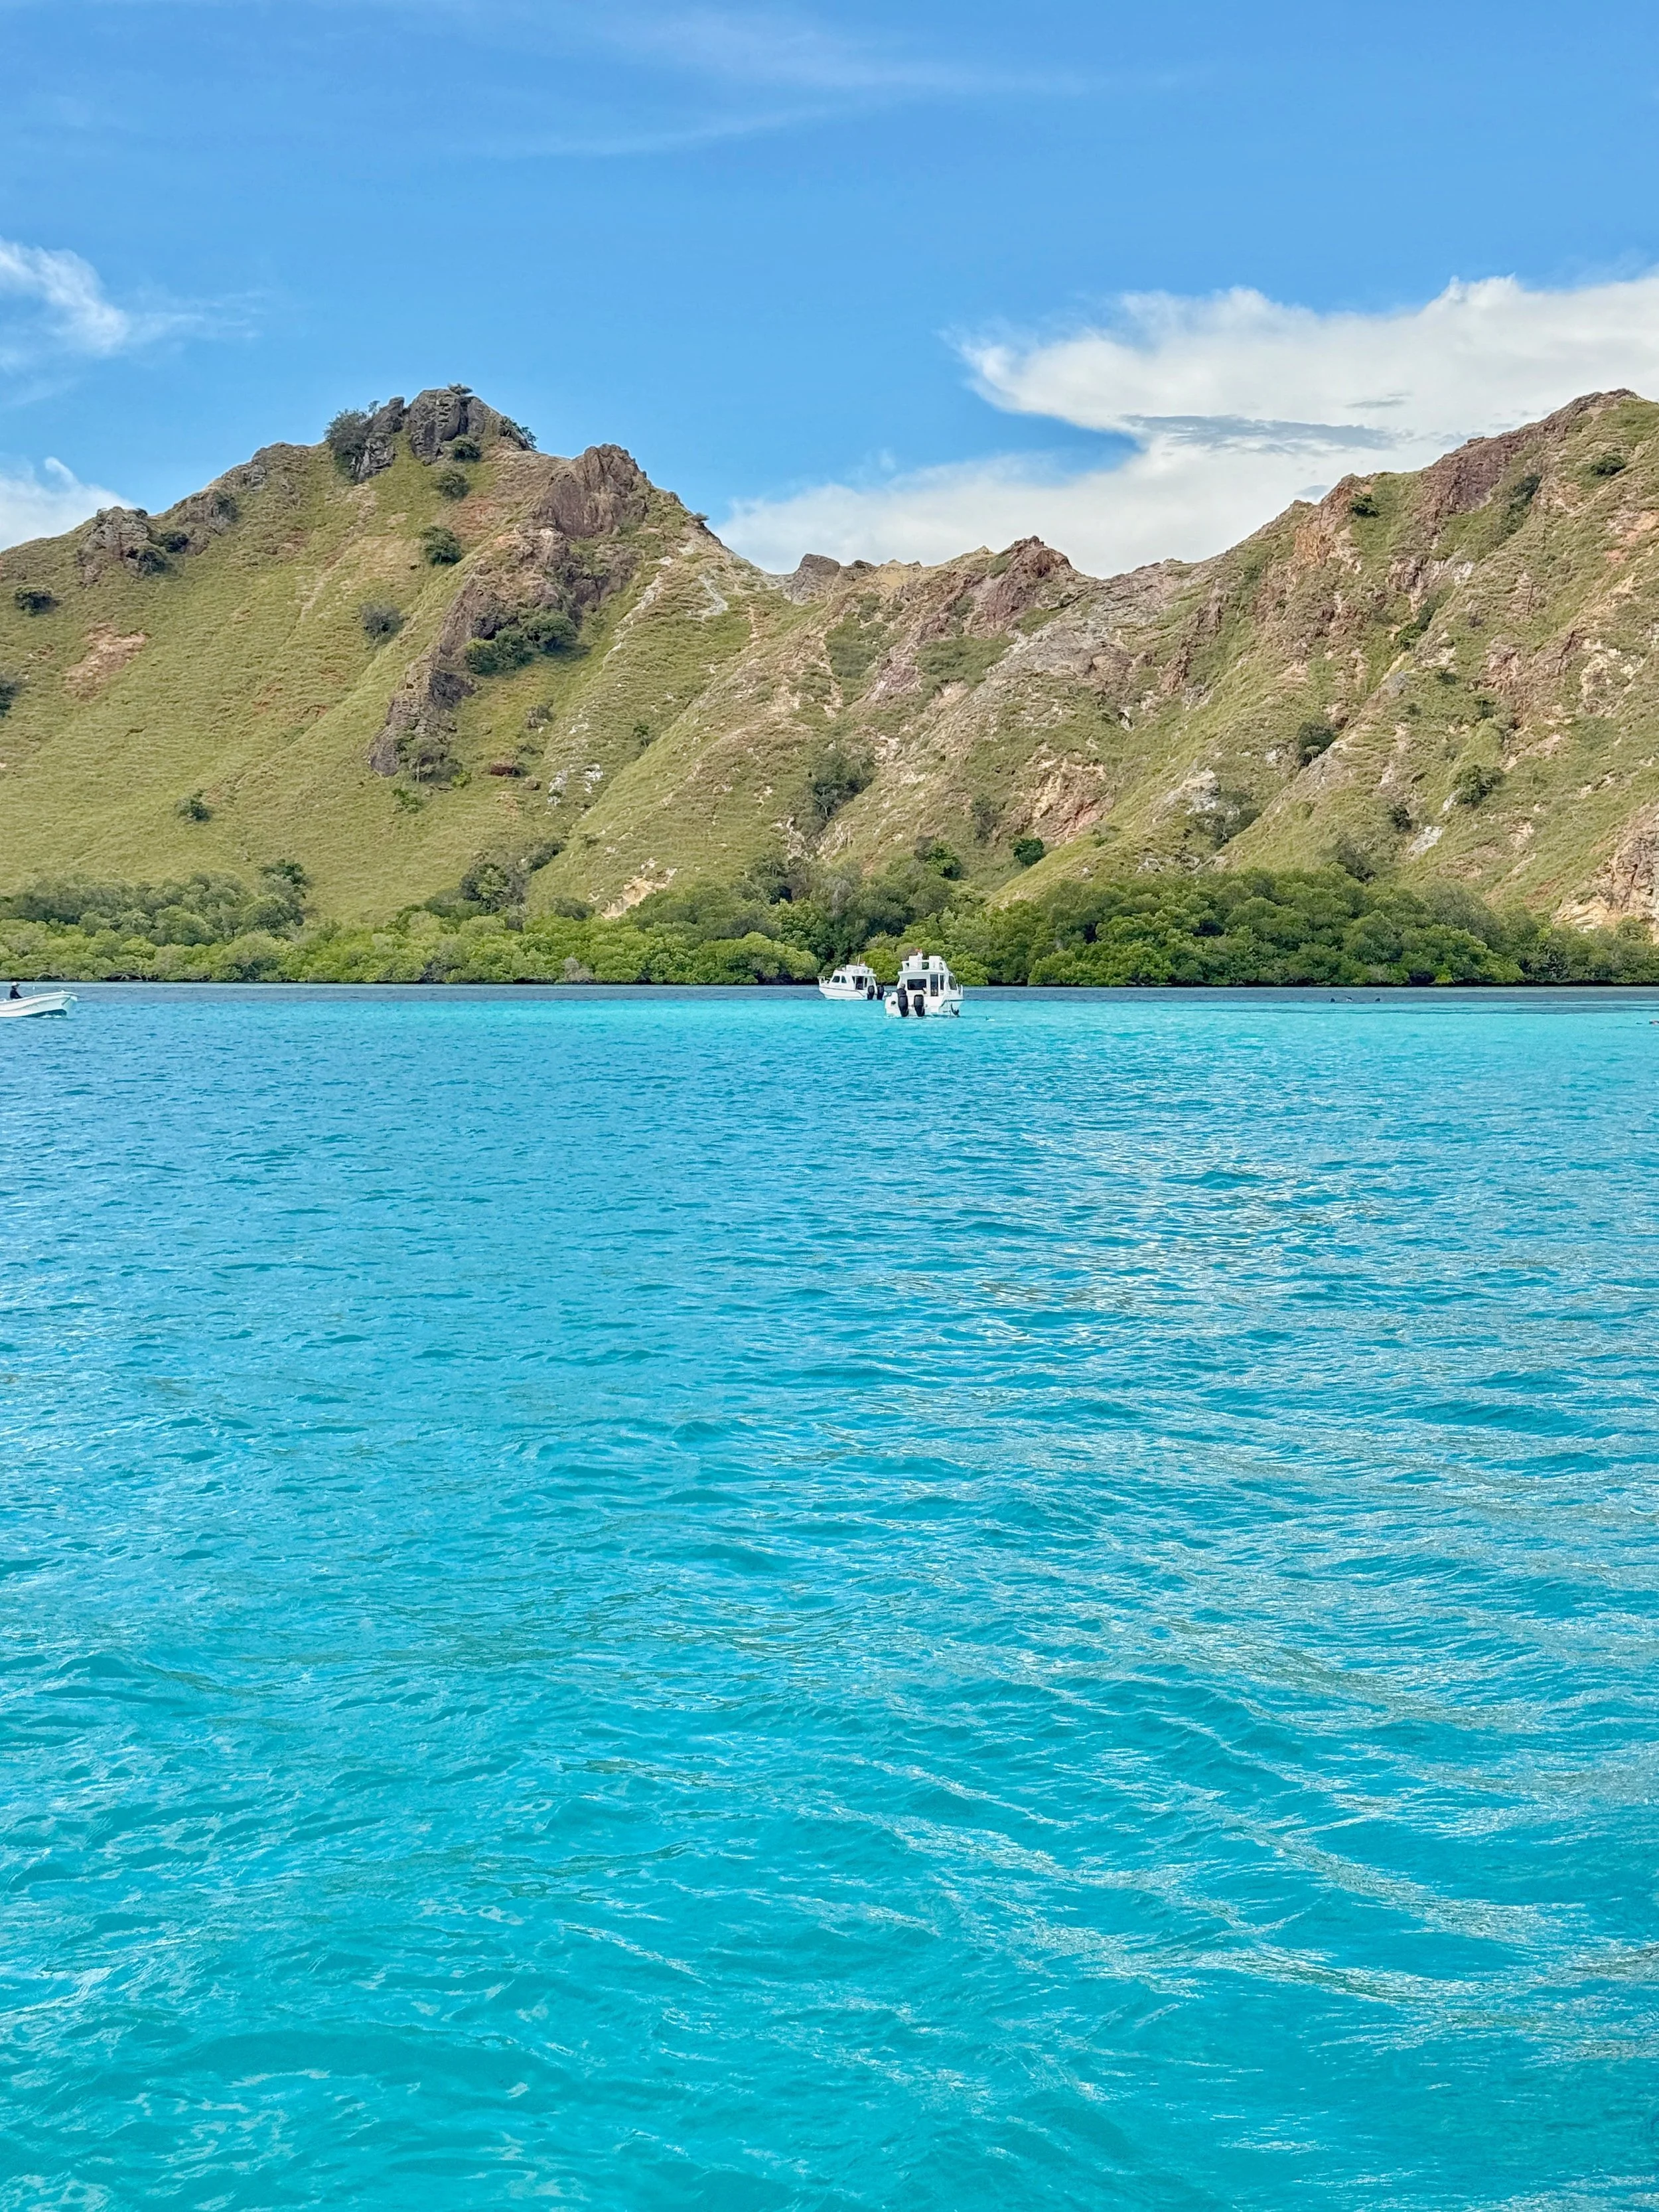
Best Day Ever: Komodo Islands Edition
Deadly dragons, bright pink beaches, lush landscape views, and water in every shade of blue…all in one epic speedboat tour
After 35+ countries, the question I get asked the most is probably about my favorite place or experience abroad. And the answer that first comes to mind is also the day my childhood dream came true.
It started when I’d sit next to my dad as he watched documentaries on the History Channel about the mystical Komodo dragons, the giant lizards on an exotic island across the world, whose single bite can bring about an adult human’s slow agonizing death (admittedly I’ve always been drawn to the macabre 🙈).
Getting to see the dragons IRL last year was obviously a dream come true but…
I had NO idea the kinds of dazzling landscapes and magical nature-moments that also awaited me on my speedboat tour of the Komodo National Park.from a bright pink beach that requires zero filter, to the most shockingly saturated shades of sea blue, to so many animal sightings I can’t even keep them straight (including many dragons!).

The natural landscape of lush green islands emerging from the ocean is even more gorgeous than Bali in my opinion. As in, the definition of “breathtaking.” I was so genuinely overwhelmed with awe that I was happy-crying about 25% of the time.
So if you’ve ever been curious to meet the Komodo dragons yourself, or even if you just appreciate nature and views, this could end up being your Best Day Ever too!
Read on to learn more about my epic speedboat tour through the Komodo Islands and how it’s different from the others in one super-key way (and remember to bookmark this for page your next trip)…
Or click here to skip straight to booking the exact tour I took (in case you have an impulsive side, like me - ha)!
Disclaimer: I paid for this tour in full with my own money, attended as a regular guest, and was not compensated in any way in exchange for expressing my opinions in this article. However, this blog post may contain affiliate links, meaning I may get a small commission if you make a purchase after clicking the link…at zero extra cost to you. I only share things I genuinely love and believe in and think my audience would benefit from too. This is how I’m able to keep making free travel resources and guides for you. Learn more about my affiliate policy here.
Thanks for your continued support!
The Early Bird Catches Everything But Crowds
I did literal hours of research before choosing this tour, and it ultimately won both because of, and in spite of, its early start time. Let me explain…
If it was up to me, it would be straight-up illegal for anything to happen before 10am, but the truth is that this kind of day requires it. So after I made peace with getting up early, what became priority was getting there as early as possible to beat the infamous crowds at the Komodo hotspots…hence, why I chose the Early-Bird Komodo Speedboat Tour (in addition to lots of great reviews).
The earlier-than-most start time meant beating the worst of the crowds, getting better pictures, and enjoying the experience more overall. Plus, was effortless to book online through Viator’s website (they also have an app I use to keep track of all my bookings in one place). And it covered all the major attractions in the area in 1 day, while still leaving plenty of time to enjoy each stop.
You’d think that after all that research, I’d knew what to expect on the tour. And I did. But I had no idea how much reality was about to exceed my expectations.
Sunrise on a Speedboat
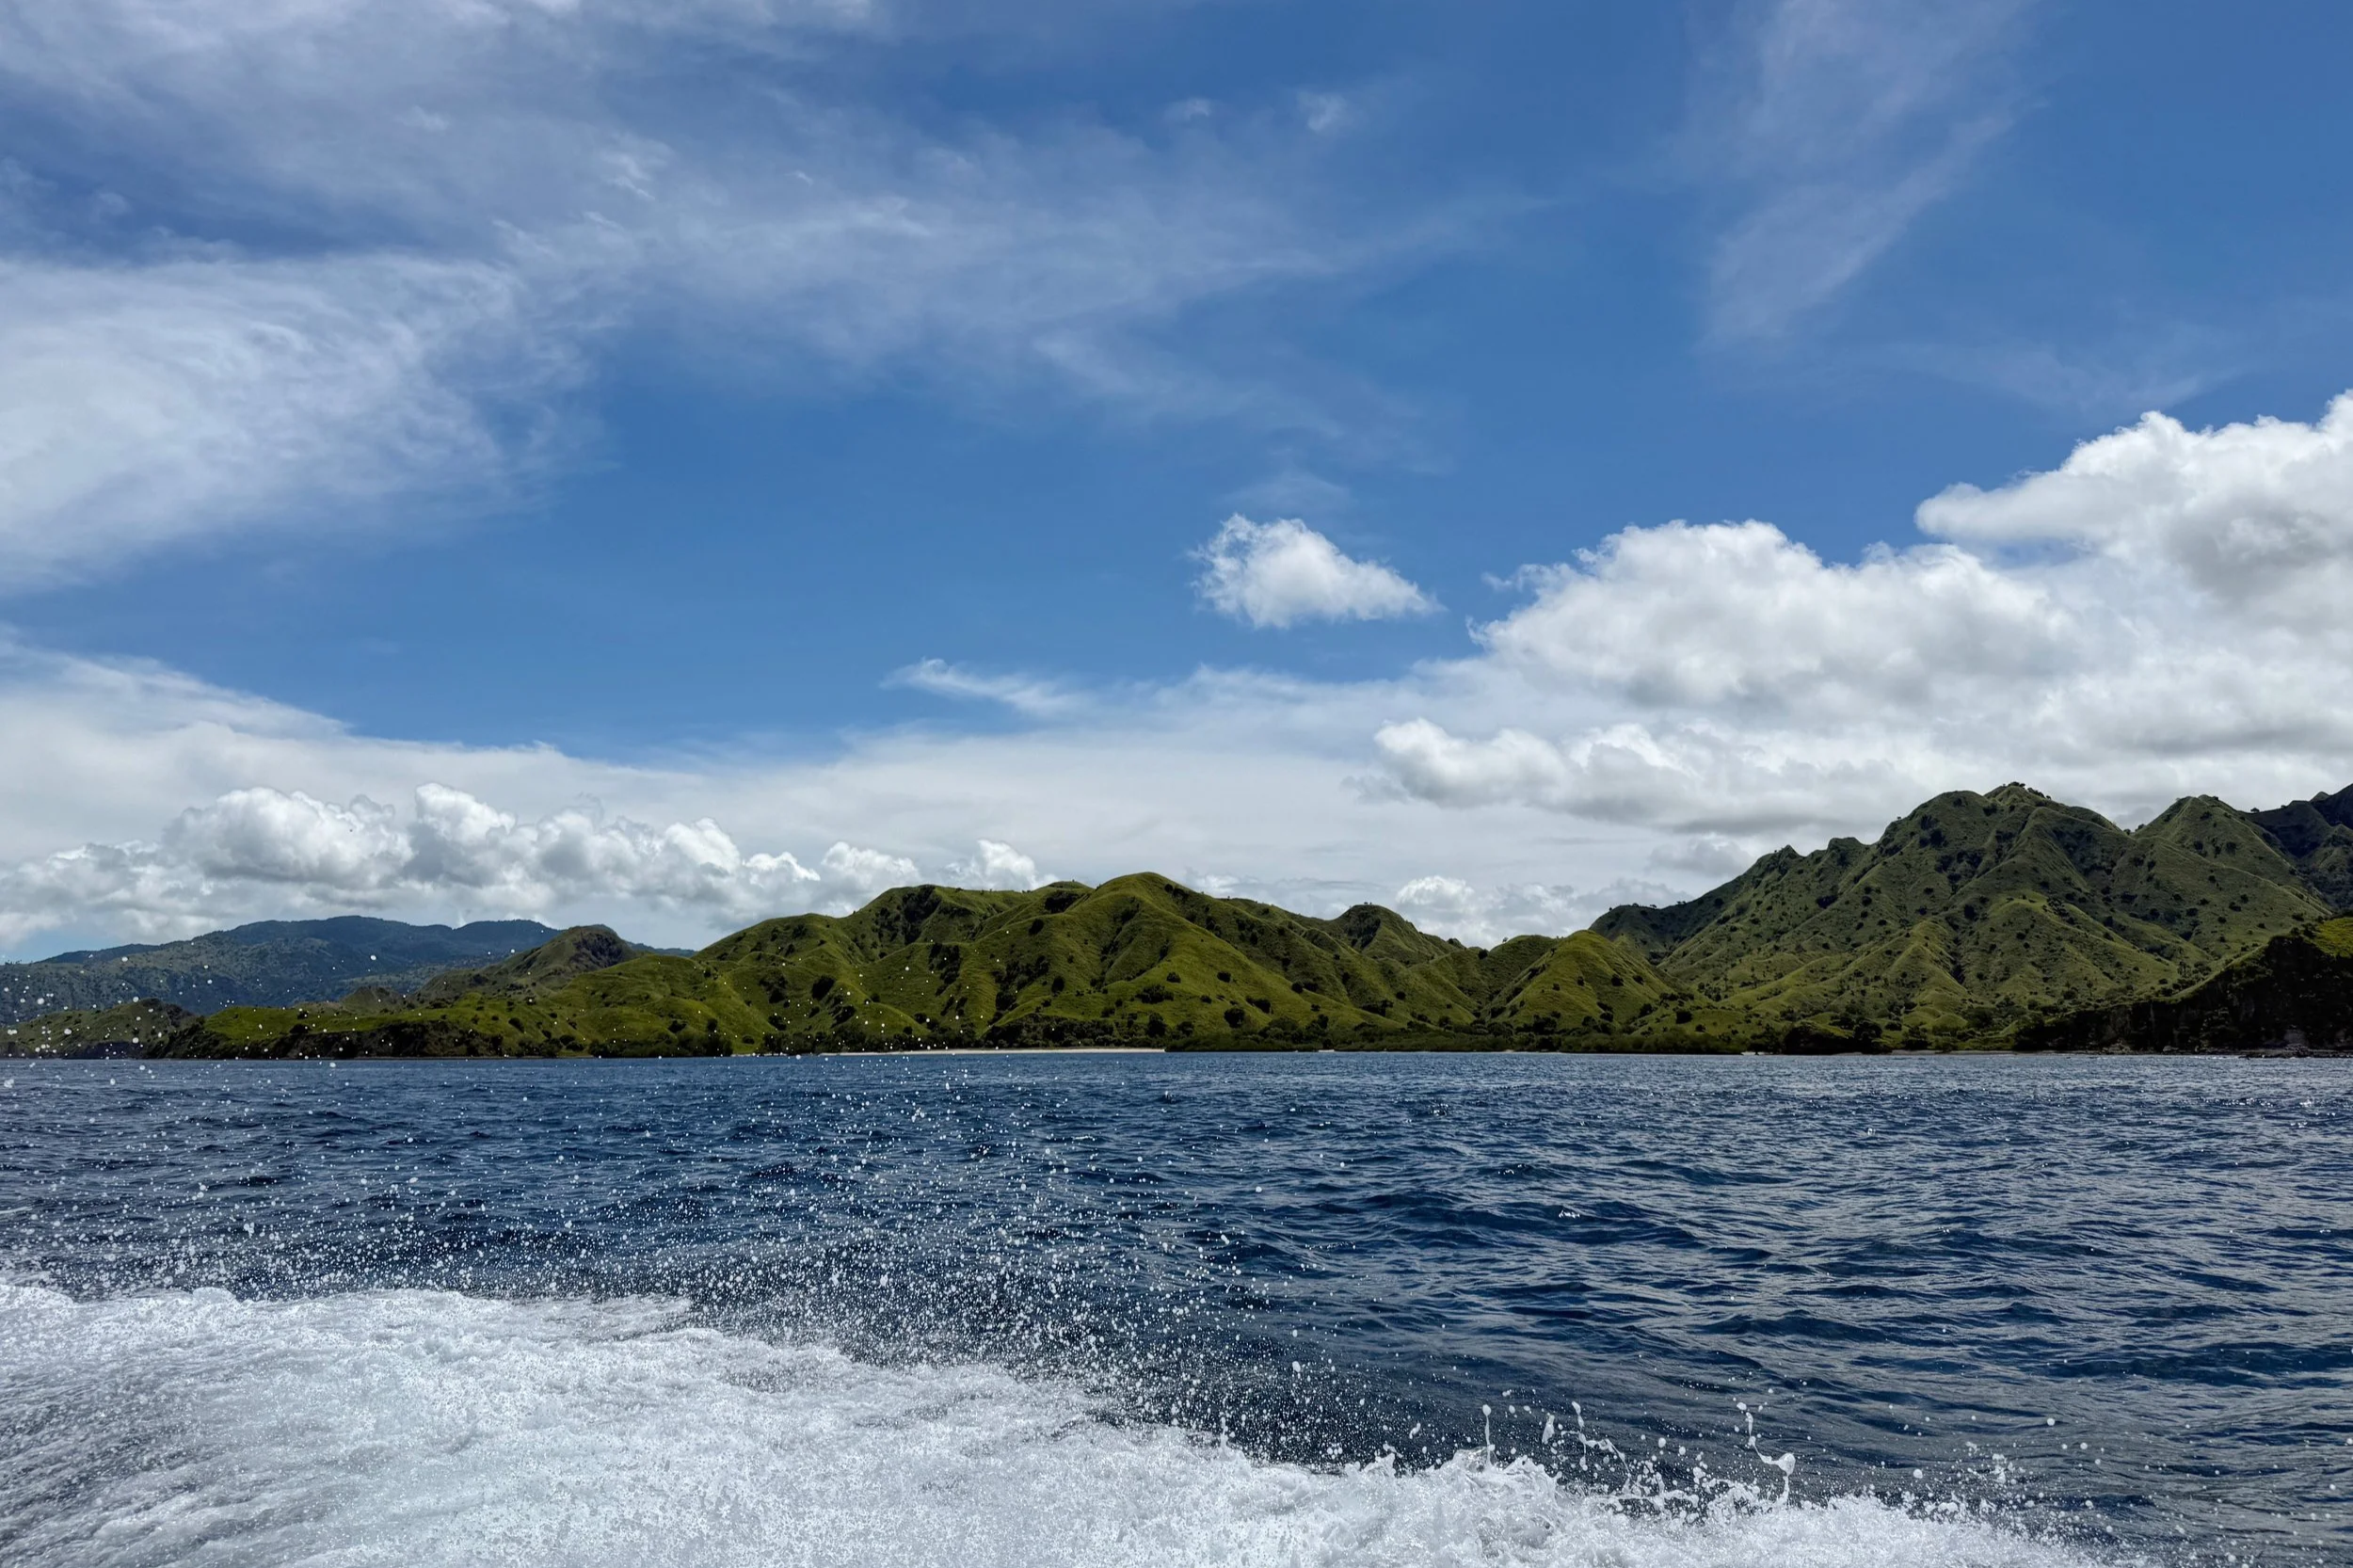
After being picked up at my hotel around 5am, I was driven to the dock, where about 10 people in total boarded our speedboat, along with 3 boat staff. Our boat was one of the first to leave the port, and we got to watch the sun rise behind us as we sped further into the countless bright green islands that make up Komodo National Park.
I remember sitting on the back of the boat, with my airpods blasting appropriately epic music, feeling the rising sun and the salty wind on my face, crying tears of gratitude into my sunglasses.
Everywhere we stopped, we got to enjoy in relative peace, only for the crowds to arrive just as we were leaving. It felt like cheating to have such an objectively better experience solely because we’d arrived 20 minutes earlier but I don’t make the rules, so…
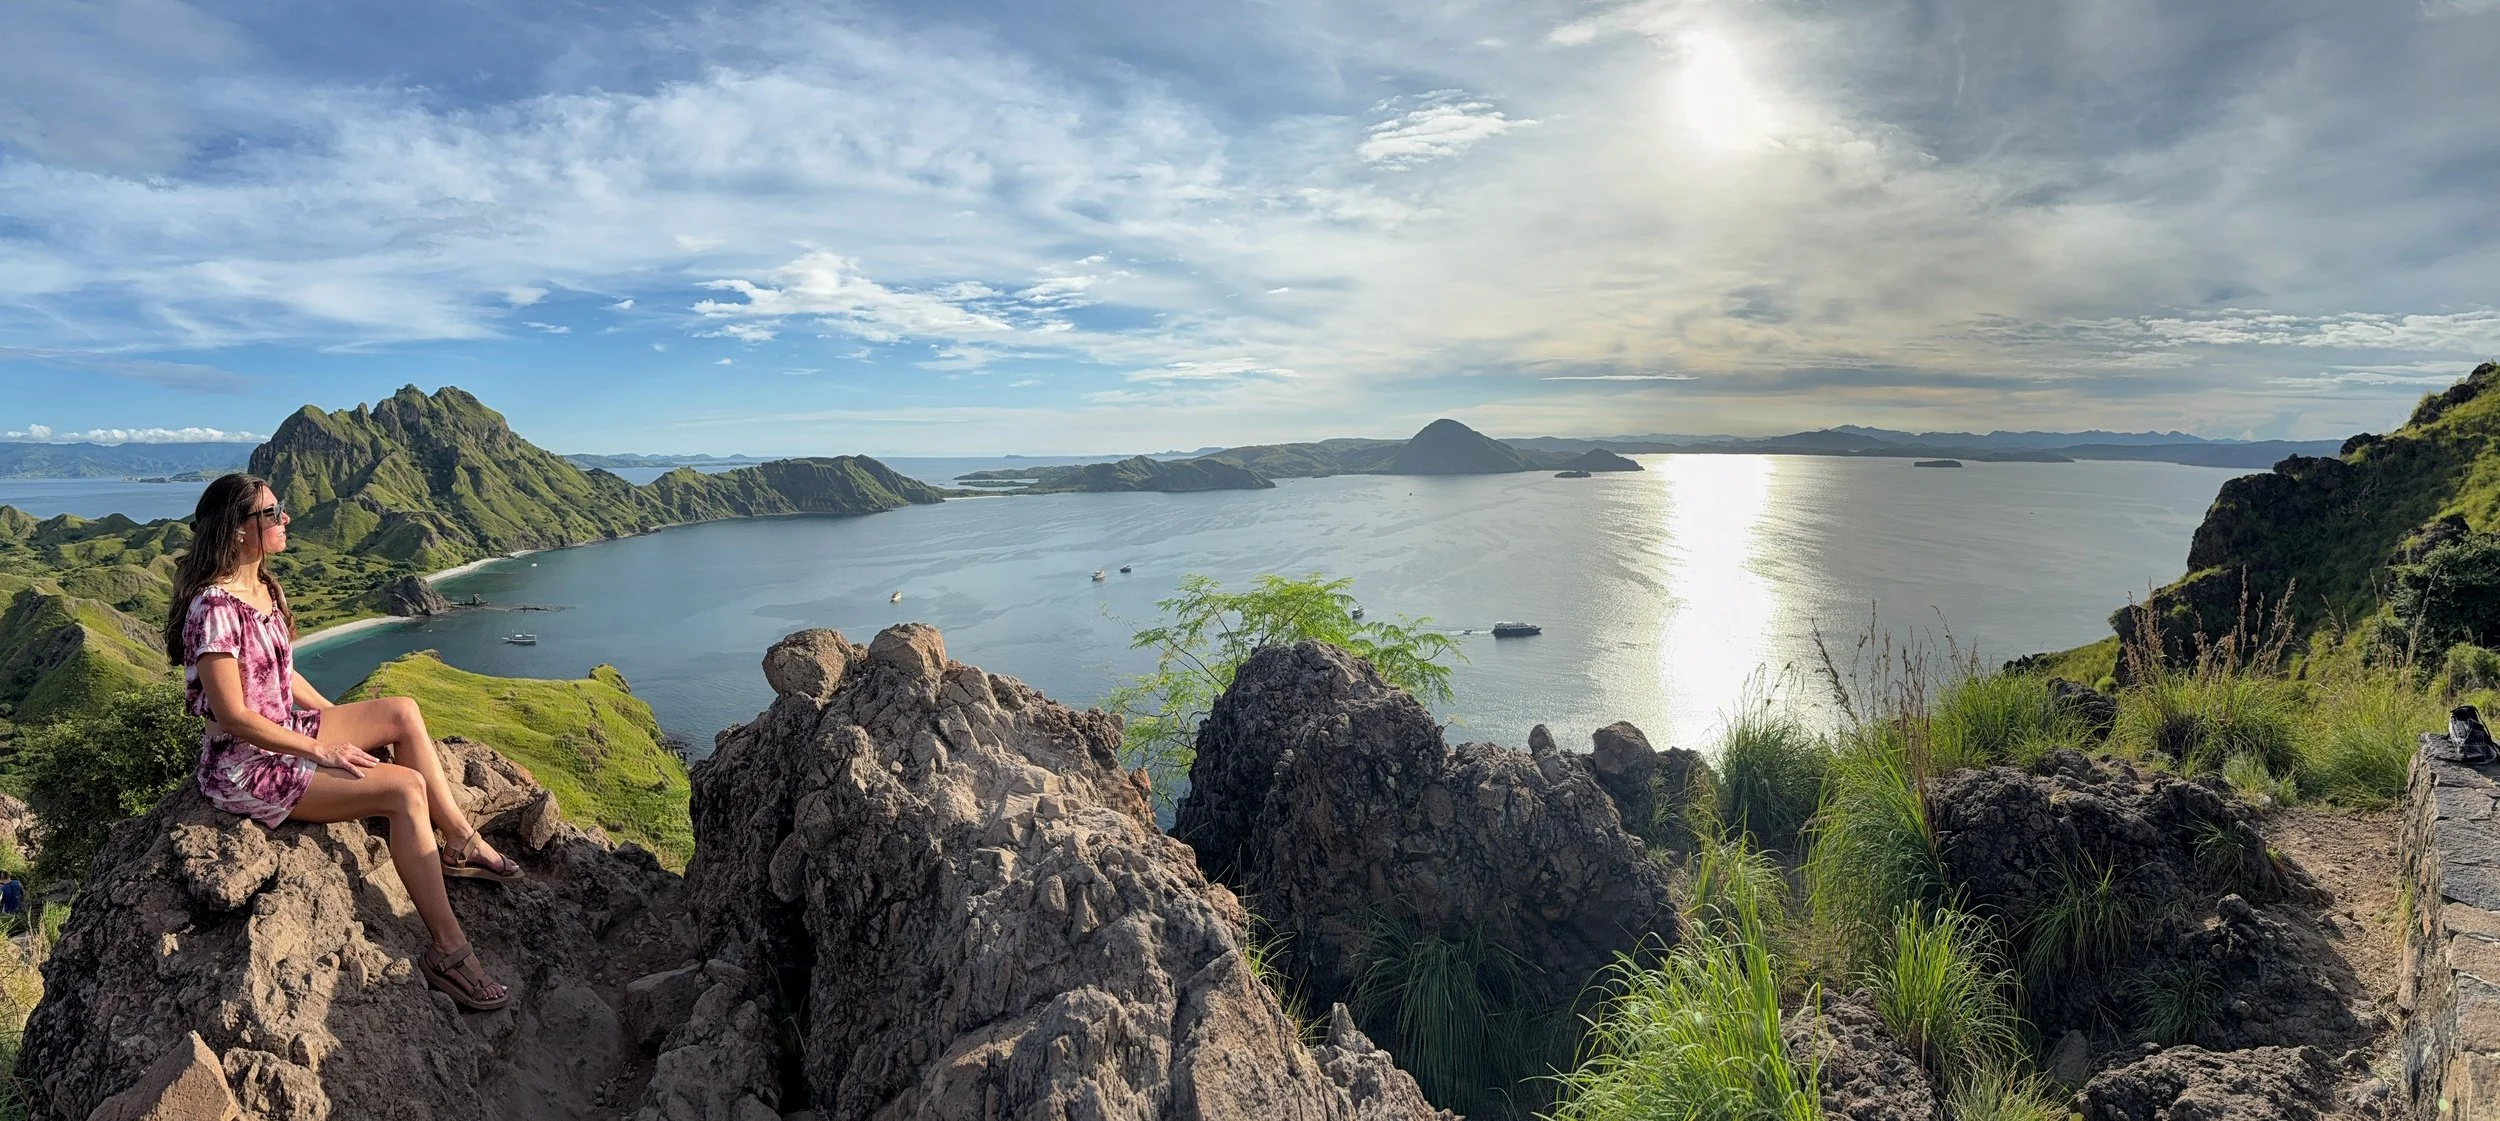
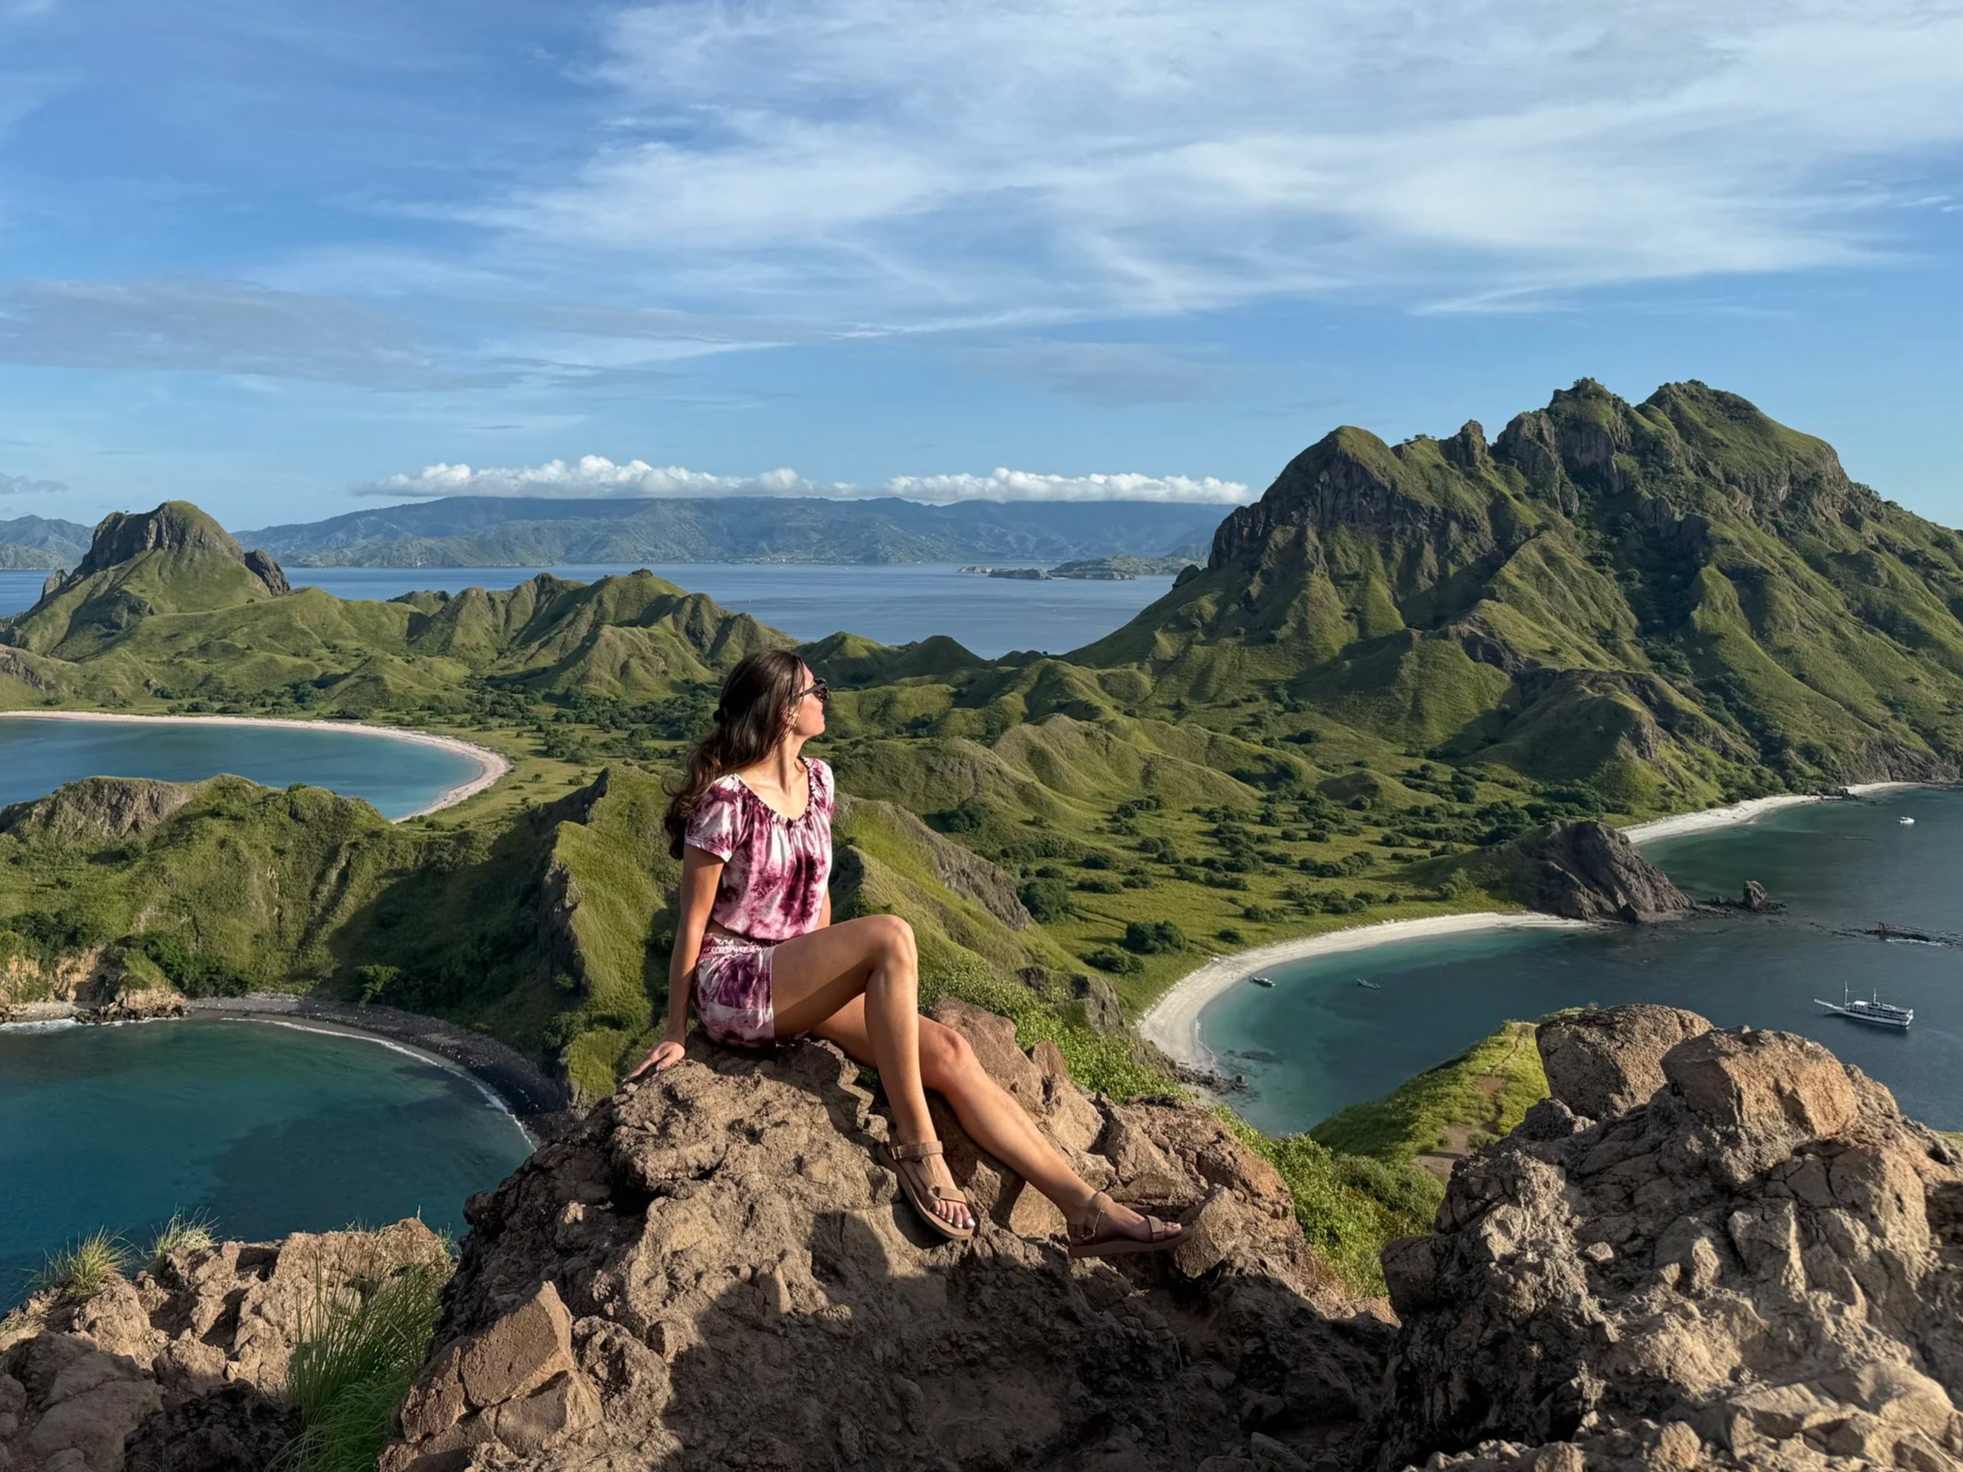
1. Picturesque Padar Island
The first official stop is the one that can get the most crowded, so I was pumped we actually got there on the early side.
Padar Island is a unique island formation known for being aesthetically stunning from the viewpoint at the top. And honestly? It completely blew me away, even having seen tons of photos.
After a short low-key hike (maybe 15 min?), I got tons of photos and videos taken of me by the guides, who were super talented and always around throughout the day to take photos with a smile.
But my favorite part happened while I waited for the rest of the group to take their photos…
A little slice of the viewpoint opened up, and I got to dance to the view of a lifetime while listening to my favorite songs. There’s nothing like the overwhelming joy I felt in that moment, and it’s probably what I’ll be comparing every other travel experience against for a while.
By the time we were pulling out of the dock on the way to our next destination, I was already thinking to myself that this day was already beyond worth it, even if I didn’t get to see anything else. (Yeah, right!)
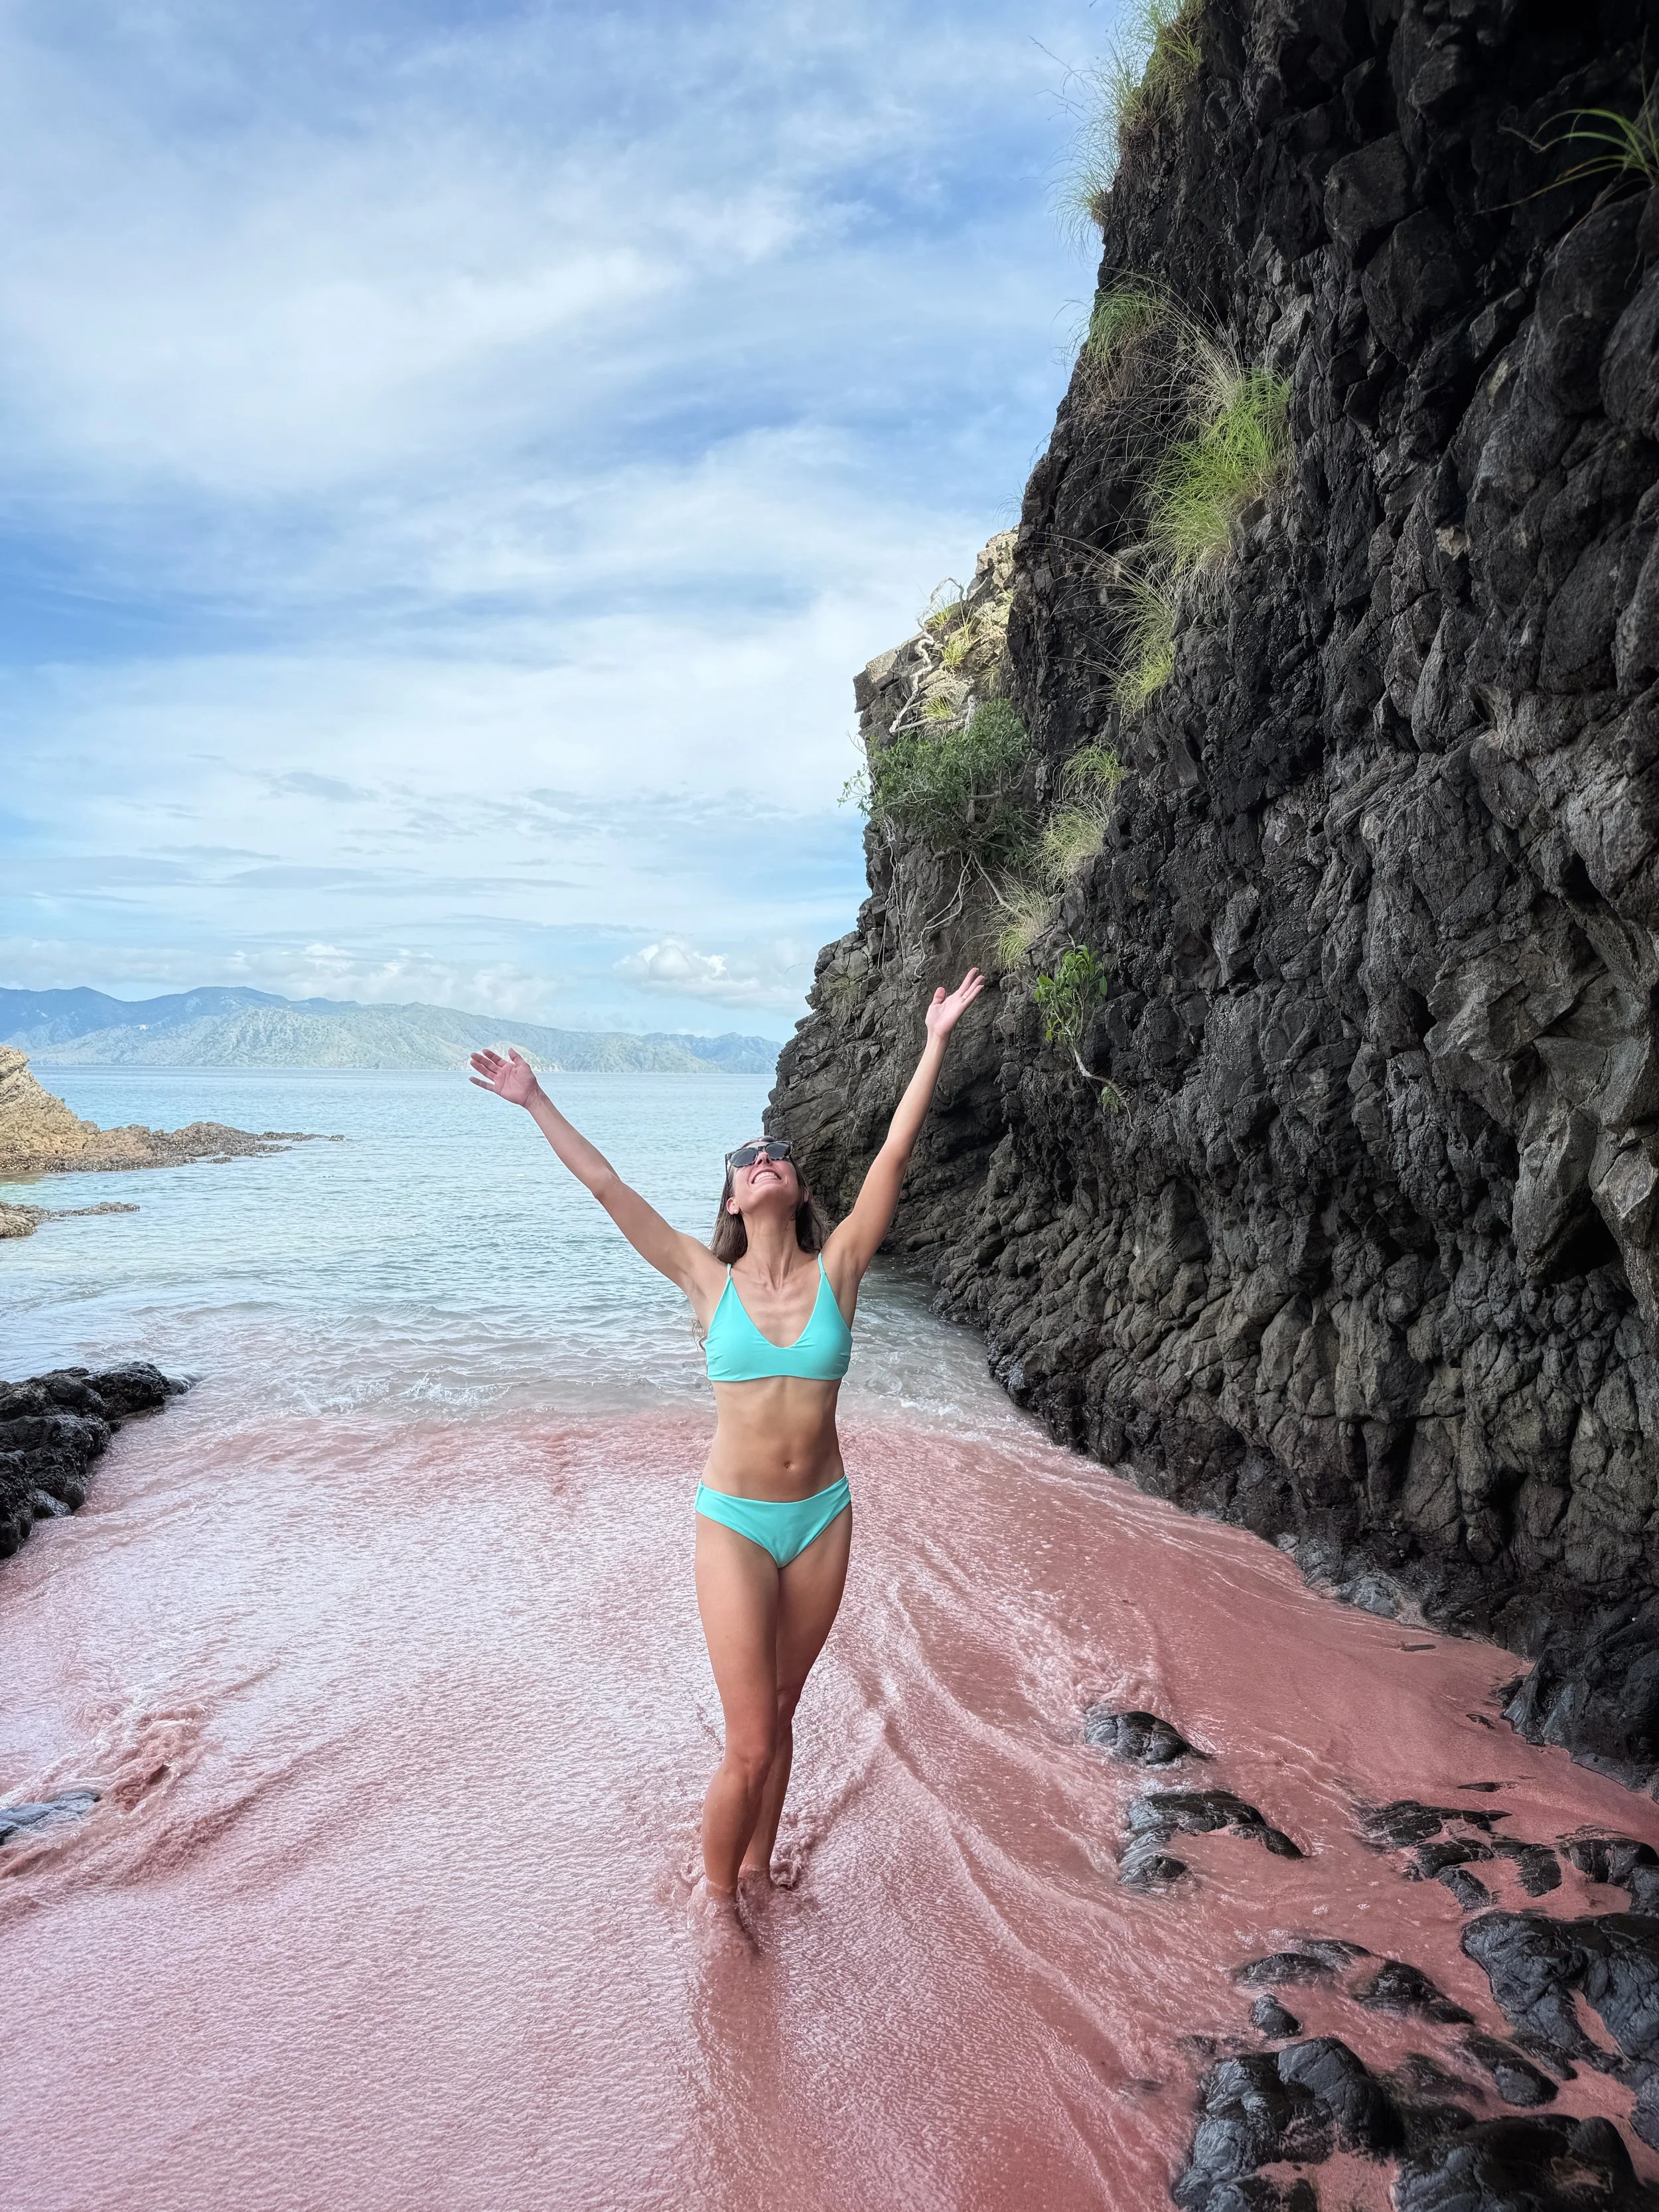
2. Pink Beach
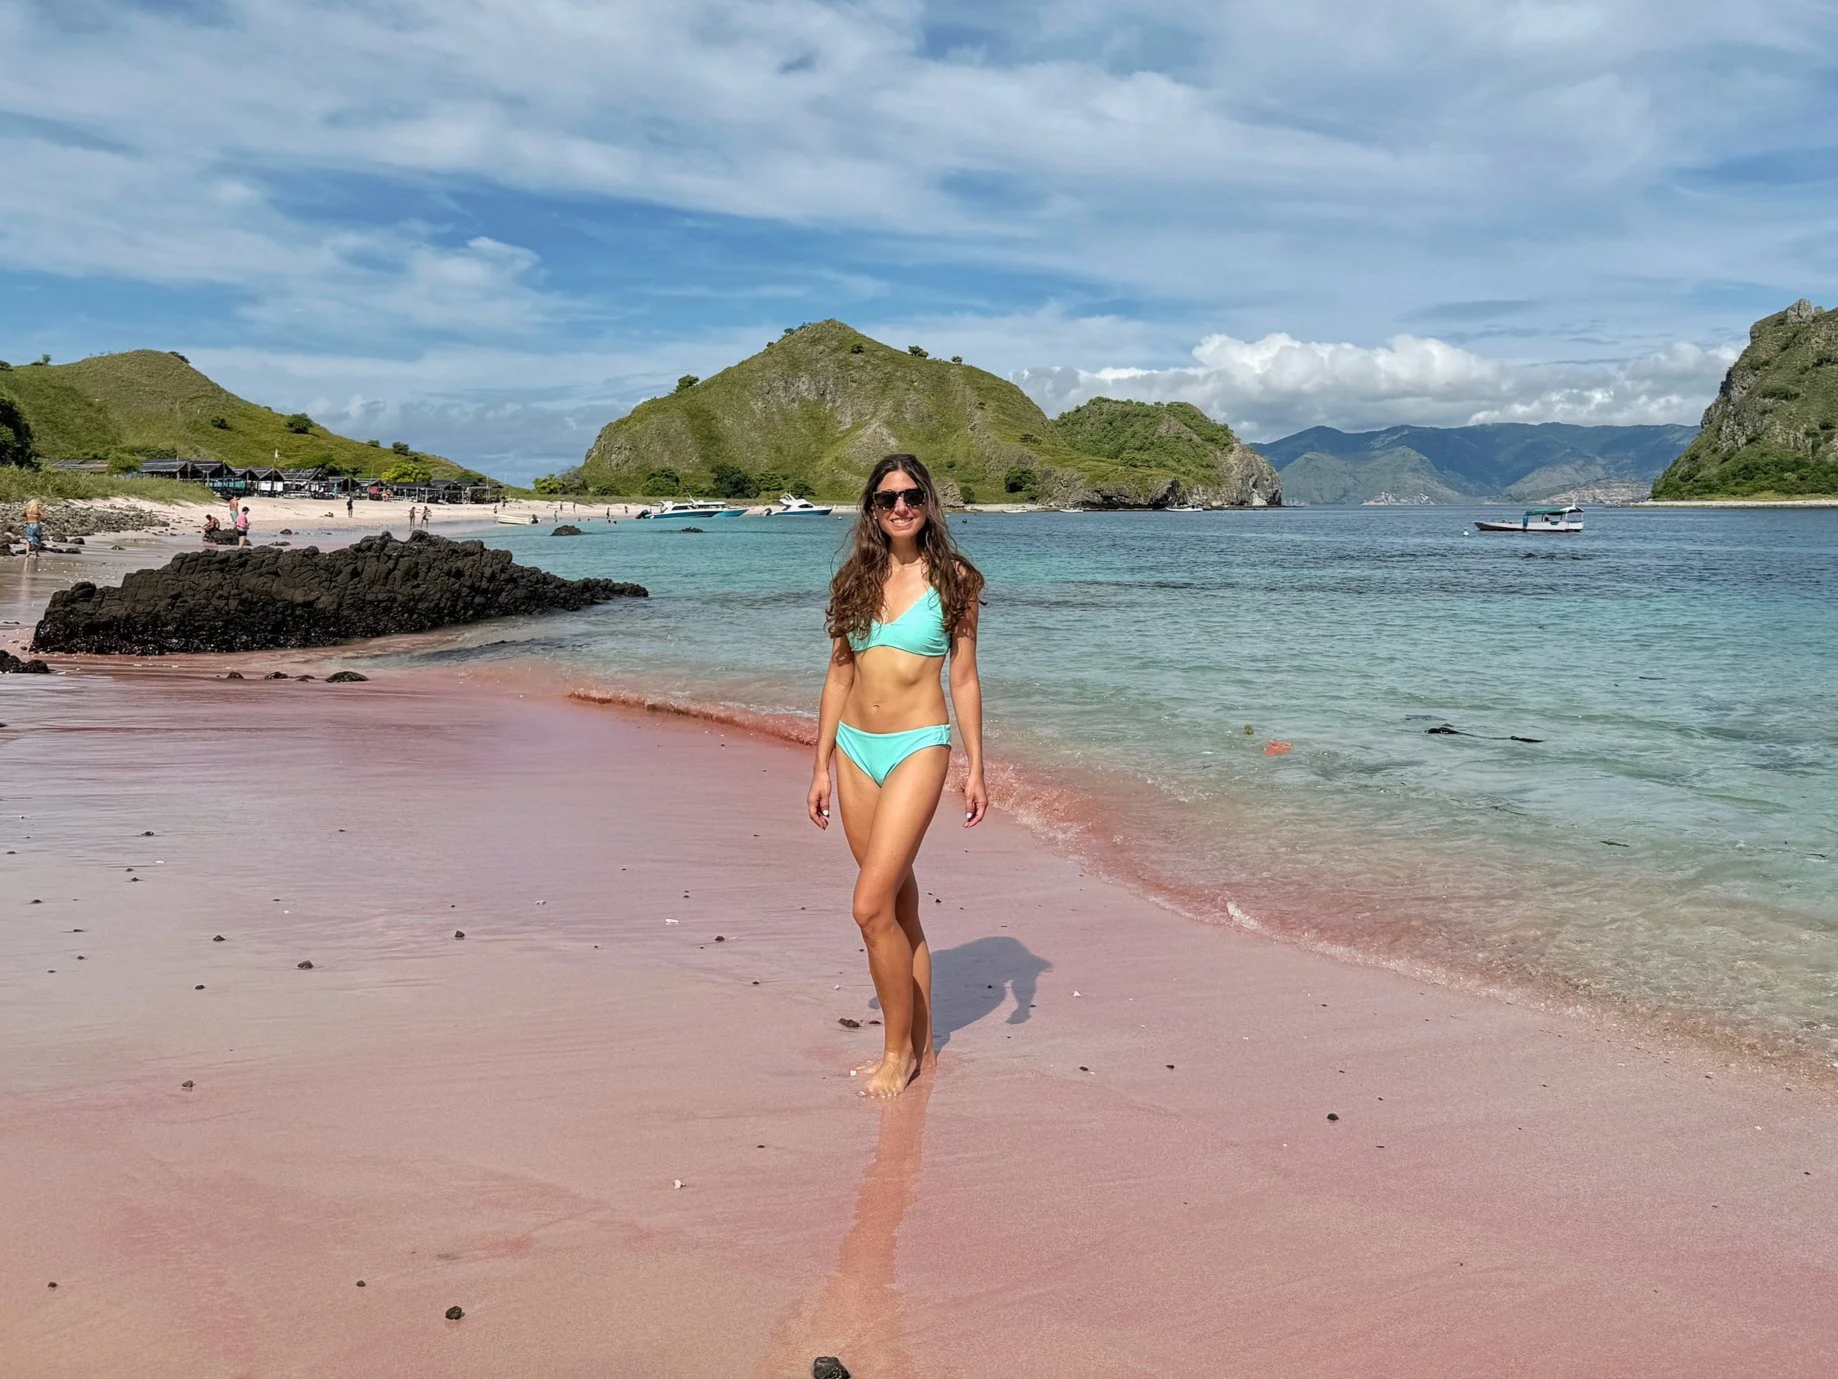
The disappointment hit when we pulled up to the next beach and the captain announced that this was Pink Beach. I mean…sure, it looked kinda pinkish but not the stuff you see on Instagram.
I was already consoling myself with my declaration from moments ago that nothing but Padar Island mattered anyway, when I walked down to the end of the beach. On that side, the sand was so pink I thought I was hallucinating.
After photos, I mostly danced some more and marveled at the insanely saturated landscape, before grabbing a drink at one of the local vendors set up on the beach.
There’s also an option to go snorkeling here if that’s your thing.
3. Komodo Dragons Up Close
Once back on the boat, we sped to Rinca Island (one of only 2 islands that still have Komodo dragons living on them)!
That scene approaching the beach with its never-ending little pier winding into the ocean, and the bright green cliffs towering above us, will be forever etched into my brain. I can still feel the tension and anticipation of that moment…this was finally it! I was actually going to see the rare and majestic Komodo dragons with my own two eyes.
After a short walk, we were introduced to our official Komodo National Park tour guide (apparently, you can’t go into the park without one).
The guide gave us a few tips about how to behave while around the venomous lizards, and we set off on a walk through a jungle area and then along the beach.
The whole way, our guide, armed only with a stick, answered questions and pointed out the dragons along with other animals.
The dragons are really slow-moving during the day so it’s easy to get a close look at them, and we even got to walk up behind one of them for photos that made my family yell at me later for getting too close!
After our mind-blowing nature walk, food was distributed in tupperware and we ate on picnic tables right on the beach. I let them know in advance that I’m vegetarian, and they served me a legitimately delicious and fresh-tasting tofu dish. I’m notoriously picky about food but it totally hit the spot and gave me energy for the snorkeling portion of the day (not that I did any snorkeling 🤭).
I should mention that throughout the day we were constantly offered fruit, water, sodas, and beer from the cooler. So you’ll have plenty of opportunities to grab snacks and drinks before the official lunchtime.
4. The Snorkel Spots
If you didn’t snorkel at Pink Beach, there’s no reason to despair because there are plenty of opportunities to do that at the end of the tour.
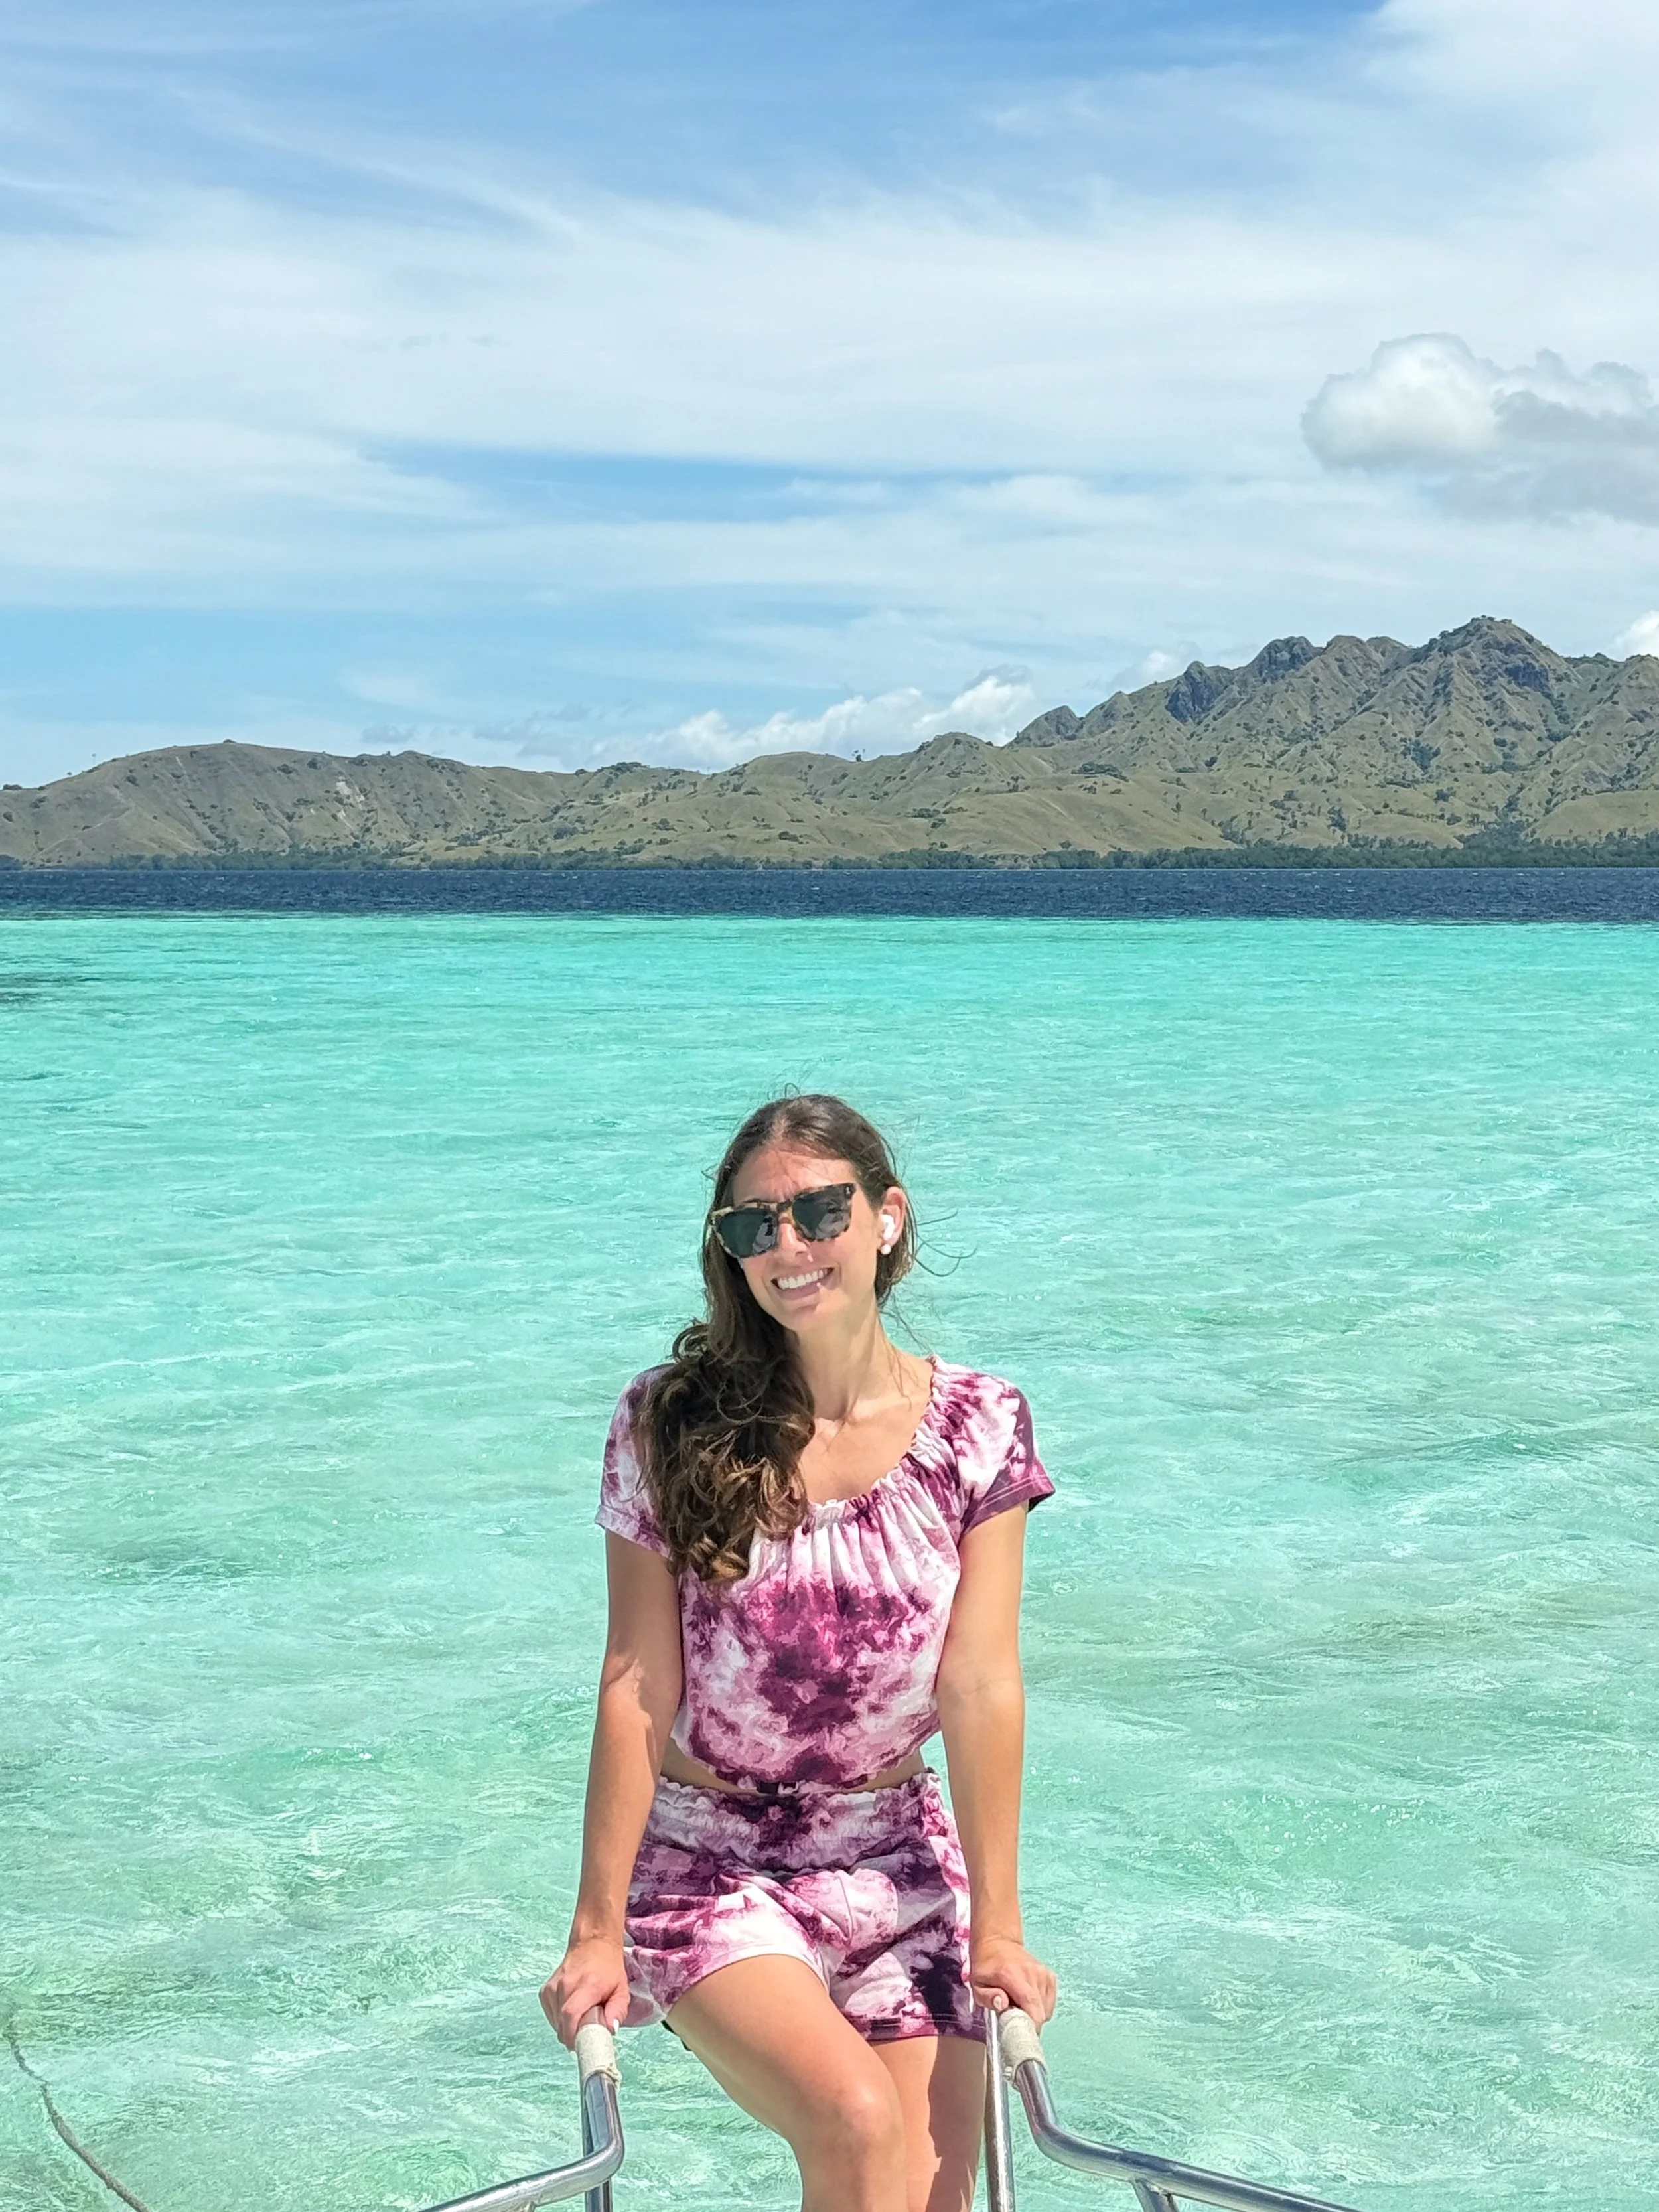
There are 3 different snorkel spots…one with insanely clear light blue water and baby sharks, one with tons of giant mantas, and one with turtles.
All of the spots had crystal-clear water in all different shades of blue, and each spot was backdropped by those iconic lush island peaks.
I’m not into snorkeling but I was perfectly content to relax, decompress from the morning’s activities, get some more photos, and take in the views from the roof of the boat (you can also grab shade in the small boat cabin).
By the time I got dropped off at my hotel, I was exhausted in the best possible way. And thus, the Best Day Ever ended with a cozy dinner at my hotel restaurant, while watching the sun setting over the same islands I’d just spent the day exploring.
Borrow My Best Day Ever
You can book the exact tour I took here:
Pssst…Remember to activate Rakuten before booking tours on Viator so you don’t miss out on FREE points!
If you’re not already familiar with Rakuten, you NEED to know about it. Rakuten is my #1 favorite (and FREE!) way to multiply the points I earn on my normal spending, and it’s the first recommendation I make to anyone who wants to start earning extra points without extra spending.
You just activate the plug-in on your Chrome browser one time, and from then on it’ll alert you if whatever “store” you’re shopping at online is eligible for rewards (including Viator). It also works through the phone app…you just have to be a little more intentional about activating it each time you’re about to book.
As long as Rakuten is activated when you make your purchase with the store (in this case, Viator), you get the extra “cash back” through Rakuten (paid out quarterly), which you can then turn into points.
Viator usually offers at least 5X points through Rakuten, and I’ve seen as high as 16X! That’s essentially 5-10 points PER DOLLAR spent.
And that’s on top of any points you earn directly through your credit card for that booking!
The best part is the options you have for what to do with the “cash back” you earn through the app! The actual cash back option is great, but if you have American Express points, this is an amazing way to accumulate them quickly. And now you can also choose to earn Bilt points (just at a less valuable conversion rate than AmEx points).
IMPORTANT: If you don’t have a Rakuten account yet, make sure to sign up using this link! - this will give you a 5,000 points FREE just for signing up (worth $50) and spending your first $50 through the portal in the first 90 days (but only spend on something you were planning to buy anyway, please)!

Where to Stay for Your Komodo National Park Trip
If you’re interested to stay where I did, my hotel (Bintang Flores Hotel) is another part of the trip I’d recommend without hesitation.
Fabulous views from the rooms, and it’s set right on a stunning little beach that legitimately glows at sunset. The food was surprisingly good too (though ordering in via Gojek or Grab is also an option).
Also, the price was shockingly reasonable for the value at $89 per night when I booked it in April 2025.
It’s located in Labuan Bajo, Flores (the town that acts as the main base of operations for Komodo National Park visits).

Looking for other cool Komodo-area experiences?
If the speedboat’s the very 1st tour to book for your adventure, then the “Flying Foxes” is #2.
This PRIVATE small-boat tour to watch thousands of giant fruit bats take off from Kalong Island at sunset was another one of my lifetime favorite experiences. Just like with the speedboat tour, it started just a tiny bit earlier than the rest, which got us a front-row view of the mangroves, where the bats put on their show.
One of my favorite parts of this was departing from the local port town nearby, which still feels authentic and is apparently so unused to tourists that a couple of the local ladies asked to take a photo with me :)
I also really appreciated getting to watch the whole spectacle while laying comfortably on the roof of the boat with nothing to block the view, while getting to know my golden-hearted guide, Chan. Chan' has now launched his own tour company and I couldn’t recommend his services enough. You can also book the same tour through Viator (like I did).
Note: Whether to book directly or with a third-party booking service is just a personal decision for you to make based on your circumstances. Usually, you can get the same tours online that you find locally (though at different prices). Local tour guides + operators always appreciate you booking directly because they get paid more overall when they don’t have to pay commission to a third-party booking site like Viator (and these are often better-priced)! But using Viator makes it easy to track bookings, and also has a certain layer of accountability built in for safety/quality. So do whatever feels right for you!
I booked through Viator since I didn’t have a local contact, but in the future I’ll book with Chan directly.
Protect Your Gut, Sleep Schedule, and Nervous System on Long-Distance Flights By Following These 7 Simple Rules BEFORE Booking
Use my tried-and-tested hacks to design bearable long-haul flights that won’t leave you wrecked (even in economy class)
How to Design Long-Haul Flights That Fly By…Even In Economy Class
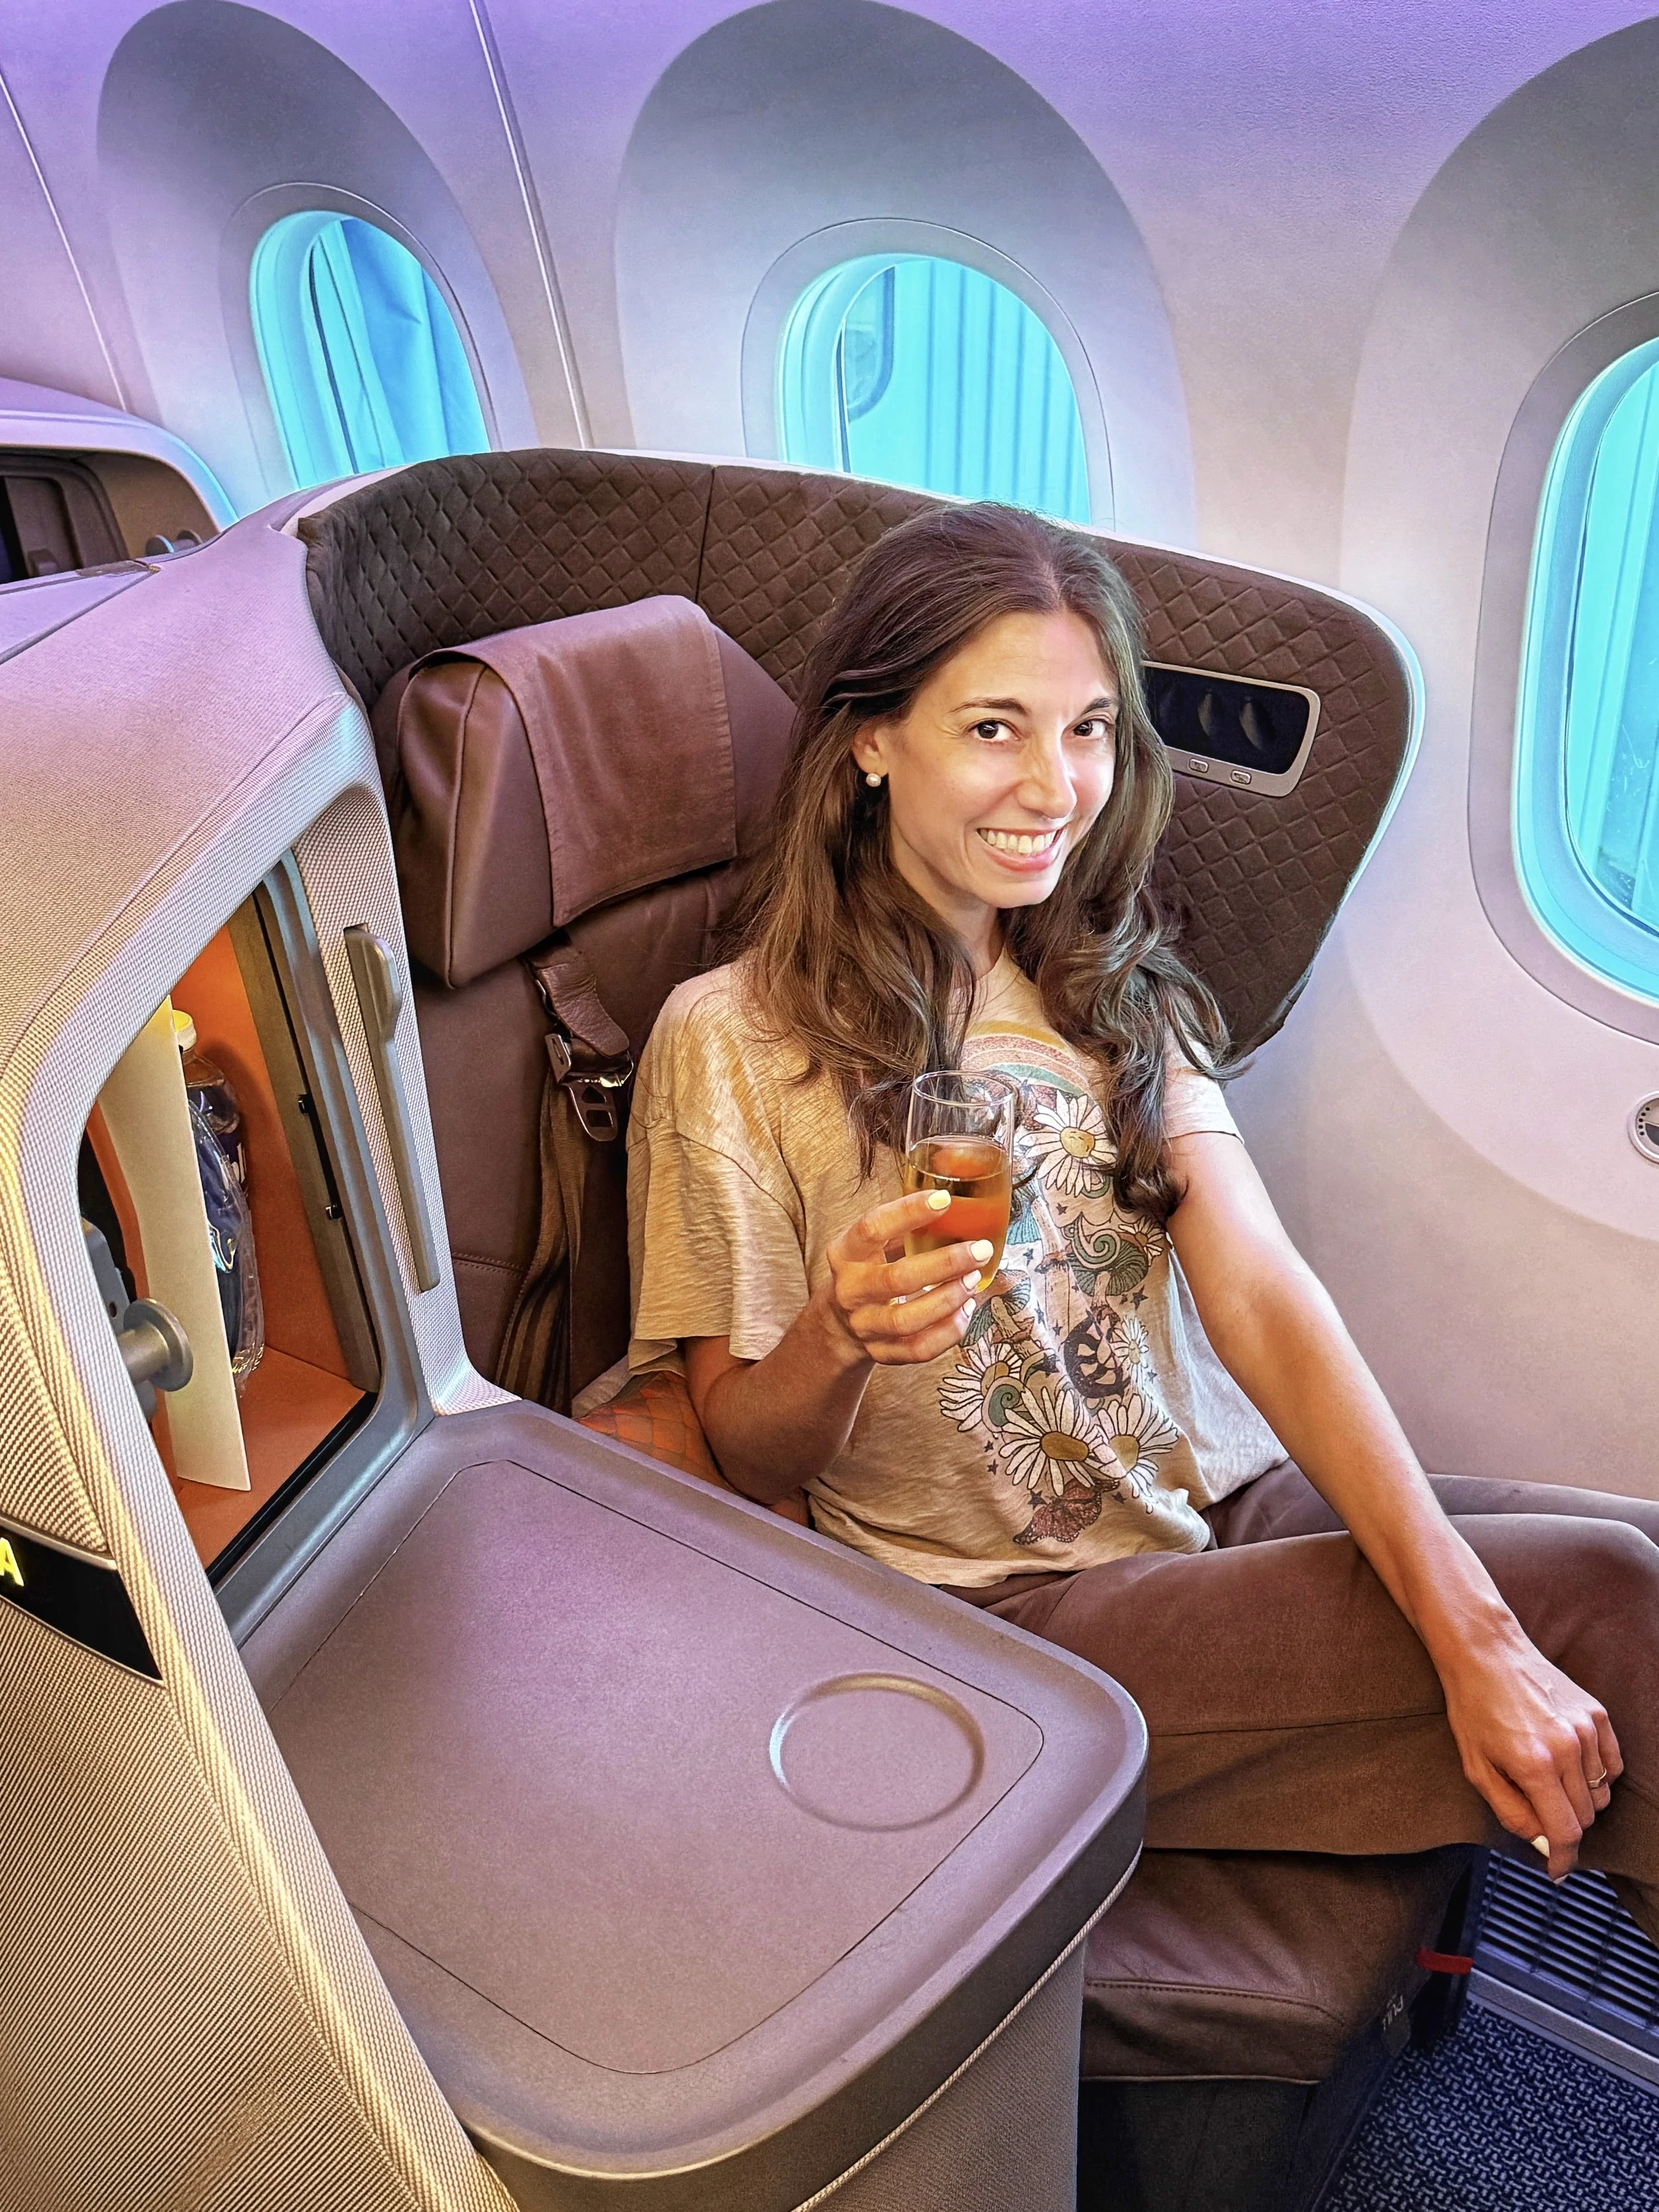
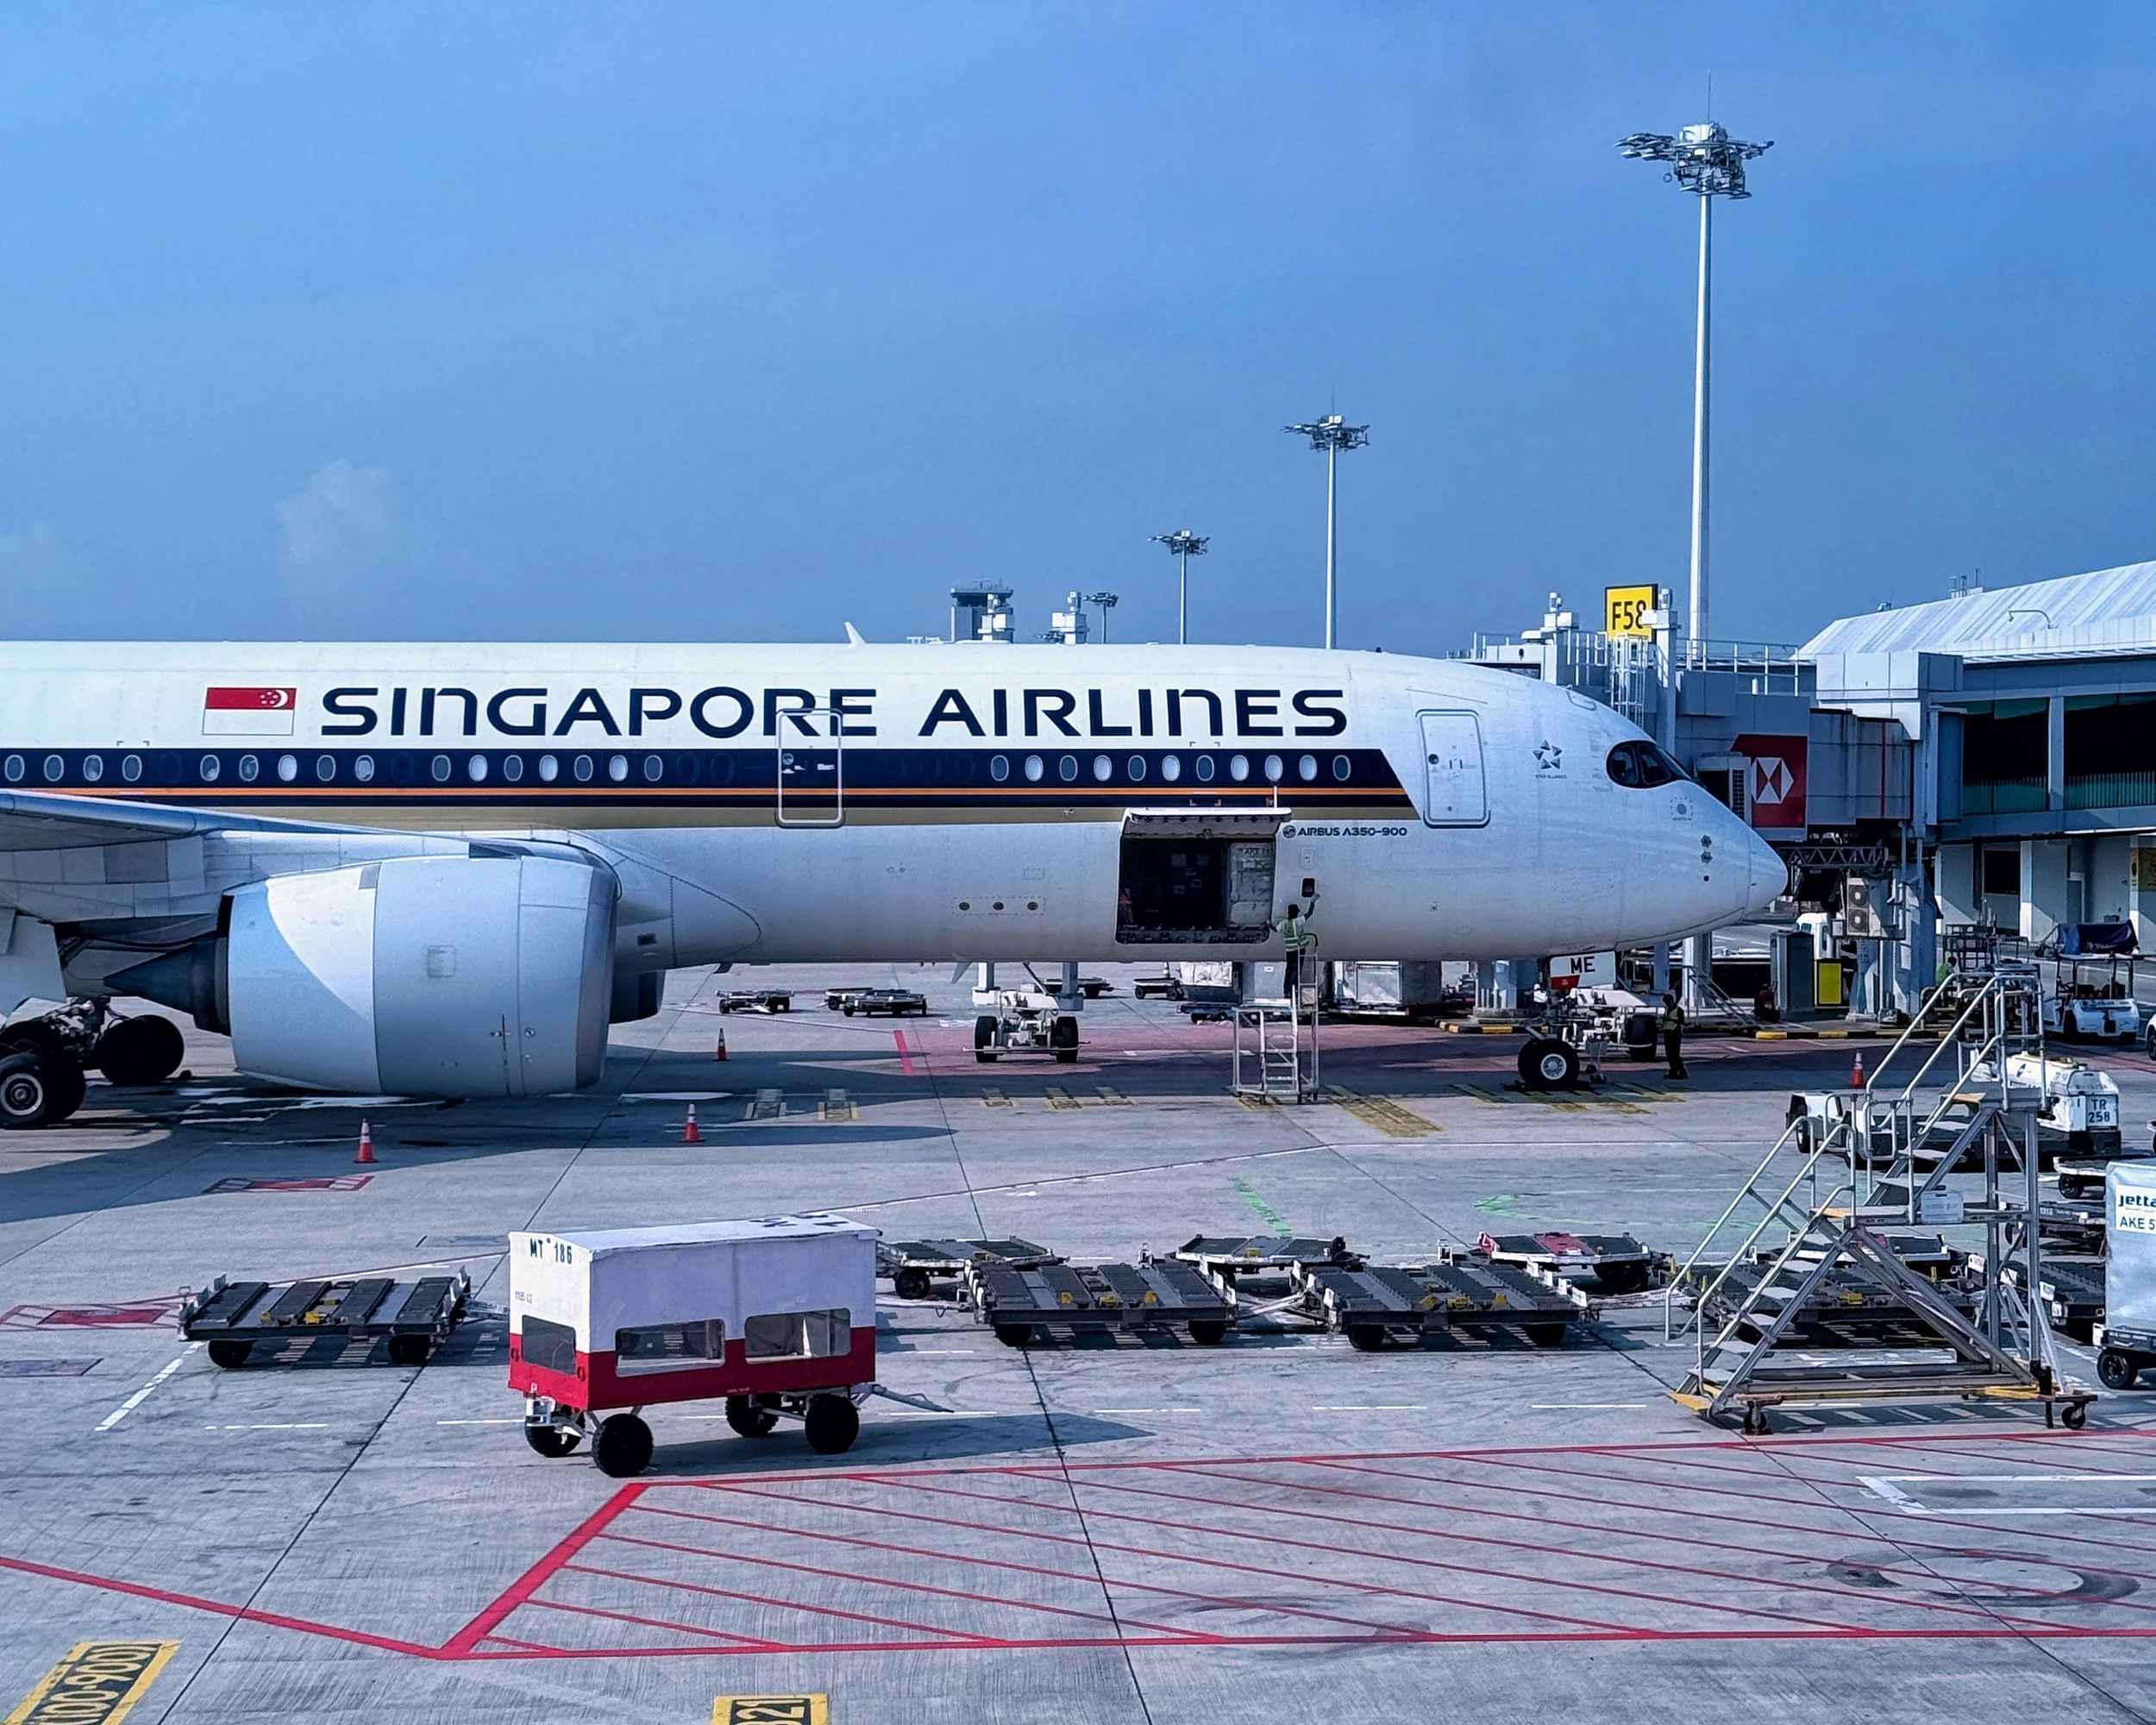
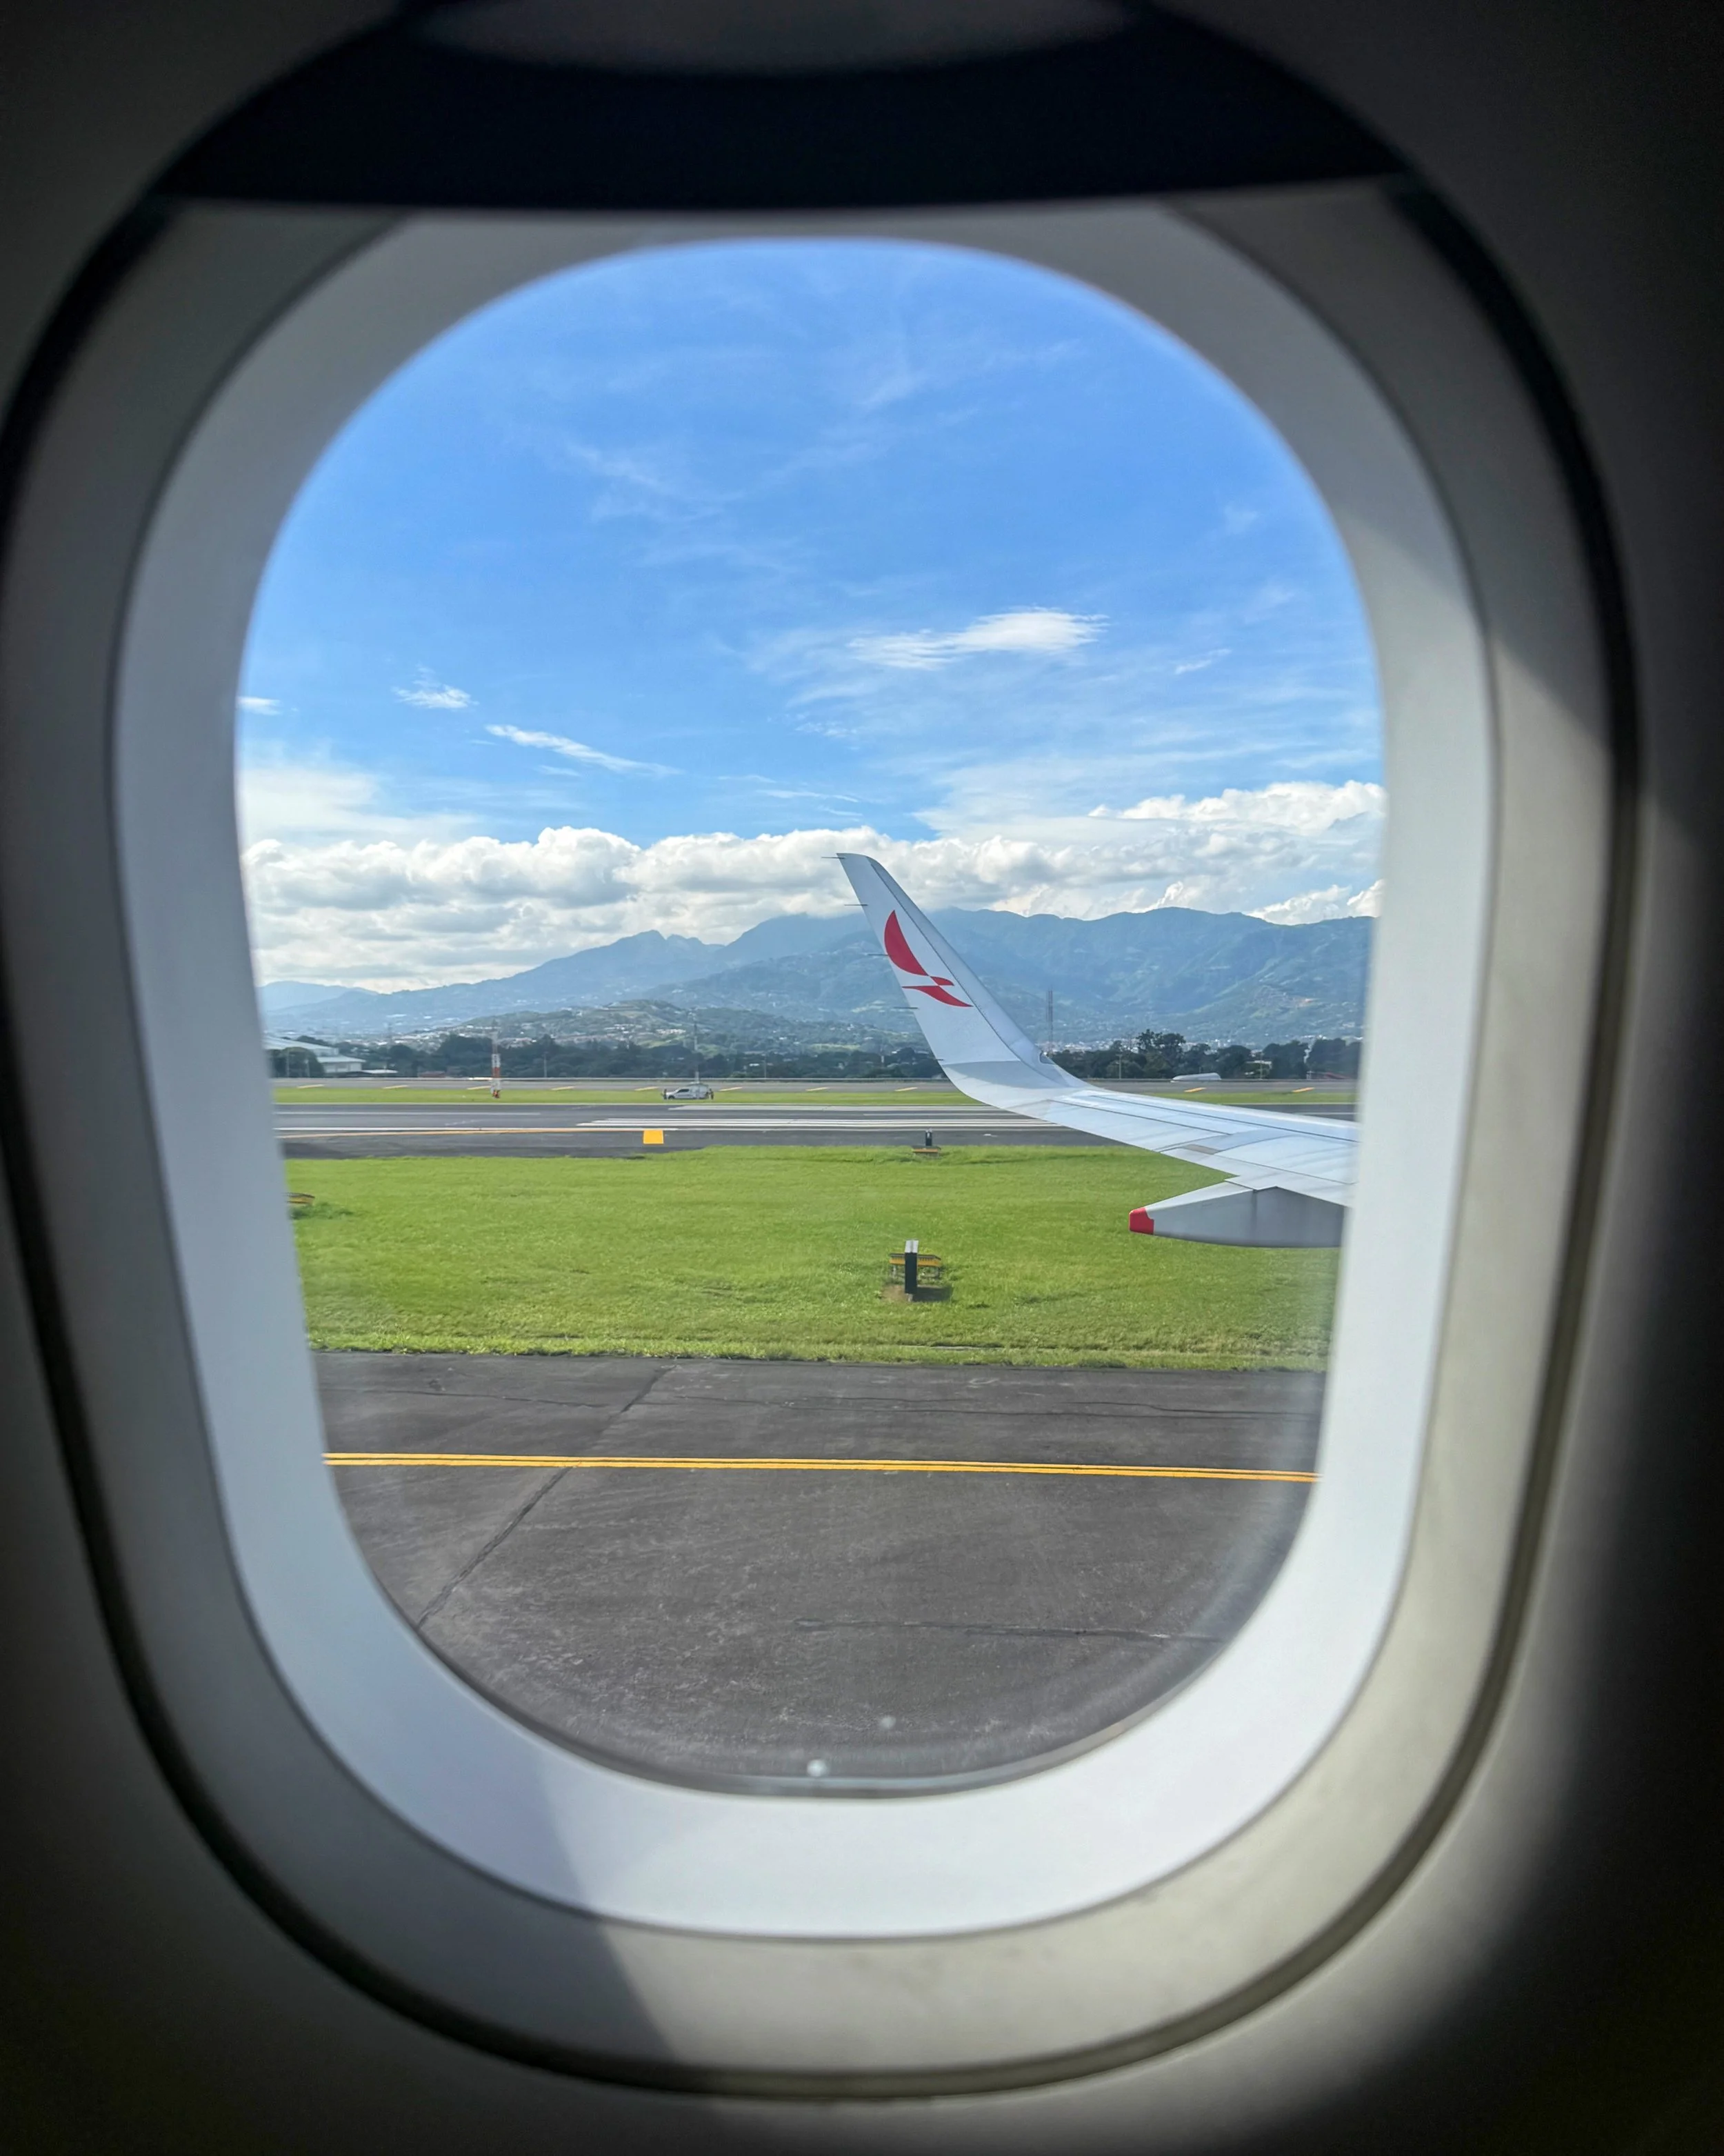
I recently took a 17.5-hour flight from San Francisco to Singapore. No layovers or stops to refuel…just endless seconds strapped into a seat at the back of the plane.
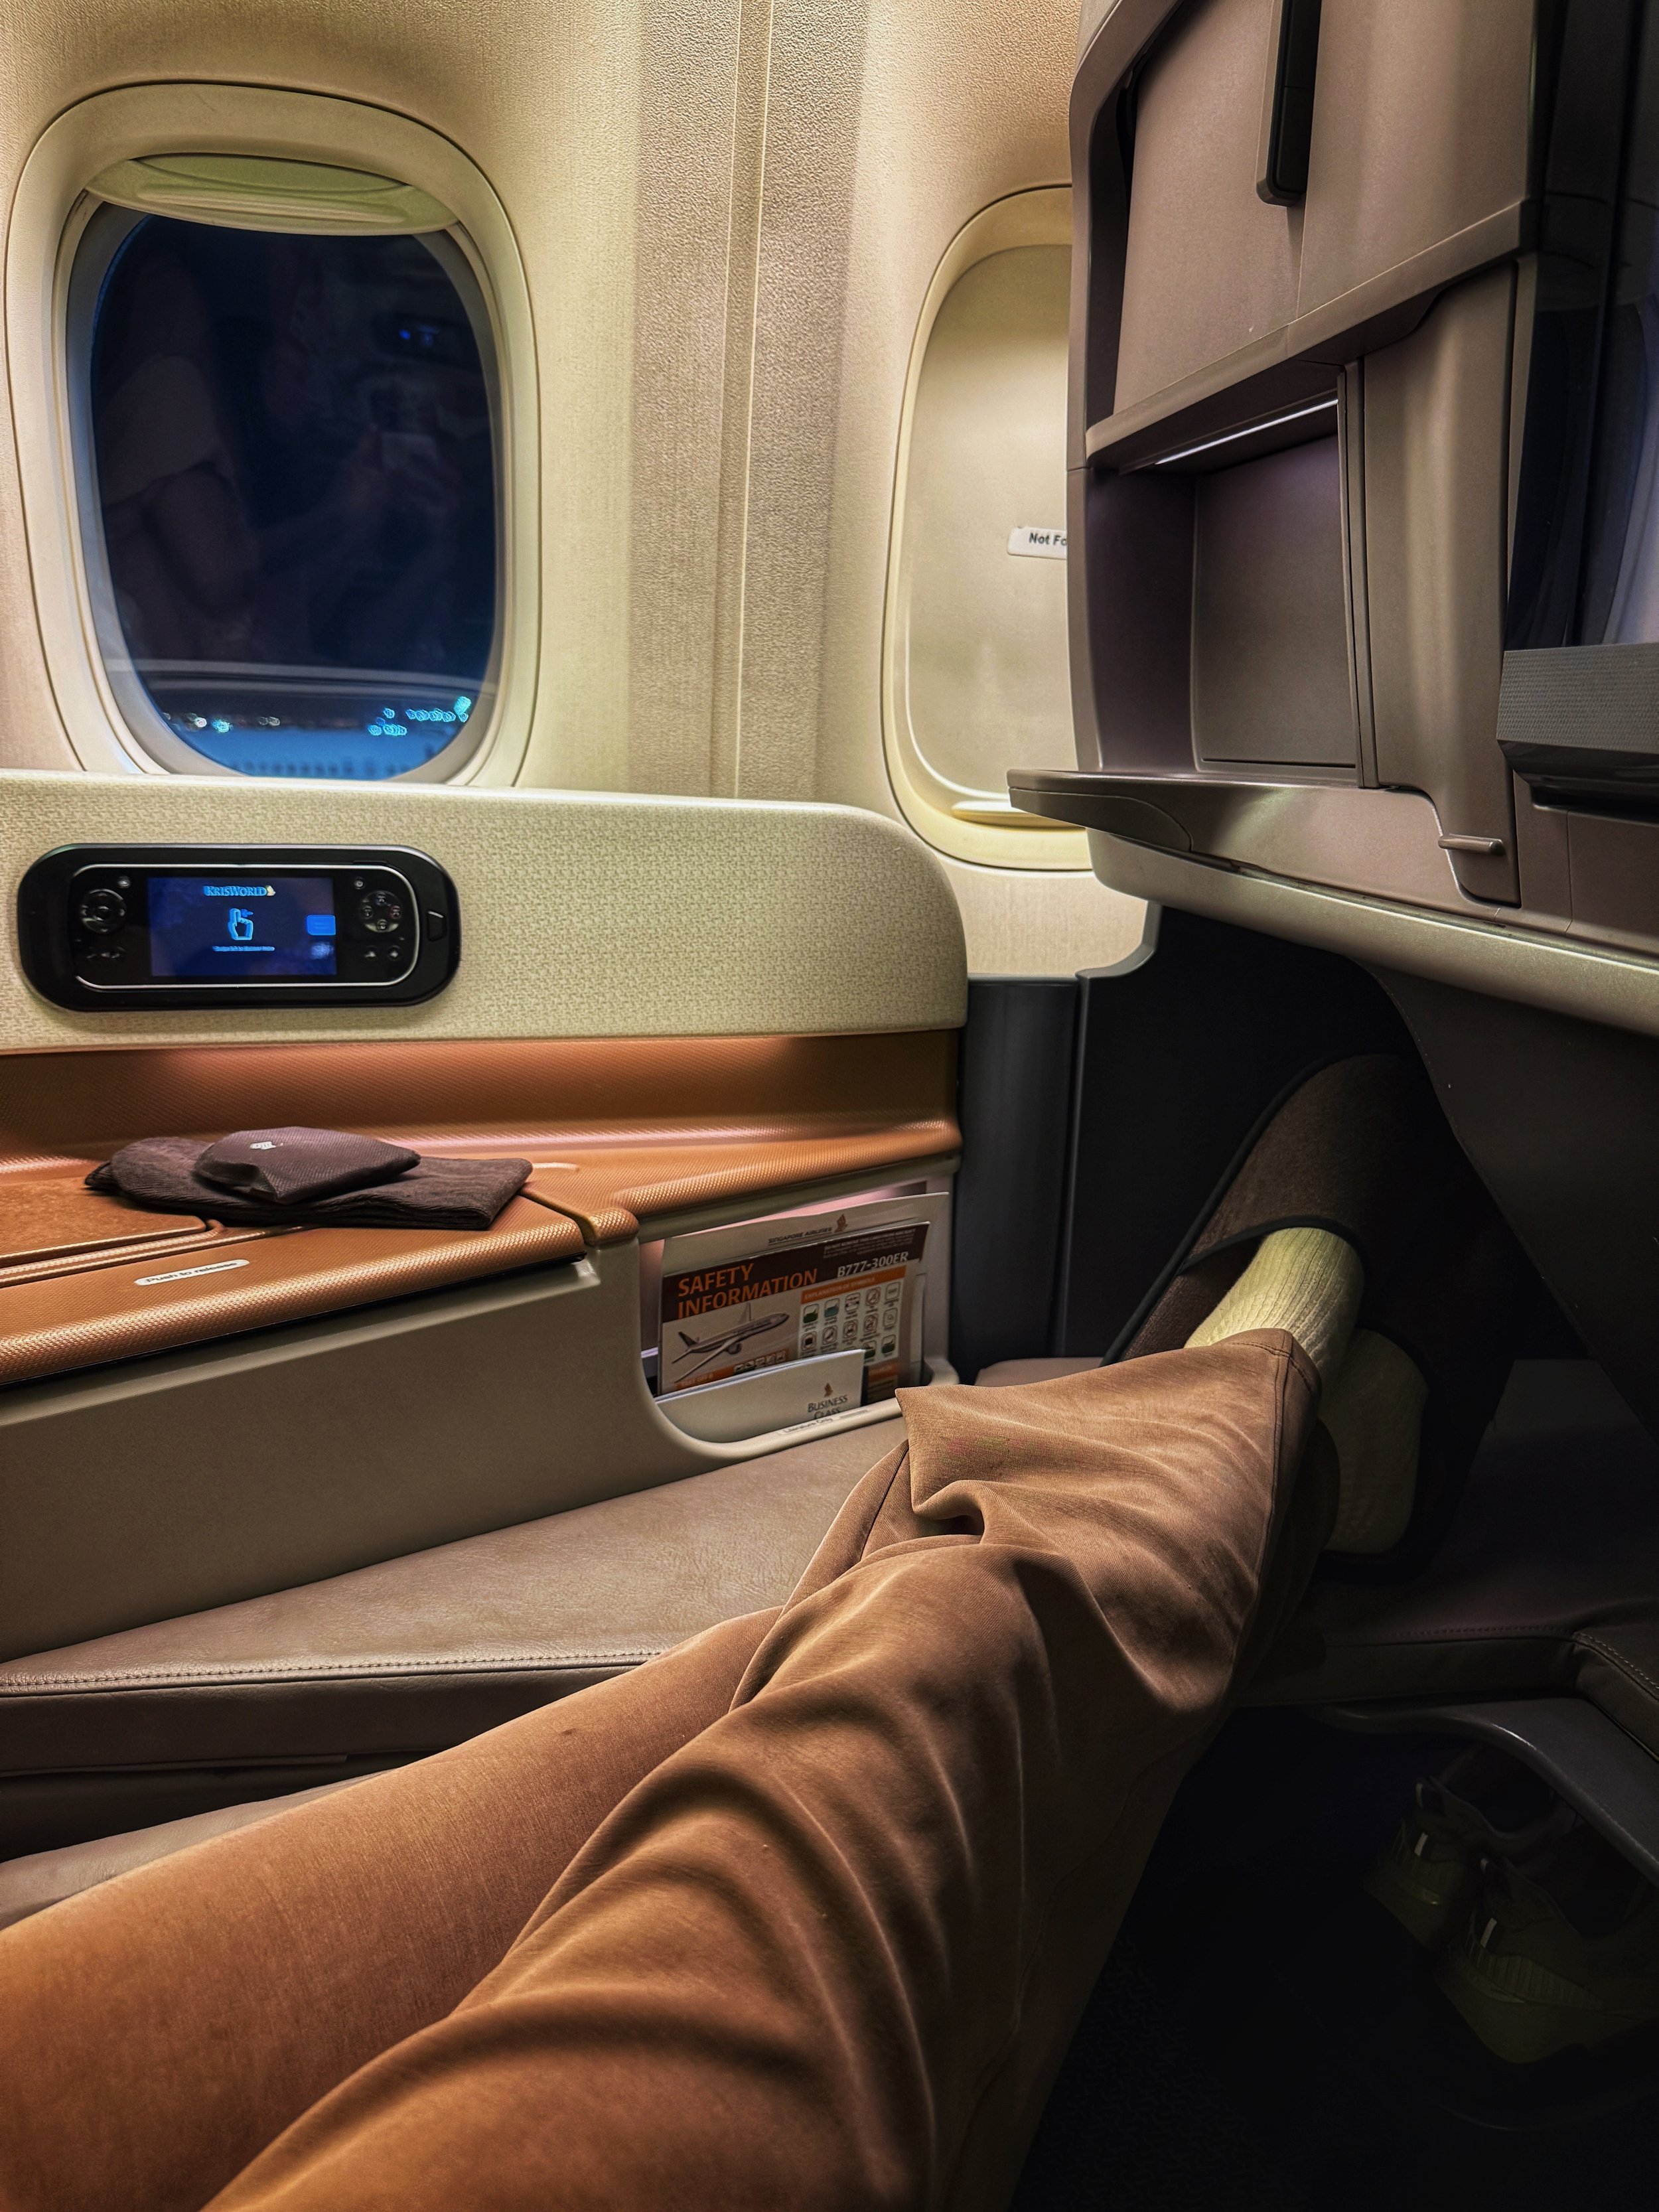
This is exactly the kind of monster flight that I’d usually be using my points to fly in lie-flat business class (so I can stay properly nourished, hydrated, and rested for all those hours).
But I was low on points when booking a flight back to Southeast Asia from the US after the holidays. So I found a way to design the most painless flight itinerary possible, even in economy class.
And in the end? Zero hours of sleep lost, minimal tummy issues, and instant adjustment to the opposite time zone…
Compared to 1 lost night of sleep for most flights from the US West Coast. And 2 SLEEPLESS OVERNIGHT FLIGHTS in a row if I’d booked a ticket all the way from Miami!
In the end, I have zero regrets about spending the time and energy to design my own quirky sweet-spot flight to Asia instead of settling for the best of the worst.
So when the points from your last sign-up bonus are still pending, the flight itinerary options are looking dismal, and you don’t quite have enough for a fancy lie-flat seat for your upcoming long-haul journey…don’t despair.
Just make these simple choices while booking to DIY the least-sucky long-haul economy flight possible.
Disclaimer: This blog post may contain affiliate links, meaning I may get a small commission if you make a purchase after clicking the link…at zero extra cost to you. I only share things I genuinely love and believe in and think my audience would benefit from too. This is how I’m able to keep making free travel resources and guides for you. Learn more about my affiliate policy here.
Thanks for your continued support!
How I found created my sweet-spot flight to Asia
7 Simple Rules for Booking Long-Haul Flights That Don’t Wreck Your Nervous System…Even in Economy Class ✈️
Choose flights during waking hours.
A huge part of what made this behemoth flight more bearable was the early (but not too early) departure. While most long-haul flights to Southeast Asia from the US west coast leave in the early evening (which means starting a long-AF flight with bad-quality sleep), I found this one flight from San Francisco to Singapore that departs at 9:40am and arrives at 7pm…
Meaning I could get a good night of sleep the night before the flight, arrive at the flight refreshed, stay awake for a full 17.5-hour “day” on the plane, and then naturally be ready to get another full night of sleep after arriving in Singapore around 6pm.
No lost sleep = happier human.
You can use tools like the Google Flights Discover tab and flightconnections.com to research available flight routes.
Choose positioning flights
I don’t live in San Fran. But the options to fly on one flight ticket all the way from Miami were brutal, with 2 overnight flights in a row. And expensive! With limited options for booking with points.
By expanding my search to departures from anywhere on the US West Coast and being willing to buy a second cheap connecting flight to get me there (the “positioning flight”), I was able to find a long-haul flight that was not only a way better schedule but was also available for me to book for under $50USD using points.
Warning: This strategy isn’t without its risks…
Because your flights aren’t connected, you’ll need to check in again, re-check your bags, and potentially go through immigration, all before your second flight. And since they’re separate tickets, your second flight probably won’t be refunded or rescheduled if you miss it because your first flight’s delayed or cancelled.
That’s why it’s best to leave way more time than you think you’ll need between your “main flight” and your positioning flight.
Which brings me to my next point…
Choose to stay at airport hotels to break up long flights.
Flying out of San Francisco at 9:40am meant arriving the night before on a separate flight and sleeping in an airport hotel (because if sleep is the goal, we’re not sleeping in airports 🙅♀️).
And that’s ok! I’d rather be actually sleeping at an airport hotel than stressing about trying to sleep upright while surrounded by strangers. And if my first flight’s delayed, I might lose some sleep at the airport hotel between flights, but I’ll have plenty of time to still make it to my second flight.
My favorite airport hotels are onsite, but even the nearby ones with free shuttles will do.
Doing this kind of journey without losing ANY sleep and with minimal jet lag is priceless, and well worth the extra cost of a budget hotel night near the airport.
I pick my airport hotels using booking.com (because of its super-handy “airport shuttle” filter). I also search hotel reviews for “shuttle” to confirm whether the shuttle is reliable and will be in service during the hours I need it, and details on how to call the shuttle from the airport.
Choose to fly in a westerly direction instead of easterly (if feasible)
The jury is out as to whether this reduces jet lag, but I SWEAR I notice a difference when I fly easterly vs. westerly.
That’s part of why I skipped booking a flight from Miami all the way to Southeast Asia (most of which travel easterly)…
Instead, I found that sweet-spot flight that traveled westerly to Asia from San Francisco, and then got myself to San Fran on that separate (also westerly) positioning flight from Miami.
Choose flights with quality airlines that will keep you fed, hydrated, and happy 🍲 🍱 🥤
Because 17.5 hours is a LONG time to be hangry or dehydrated, while stuck in a proverbial sardine can.
Singapore Airlines is probably my favorite airline to fly in ANY class, and it’s because their quality meals, humane service, and ample legroom make the trip feel shorter, even in economy.
And if you’re flying easterly instead, Turkish Airlines and Qatar have always done me right in economy.
Choose Airbus A380 for long haul flights when possible
These planes are famous for being super quiet and better pressurized than other planes, thereby reducing jet lag, so I look for flights that list the Airbus A380 as the aircraft.
When that’s not available, I do a quick google search of the aircraft to make sure it has an ok reputation before booking. (I also have a general distrust of Boeing planes and try to avoid them entirely when possible 😅)
Choose points as your payment method
It’s bad enough to have to endure these long flights for however-many hours in economy…also having to PAY FOR THEM?! No, thank you.
My flight from San Francisco was under $50USD and 47,000 Singapore Airlines Krisflyer miles (including a connection from Singapore to Bangkok) 🏆🏅🥇🙌
At the time I was running REALLY low on mile, so I ended up cobbling together the amount I needed from my various credit card accounts (mostly Chase and Amex, with the last few thousand from Capital One).
What if the long-haul flight’s already booked?
Try my go-to strategies for making even the most brutal flight more bearable…
Choose an aisle seat so you can guzzle water and pee as much as you want 💦
Pro tip: use the secret button to put up the armrest between you and the aisle for a little extra room (google how before takeoff). It’s totally ok to do this, and it works on most major airplanes but people are always so confused (and jealous 😬) when they see me do it.
Use a Sondur butt cushion 🍑
My parents gave me one of these for Christmas and it legit made such a difference because usually my back and hips are killing me by hour 6 in economy…but on this flight I went a solid 14 hours before feeling any pain in my back or hips.
Bring an eye mask and noise-canceling headphones for any chance of quality sleep 🎧
Because you can’t always control kids crying or the lady who keeps her light on all night to read.
If your flight’s barely a full night long (like an 8-ish hour flight to western Europe from the US East Coast), consider skipping meal service entirely to get in as much sleep as possible. As someone who has trouble sleeping in economy, I rarely attempt this…
But for anyone lucky enough to be able to sleep upright, skipping 3-4 hours of meal service can make the difference between a full night of sleep and feeling off for the whole trip.
Why You Should Skip the Nusa Penida Day Trip in Bali
Here’s EXACTLY how to visit those iconic sights MINUS the urgency and exhaustion
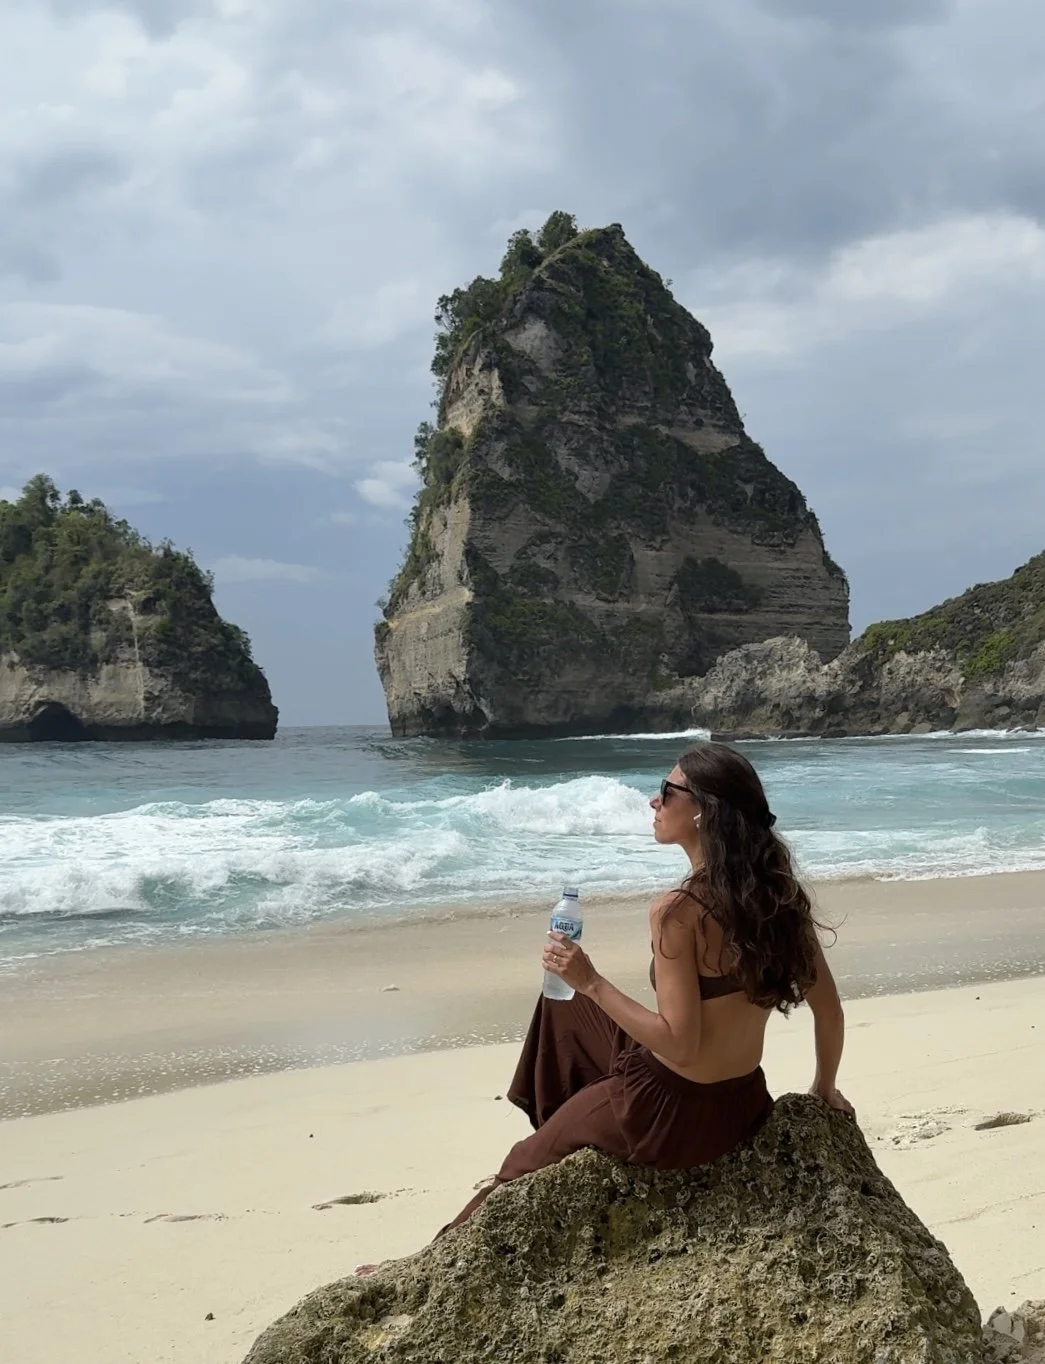
Diamond Beach, Nusa Penida
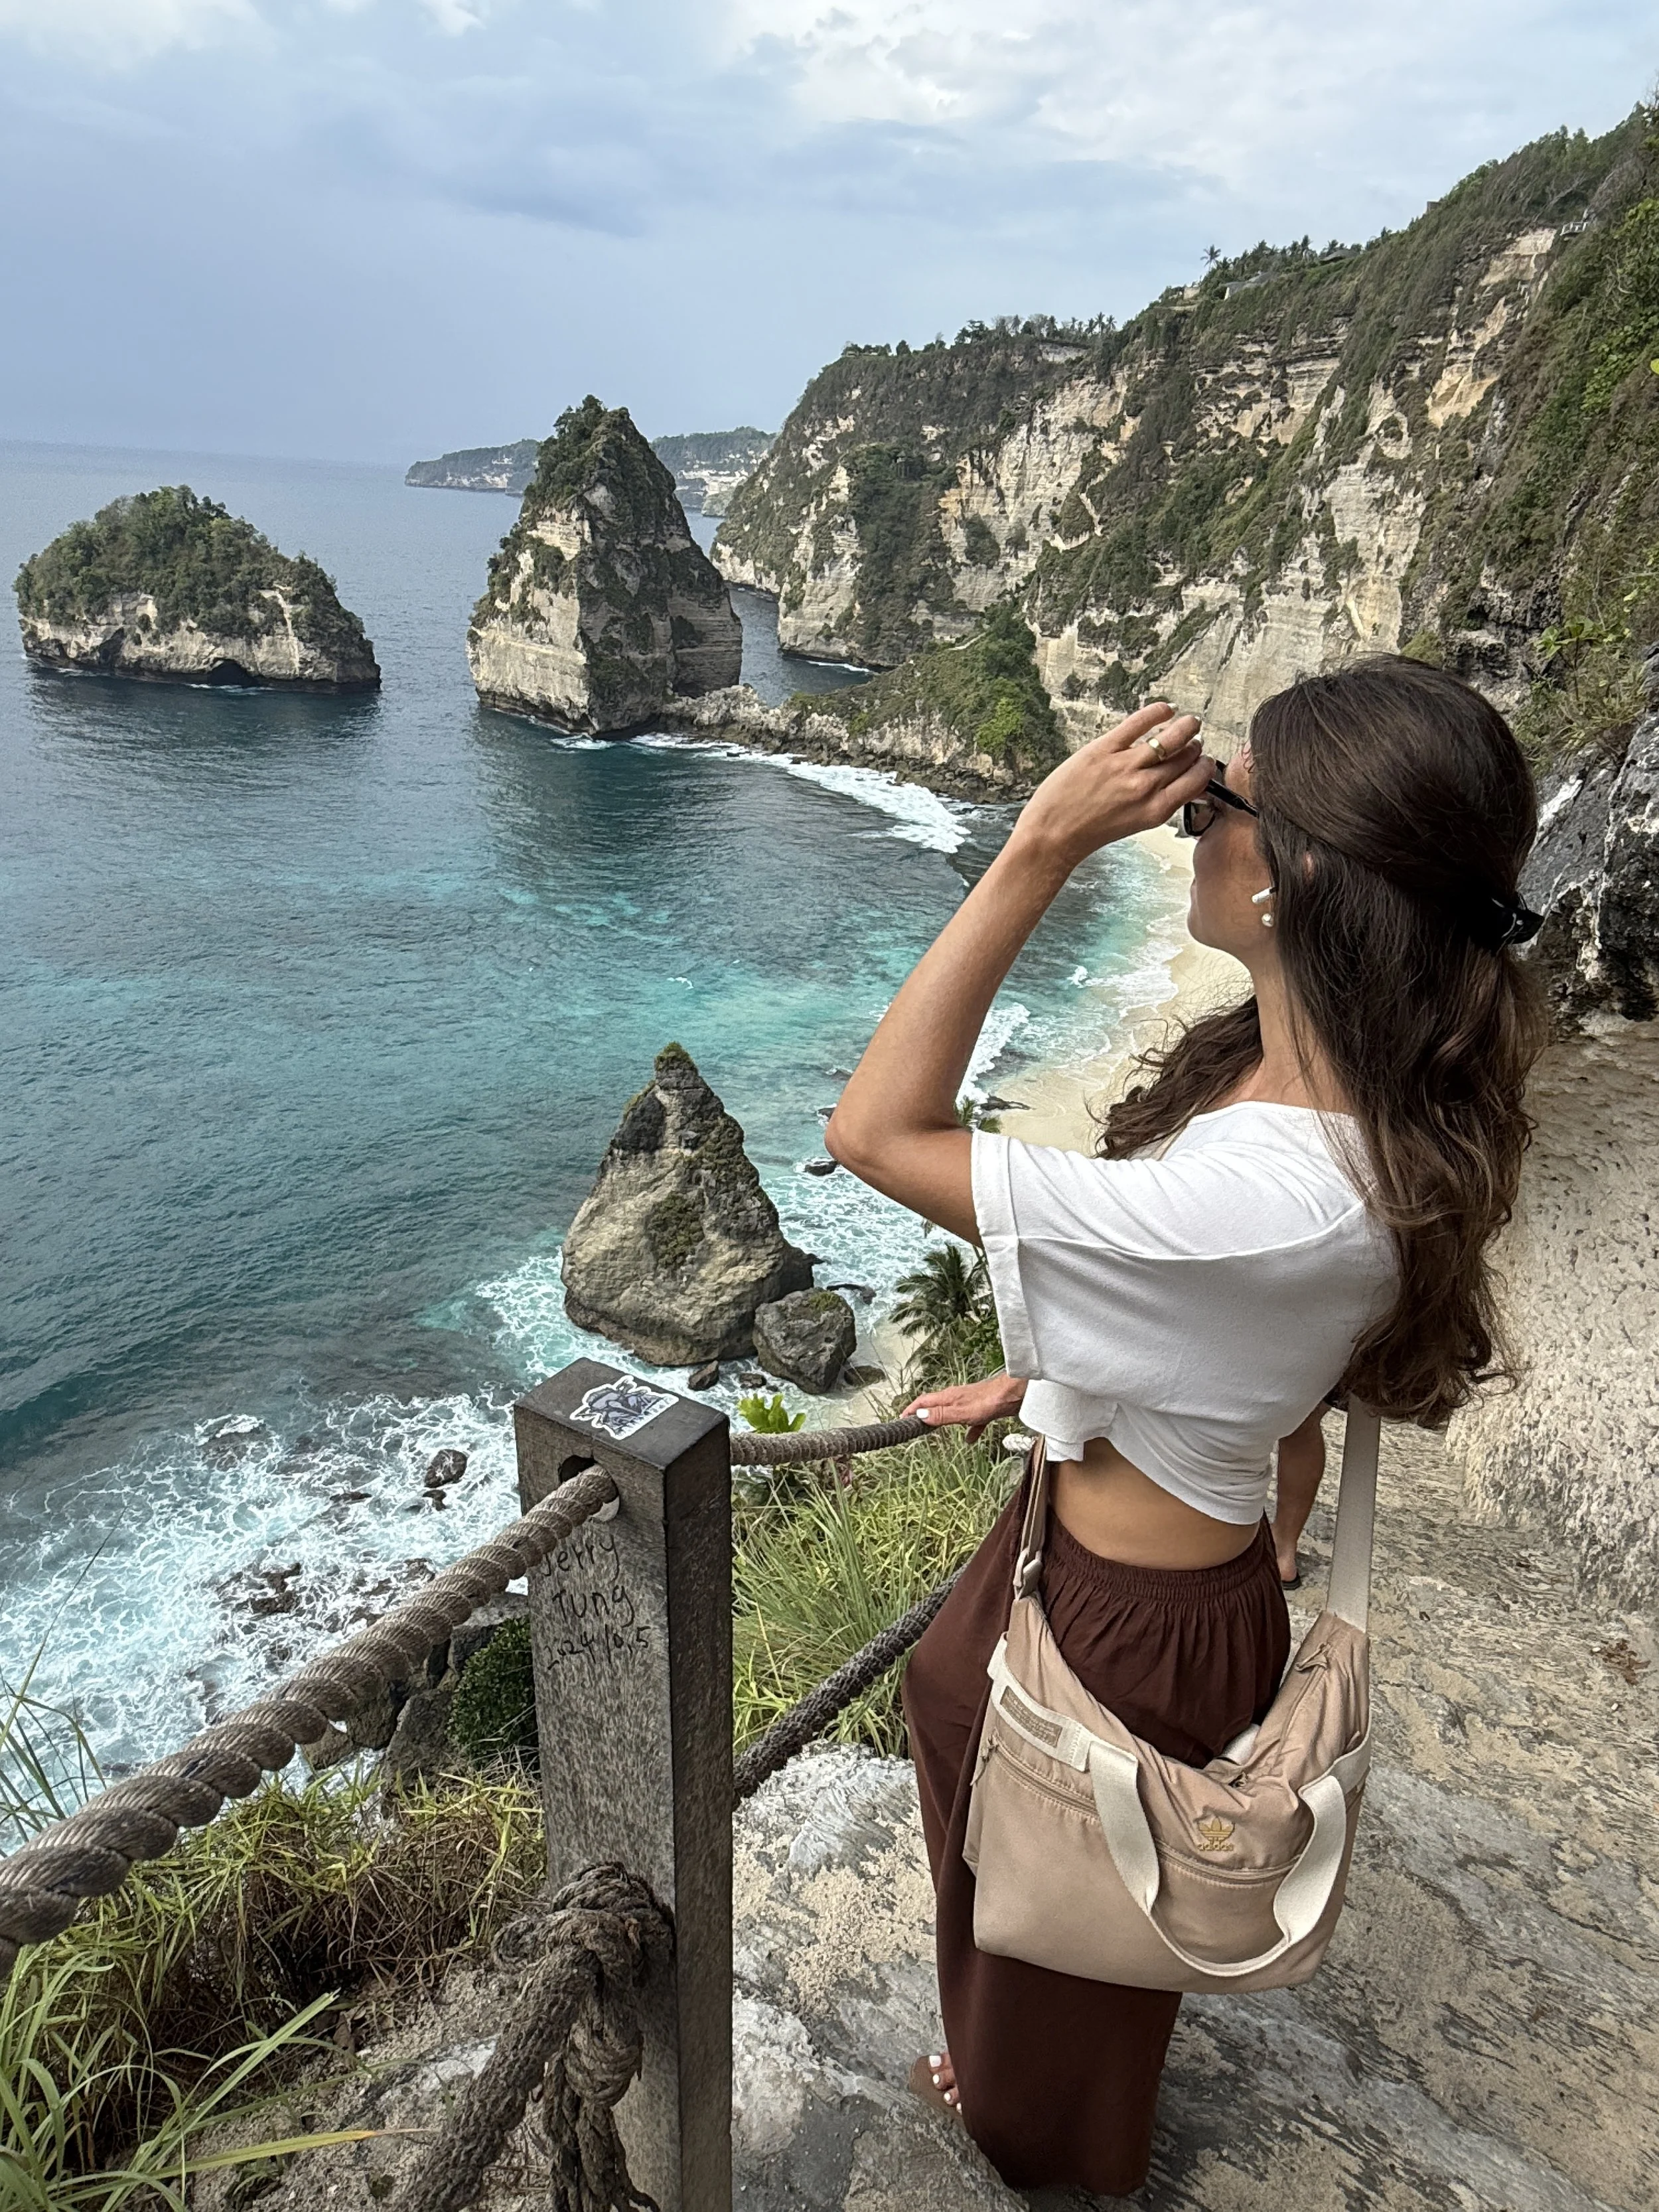
The popular sights on Nusa Penida (a satellite island off the coast of mainland Bali) are truly breathtaking. This is where you’ll find the iconic Kelingking Beach (aka the T-Rex), Angel’s Billabong, Diamond Beach, and many more.
The only problem is…they’re popular. And no matter what you do, getting there requires a separate hour-long boat ride, and the sights are all about an hour’s drive away from each other.
Meaning that if you take a day trip there like most people do…you’ll spend most of your long exhausting day on the boat ride there and back, or driving on the bumpy winding roads.
And during the little time you actually get to see the attractions…all the other day trippers are there too. So you’ll be wrestling lines and crowds to barely snap your photo before rushing off to the next thing.
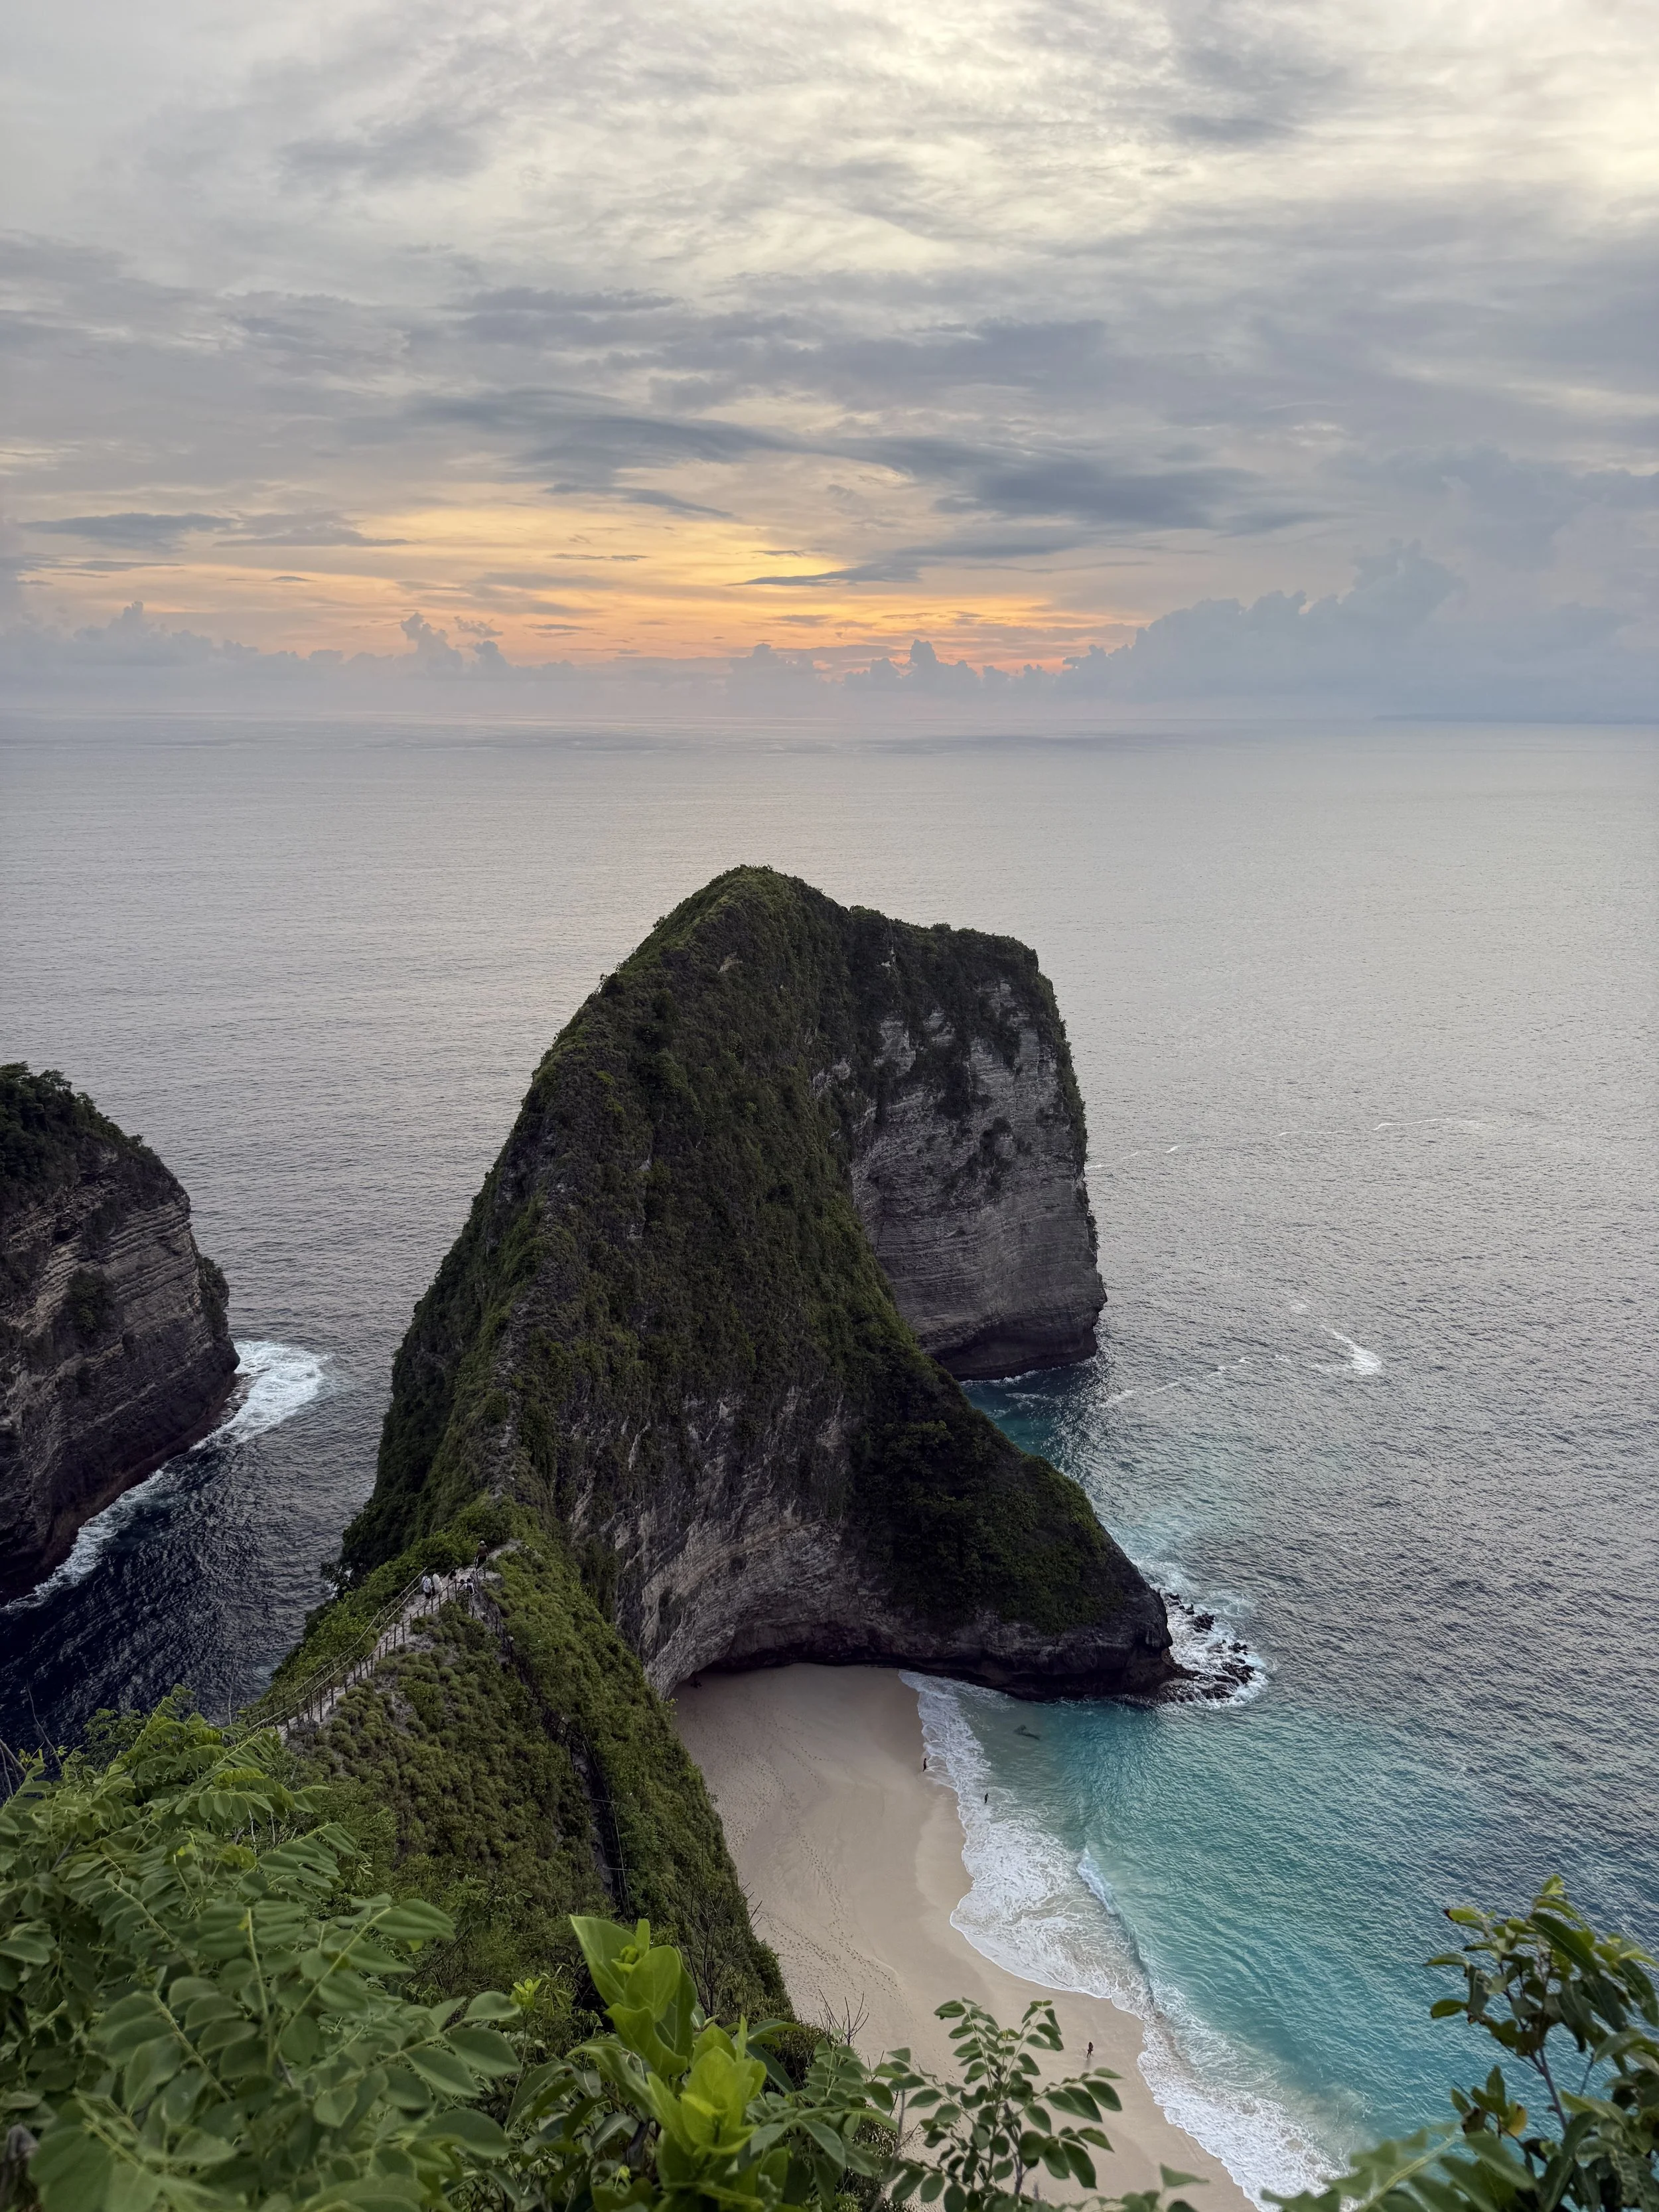
Kelingking Beach aka T-Rex, Nusa Penida
And you DEFINITELY won’t have time to do the epic hike down to Kelingking Beach unless that’s all you plan to do that day (🚨 fair warning: that sh*t is a super-intense hour-long hike down and the 2nd half of it you’re basically just scaling a steep cliff face. And then you have to get back up 😅 Bring water, use caution, and do NOT attempt if you’re scared of heights).
As an autistic person, I just knew I wasn’t going to enjoy that (and it’d probably leave me recovering for days afterward). So I researched high and low for a better alternative.
Here’s the advice I DON’T regret following when planning my trip to Nusa Penida.
Disclaimer: This blog post may contain affiliate links, meaning I may get a small commission if you make a purchase after clicking the link…at zero extra cost to you. I only share things I genuinely love and believe in and think my audience would benefit from too. This is how I’m able to keep making free travel resources and guides for you. Learn more about my affiliate policy here.
Thanks for your continued support!
How to see everything you want in Nusa Penida…but with far fewer crowds and way less overwhelm:
Banjar Nyuh Harbor (Nusa Penida)
Stay 2 (or more) nights on the island of Nusa Penida
…instead of doing a day trip from Bali. Choose a place within walking distance of the attraction you’re most excited about (since there’s no uber-type apps on the island).
I stayed 3 nights within 5 minutes walking distance from Kelingking so while most people only get to see that famous t-Rex for 10 minutes in the blazing mid-day heat, I got to see it multiple times, including at sunrise sunset while it was basically empty. I also had 2 full days at my hotel to do tours and return to a hot shower, without having to deal with checking in/out or packing/unpacking on the tour days.
Book fast boat tickets for off-peak times
Day tours usually take the earliest departure times (from Bali to Nusa Penida) and latest departure times (returning to Bali from Nusa Penida), so if you buy tickets for less busy times then you’re more likely to have a less chaotic experience.
I chose the 1pm boat from Bali (Sanur Port) to Nusa Penida, and I had an entire row to myself on the boat (which helped with airflow and also allowed me to get a window seats even though I was one of the last passengers to board). For my departure back to Bali, I left at 8:30am, and that boat was even emptier.
Leave the big bags behind, if you can
Most hotels on Bali will hold your bags for you until you get back. That way you can avoid having to lug your bigger bags around the port and you can go straight to your destination when you arrive in Nusa Penida without waiting around for them to unload your bags. But depending on where you stay in Bali, this just might not make sense for you.
Before I went to Nusa Penida, I stayed in Sanur (where the Bali port is located), so I left my suitcase in my Sanur hotel and packed what I needed for Nusa Penida in a backpack that was easy to take with me on the boat. If you can plan to stay in Sanur before (and/or after) Nusa Penida, that will make your trip a lot smoother. Because Bali traffic is no joke…and I’m from Miami.
Hire a private driver for the day (or half-day)
Schedule the tour for the early morning and late afternoon so you can see the sights before and after the day tours arrive.
Plan to see the east-side sights (like Diamond Beach and Atuh Beach) early (since that’s the sunrise side), and the west-side sights like Angel’s Billabong, Crystal Bay and Kelingking closer to sunset for the best photos. Just trust me when I say that 1 day is not enough to comfortably cover both east and west, so do yourself a favor don’t even try it. Just plan to stay in Nusa Penida for 2 full days (3 nights), and visit one side of the island each day.
Private drivers for a day cost anywhere from $30+ (if you book ahead using sites like Viator or GetYourGuide) to $45+ (if you book last-minute through your hotel like I did 😅).
Research the sights beforehand, choose wisely what you really want to see, and space them out
I recommend no more than 2 sights per half-day, max of 3 per day. Because it’s about an hour-long drive between most sights, you’ll end up rushing at each location and spend most of the day on the road if you try to cram everything into 1 half-day. But some sights (like Angel’s Billabong and Broken Beach) are closer together, so you can comfortably do more in less time if you’re combining them.
I was most excited about Diamond Beach, so I planned an early morning around that and did nearby Atuh Beach on the way back. I skipped Crystal Bay/Beach entirely because it just wasn’t as exciting to me, and ended up being so relieved to have some chill time at my hotel that day instead of rushing off to another tour.
Bring your own snacks, adjust your food expectations, and use reviews to choose a hotel with good food
The food options just aren’t the same as on Bali proper…Barely any international food options, limited veggie options, and no delivery apps, so you’re stuck with whatever’s available in walking distance.
I stayed at Kelingking Mesari Villa & Spa (booked on booking.com) for about $40/night…and as someone’s who super picky about food, I was SO relieved not to have to venture out for a meal I could eat (even moreso after I discovered my hotel food was better than all the walkable options nearby).
Diamond Beach, Nusa Penida
TLDR: A trip to Nusa Penida is TOTALLY worth it…just not on a day trip from Bali like most people do it.
But with an extra bit of planning, you’ll go from waiting hours in line for a photo in the blazing heat…to having that picture-perfect sunset view all to yourself.
Ever Needed a Vacation From Your Vacation? How to Plan a Trip That Doesn’t Drain You

For anyone who’s burned out, overstimulated, and just wants to feel alive again
Let me guess…
You’re daydreaming about a trip because you desperately need to feel something again… something other than the anxiety and urgency that sits heavy on your chest from the time the alarm goes off in the morning until you fall asleep at night. You want to feel alive, inspired, light. Like yourself.
So you open your laptop and start planning…
But 5 tabs later, you’re over it.
Because here’s the thing no one says out loud…
Most travel advice is made for people who are already thriving.
Not for the burned-out, the introverted, the highly sensitive, or the neurodivergent among us who need the travel to also be the healing.
But that kind of travel is 100% possible. And honestly? Way more satisfying.
Here’s how to plan a trip that leaves you feeling inspired and energized…not like you need a second vacation to recover.
✨ 1. Start with how you want to feel
Most people choose destinations based on photos or hype. But when you plan a trip around a feeling, everything clicks into place faster…and leads to a trip you’ll actually enjoy living, not just posting about.
Before planning anything, just quickly (but honestly) reflect: Do you want to feel calm? Connected? Cozy? Free? Held by something bigger than you?
Let that feeling be your guide.
Even if you have a specific destination or attraction in mind, you can still plan an itinerary that works with your energy instead of against it.
⚡Want to feel inspired? Think art, landscapes, quiet awe
🏃Want to feel free? Open roads, flexible timelines, wide skies
🧘Want to feel rested? Less movement, more slowness, soft beds, room service
🧠 One of my go-to moves now is to put the most intense part of the trip at the beginning, when I’m still running off adrenaline…and save the relaxing, slow part for the end. That way, I actually return home refreshed instead of dragging myself back to “real life” running on fumes.
I once did a whole trip to Egypt and I knew Cairo would be intense but I really wanted to see the pyramids and the Sphinx…so I made the rest of the trip a peaceful Nile cruise. It was one of the best travel decisions I’ve ever made because I got to see everything I wanted to see AND get the rest that my body and brain so desperately needed.
🕰️ 2. Plan pace, not just places
Your energy is part of your travel budget. So spend it wisely.
Everyone says to cram your trips full of activities so you don’t “waste” the opportunity.
But the real waste? Rushing through the experience so fast you don’t ever really feel it, or coming home so wiped out you can’t even enjoy the memories.
Here’s my rule: 1 meaningful thing per 1-2 days. That’s it.
Not 5 things. Not “just one more stop.” One thing…and anything else is bonus.
💡 I usually plan to stay at least 2-3 nights in every place I visit. Staying anywhere just 1 night is inherently chaotic…especially with standard afternoon check-ins and early morning check-outs. Even adding 1 extra night gives you a full day of actually enjoying a place without the added stress and energy drain of having to move all your stuff in the middle of trying to “experience” a destination.
💡 I aim for 1 scheduled half-day activity for every 2 days on the itinerary. And if there’s an activity that requires a full day of being out-and-about, the next day is definitely a “free day” to wander and recover. I know, I know! You want to experience it all. But trust me…some of the most magical travel moments happen during those unscheduled pockets when all you’re doing is existing…but in a new exotic place.
💡 I always book tickets in advance for anything I really care about (especially things that sell out or get crowded). That becomes the main anchor of my day and I plan everything else loosely around that one experience.
💡 Regardless of what’s on the itinerary, I schedule 1 “free day” in every place I visit…not just for rest or exploration, but in case I get sick, tired, need to delay plans due to weather, or just need a break.

🔉 3. Prioritize sensory sanity
If you’re sensitive to sound, smell, lighting, people, or crowds…plan for that.
You’re not being “extra.” You’re being smart.
Pick places that won’t overload your nervous system. Think walkable towns instead of chaotic cities. Hotels with windows and natural light instead of dark hostels. Bring your favorite packable snacks, sleep mask, noise-canceling headphones, and whatever you need for your favorite comforting night-time routine.
Set yourself up to actually enjoy where you are.
⚠️ Also: please give yourself an extra day off after returning home to decompress and process all the amazing things you’ve just experienced. The office will not burn down over 1 extra day, and 5 years later you’ll give ZERO sh*ts about the workday you missed. Thank me later.
🛑 4. Take the pressure off
If everything on your itinerary is mandatory, your trip starts feeling like a to-do list.
Instead, give yourself permission to bail.
I save restaurants, monuments, cafés, and hidden gems in Google Maps ahead of time…Whenever I’m looking for a place to eat or visit on my “free” time, great! I just open the map and pick something nearby that sounds good. And if I miss something? That was always part of the plan. I had a great time so who cares 🤷 It keeps things flexible without leaving everything to chance.
You don’t have to do it all. In fact, you’re more likely to enjoy the things you do choose when you don’t feel forced.
TMI warning: I got Bali belly and my period in the same week while staying in Ubud and missed all the main events I had planned…the monkey forest, the rice paddies, the waterfalls, the temple dances. And honestly? It was fine. The world didn’t end. I rested, took care of myself, and still had an amazing trip.
(Plus now I have the perfect excuse to go back.)

👯 5. Travel with the right people (or none at all)
Listen, someone needs to say this: Most ruined trips…are ruined by the wrong company (coming from someone who has never had a solo trip ruined 😜).
If you need downtime, quiet, or slowness…communicate that before the trip. The key here is radical self-awareness and honesty about the experience you want to have.
And if your dream trip doesn’t align with theirs? It’s okay to go alone, I promise.
You deserve a trip that feels good for you…not one where you’re constantly managing someone else’s energy on top of your own.
I’ve found the best travel partners are the ones who get my need for downtime and who never try to yuck my yum. Like the friend who has no problem going on a snorkeling tour alone when I’d rather chill. Or the friend who encourages me to dance it out by the beach for a few songs (because she knows that makes me happy) while she sips her coffee and watches our stuff for a bit…
And they ALL understand that no, I will not be splitting a room, because I absolutely need my own space where I can retreat to exist in my own head…without being constantly perceived. That’s the energy I look for. Someone who supports me being me.
📋 6. Don’t wing the logistics
Spontaneity is cute until you’re hangry, tired, overstimulated, and stuck figuring out how to get across town in the dark.
I’m all for loose plans, but decide the key stuff ahead of time…
Where you’re sleeping.
How you’re getting there.
What the food situation will be. A few safe cafés or quiet places bookmarked. That way, when you land, you get to be present, not panicked.
🧳 I always pre-book my transport from the airport to my hotel and activate my eSIM before I land, so I have data the second I arrive. It sounds basic, but those 2 things save me so much stress…especially after a long travel day when decision fatigue hits hard.
Once those are locked in, I give myself permission not to plan every detail. I can wander, rest, and explore free from the demands of figuring out the core essentials.

✈️ 7. Choose your flights wisely
The travel to the destination matters just as much as the destination itself…especially when you’re sensitive to exhaustion, jet lag, or disrupted routines.
A few tips that make a huge difference:
⏱️ Choose your flight times wisely. Pick flights that arrive during the daylight, so you’re not navigating a new place in the dark
🛩️ Choose your aircraft wisely. Look for planes with better lighting, air pressure, and layout (for example the Airbus A350 is my favorite for long-haul flights because it’s quieter than most and the cabin pressure is better for jet lag. If it’s Boeing I ain’t going…unless it’s much cheaper or I don’t really have a choice
🌇 Choose your layovers wisely. Turn your layovers into an opportunity to break up the trip and see a new city (assuming you’re not flying direct). Recently I had a long economy flight connecting in Dubai overnight. Instead of choosing the shortest 6-hour layover that would’ve had me waiting hours in an empty airport in the middle of the night, I chose the flight with a 12-hour layover so that I could check into an airport hotel. Not only did I get a full night’s sleep in between flights, but I also got to see the Burj Khalifa from afar when I woke up to find the hotel had upgraded me to a premium view.
💺 And here’s the ultimate hack that changed the game for me:
I learned how to use points and miles to fly in lie-flat business class on long overnight flights, for less than the price of economy. Waking up rested and properly nourished on another continent instead of spending your first two days recovering? Priceless.

🌿 You’re not too much. You just need a different kind of travel.
If you’ve ever come back from a trip feeling absolutely destroyed, I promise it wasn’t a failure. You’re not bad at travel. You’re just wired differently…welcome to the club 💃
You’re allowed to want more space, more slowness, more meaning.
You’re allowed to want to come home feeling fulfilled instead of fried.
And you’re allowed to redefine what travel looks like for you.
It’s not about doing it all.
It’s about doing it on purpose.